3D Printer Upgrades. Are They Worth It?
This is not an in-depth examination of the question. It is rather my experience with a particular 3D printer. But I believe that my experience has been experienced by many other 3D printer owners, so I have decided to make this record.
The printer which I purchased was a Creality CR 10s. I bought it in January 2020. I had been considering such a purchase for a year or more, and finally took the plunge when faced by making components for the model Armstrong cannon which featured in this blog over the past 18 months, I realised that I would have to metal cast quite a few complex parts. And the “lost PLA” method seemed like the best option to cast those parts.
So I accumulated the equipment for printing the PLA, making the molds from jeweller’s investment medium, a potter’s oven for burning out the PLA and baking the moulds, a furnace for melting the aluminium and bronze, and assorted other necessary paraphernalia.
Choosing the 3D printer was difficult, coming from a knowledge base of close to zero. I asked members of my model engineering society which printers they chose, and why. I watched numerous YouTube videos, and read reviews. As usual, I discovered that the more information you absorb, the more confusing it all becomes. I have the same feelings when researching which car or camera to buy. Eventually, I decided to buy a lowish cost printer, with the idea that I would eventually replace it with a better unit for long term use.
For this first 3D printer I wanted a well known brand with a good reputation, a build volume which would allow me to print the biggest component of the model cannon (the barrel, which is 300mm long x 65mm x 100mm).
I was still mulling this choice when Amazon advertised a special deal for the CR10s, and I made a snap decision to take the plunge. Would I make the same choice today? Quite possibly (actually, no. see below). Although technology has advanced. I am now considering whether to add an Elegoo Saturn resin 3D printer to my ever growing list of machines.
So this is what I bought. It is an open frame 3D printer, with a separate box for the motherboard and controls, and a side mounted spool. Single extruder. Advertised as an auto self levelling base (but it is not. It is manual, time consuming and fiddly). Filament end detection (hence the “s” after the 10), which works well. The build volume is 300x300x400(h), which is at the high end of low cost 3D printers, and bigger than any of the low/medium cost resin printers. I used close to the full extents of the volume on several occasions.

Actually, the very first modification was the slicer software. The printer came with a free version of “Cura”, but I accepted some expert advice to use “Simplify 3D”, which I purchased ($AUD 175) and used exclusively until recently. More about that later.
The instructions for using the printer were in an illustrated 10 page booklet, and a pdf file. As instructions for assembling the printer, they were just OK (do manufacturers EVER test their instruction booklets on novices??). As instructions for fault diagnosis they are hopelessly inadequate. In my previous post I showed a paper back book which would have been immensely useful when I started this 3D printing journey, and HAS been immensely useful after almost 2 years of wallowing about in ignorance. (“3D Printing Failures” by Sean Aranda).
By trial and error (mostly error), I printed the parts for my model cannon, and also came to grips with the casting processes.
BUT. When I started printing components for my next project I experienced failures and frustrations which I could not overcome. The Ottoman bombard has only 2 components, the breech and the barrel, which I intend to cast in bronze, using the lost PLA technique. These will be the biggest castings, and biggest 3D prints which I have attempted. Not surprisingly, I had problems with the 3D prints. Some of my attempts at fixing the problems caused further problems. After reading Sean Aranda’s book, discovered that my problems had ALL been described, catalogued, and fixes known.
The problems were:
1. Poor plate adhesion causing models to break free during printing.
2. Poor adhesion between layers causing gaps and structural failures.
3. XY shifting between layers
3. Gaps between filaments which would cause casting holes.
4. Excessive stringing.
5. Lumps on surfaces.
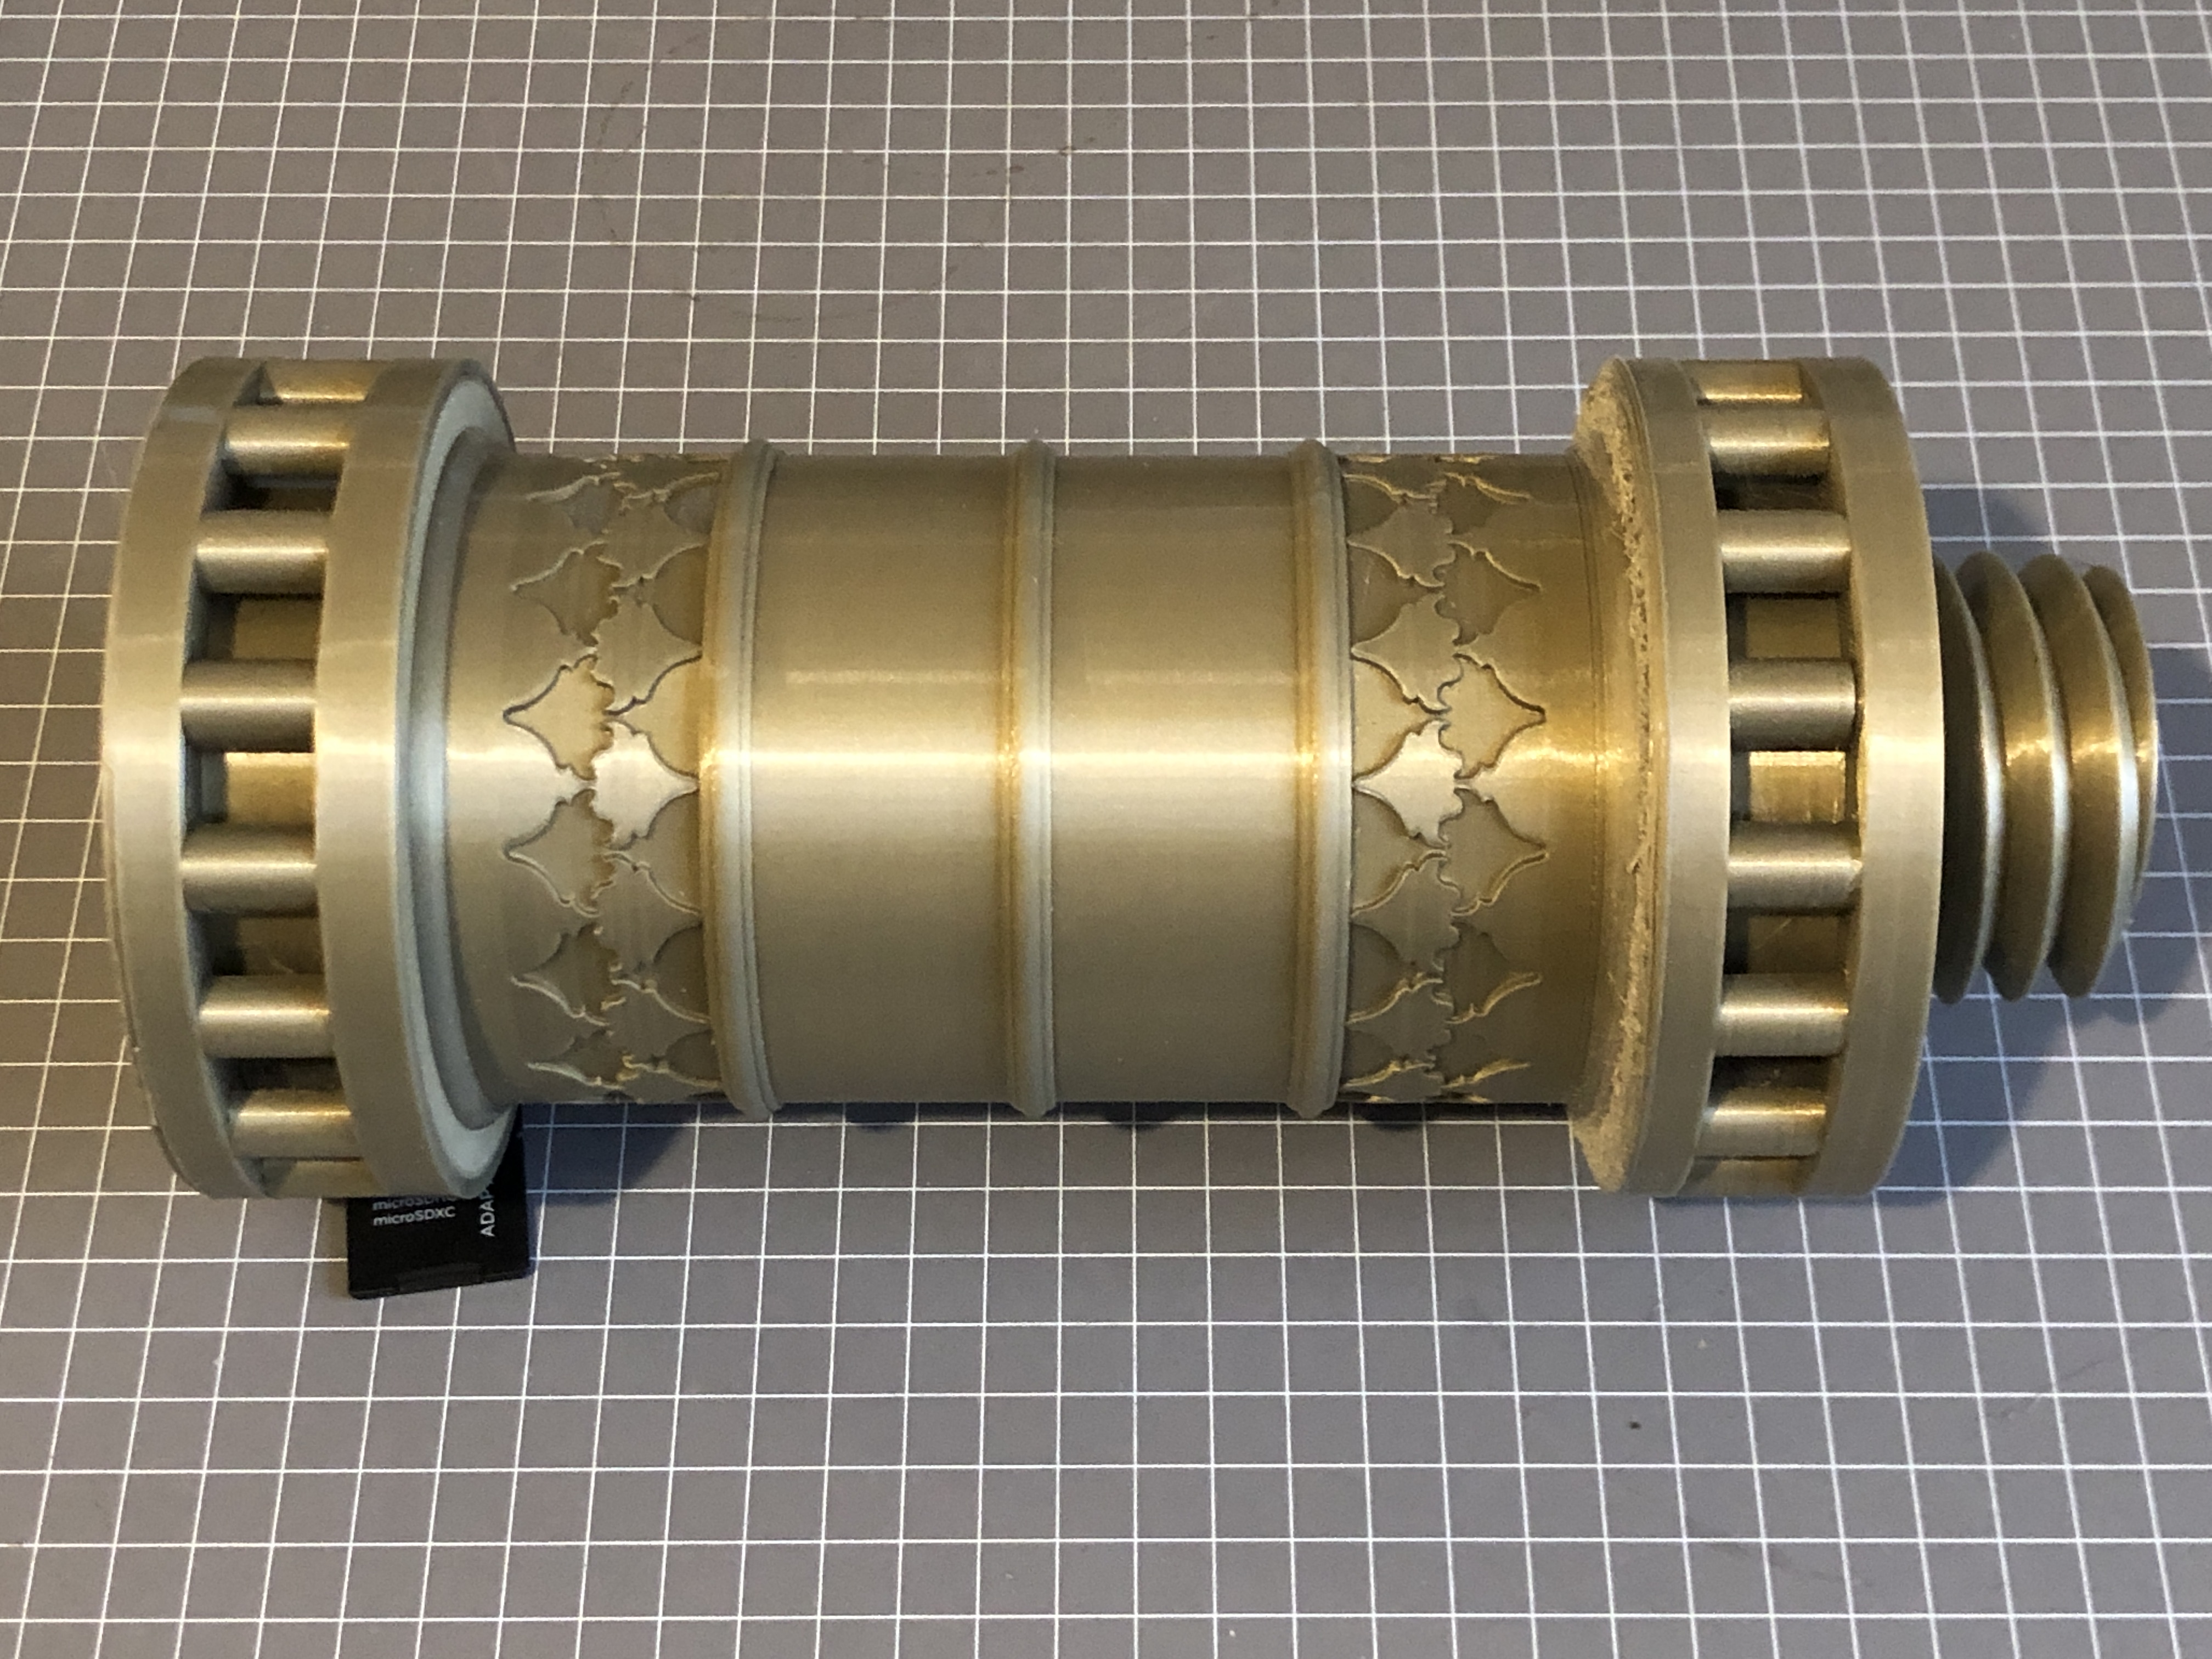
And this was typical of the failures….

Then I decided on some upgrades….
- An enclosure to prevents drafts, and keep the printing environment warm during cold nights. $AUD155. A temperature and humidity logger kept a record of overnight temperatures. The heated printer bed provided the heat. I noted that temperatures remained between 22 and 26ºc inside the enclosure.
- An all-metal fully geared extruder. $AUD25
- A filament dehydrator, and warmer. “Sunlu” brand. $AUD60. Old filament can be reconditioned by warming at 50ºc for 4-8 hours. The same machine can hold the filament during printing to keep it warm and dry.
Around this time I experienced a serious filament leak and blockage which bent the hot end enclosure, broke the wire to the thermostat, and broke some insulating material. The leak was caused by a loose extruder nozzle, and an imperfectly seated Bowden tube. It was probably repairable, but when I saw that the cost of a replacement unit, including the wiring loom, hot end, 2 fans, silicon boot, etc was only $AUD35. So I bought one, had it installed easily in a few minutes. It came very well packaged, and quickly.
Also about this time I read Sean Aranda’s book. It has been a game changer.

Aranda uses “Cura”, and although his fixes can been used by any other slicer, one of my problems was holes between walls and internal surfaces. He says that this is a problem which is worse with “Simplify 3D” than with “Cura”, and he also thinks that “Cura is a better program overall, mainly due to the quality and number of online updates. The fact that “Cura” is free is an added bonus.
4. Sean Aranda’s book. “3D Printing Failures”
5. Changed slicer to “Cura”. Although it is called “Ultimater Cura” it works on most if not all 3D filament printers.
6. Changed the stick-on printing surface to a new 3M cover. This was after I read the product information which stated that these surfaces last for only 10 prints! I am quite sure that mine lasted for at least 50 prints before becoming unusable. Now I print on different areas of the surface, and keep a record of the number of prints at each location. Since then I have bought a magnetic cover which I will use when the current 3M cover starts to fail. (p.s. I have now installed the magnetic base, and so far, it has been wonderful!). No break aways despite not using brims or platforms, and easy to remove prints
After all of those changes my prints have been excellent. No break aways, no X-Y layer shifts, good adhesion between layers, better surfaces, and no holes/gaps between filaments. The only problem is that I am not sure exactly which changes were effective and which ones were not. Probably they have all helped to a degree.
Postscript. I have been considering buying an Elegoo Saturn resin printer, or maybe even substituting the Saturn for my Creality CR-10s. From the reviews the Saturn produces much smoother surfaces, and more precise dimensions. And the prints are much faster. My 3 and 4 day barrel prints could be printed 5-10 times faster. The known down side is the is the cost of the machine (on special at Amazon at present for $AUD639), the smell, the need to avoid skin contact with the uncured resin, the desirability of a print washer/UV curer, and the need for extra space. The other major consideration for me is the smaller maximum print size. 200x192x125mm. The bombard parts would need to printed in halves and glued together in order to make the molds. So, while the CR 10s is working well, I will hold off buying the resin printer. There is some advantage in waiting because 3D printing is a constantly evolving and improving technology.

So, were the upgraded components worth it? A resounding yes, as far as I am concerned. Still pondering the Elegoo Saturn
P.S. a month or 2 later. Since I wrote the original article I have taken delivery of, and installed some 1 meter cable extensions, which were made for this machine. Obviously I am not the only Cr10s owner to have decided that the cables are a bit too short. The 6 or 7 cables were fitted with connectors and installed quickly and easily. The printer functions perfectly, and I can now place the control box a comfortable distance from the printer enclosure without worrying whether the too short cables will cause a print failure. Actually, the one meter extensions are a bit too long, and need to be carefully positioned to avoid snagging. Half a meter extensions would have been ideal. And the cost? $AUD35 with free postage. Considering the labour involved in making and packaging these items, the price was cheap.