johnsmachines

machines which I have made, am making, or intend to make, and some other stuff. If you find this site interesting, please leave a comment. I read every comment and respond to most. n.b. There is a list of my first 800 posts in my post of 17 June 2021, titled "800 Posts"

Tag: Ships boats

USS Constitution’s GunPort Covers

PART A. The GunPort Covers. See the photos. They were attached yesterday, after the previous post’s pics were taken.

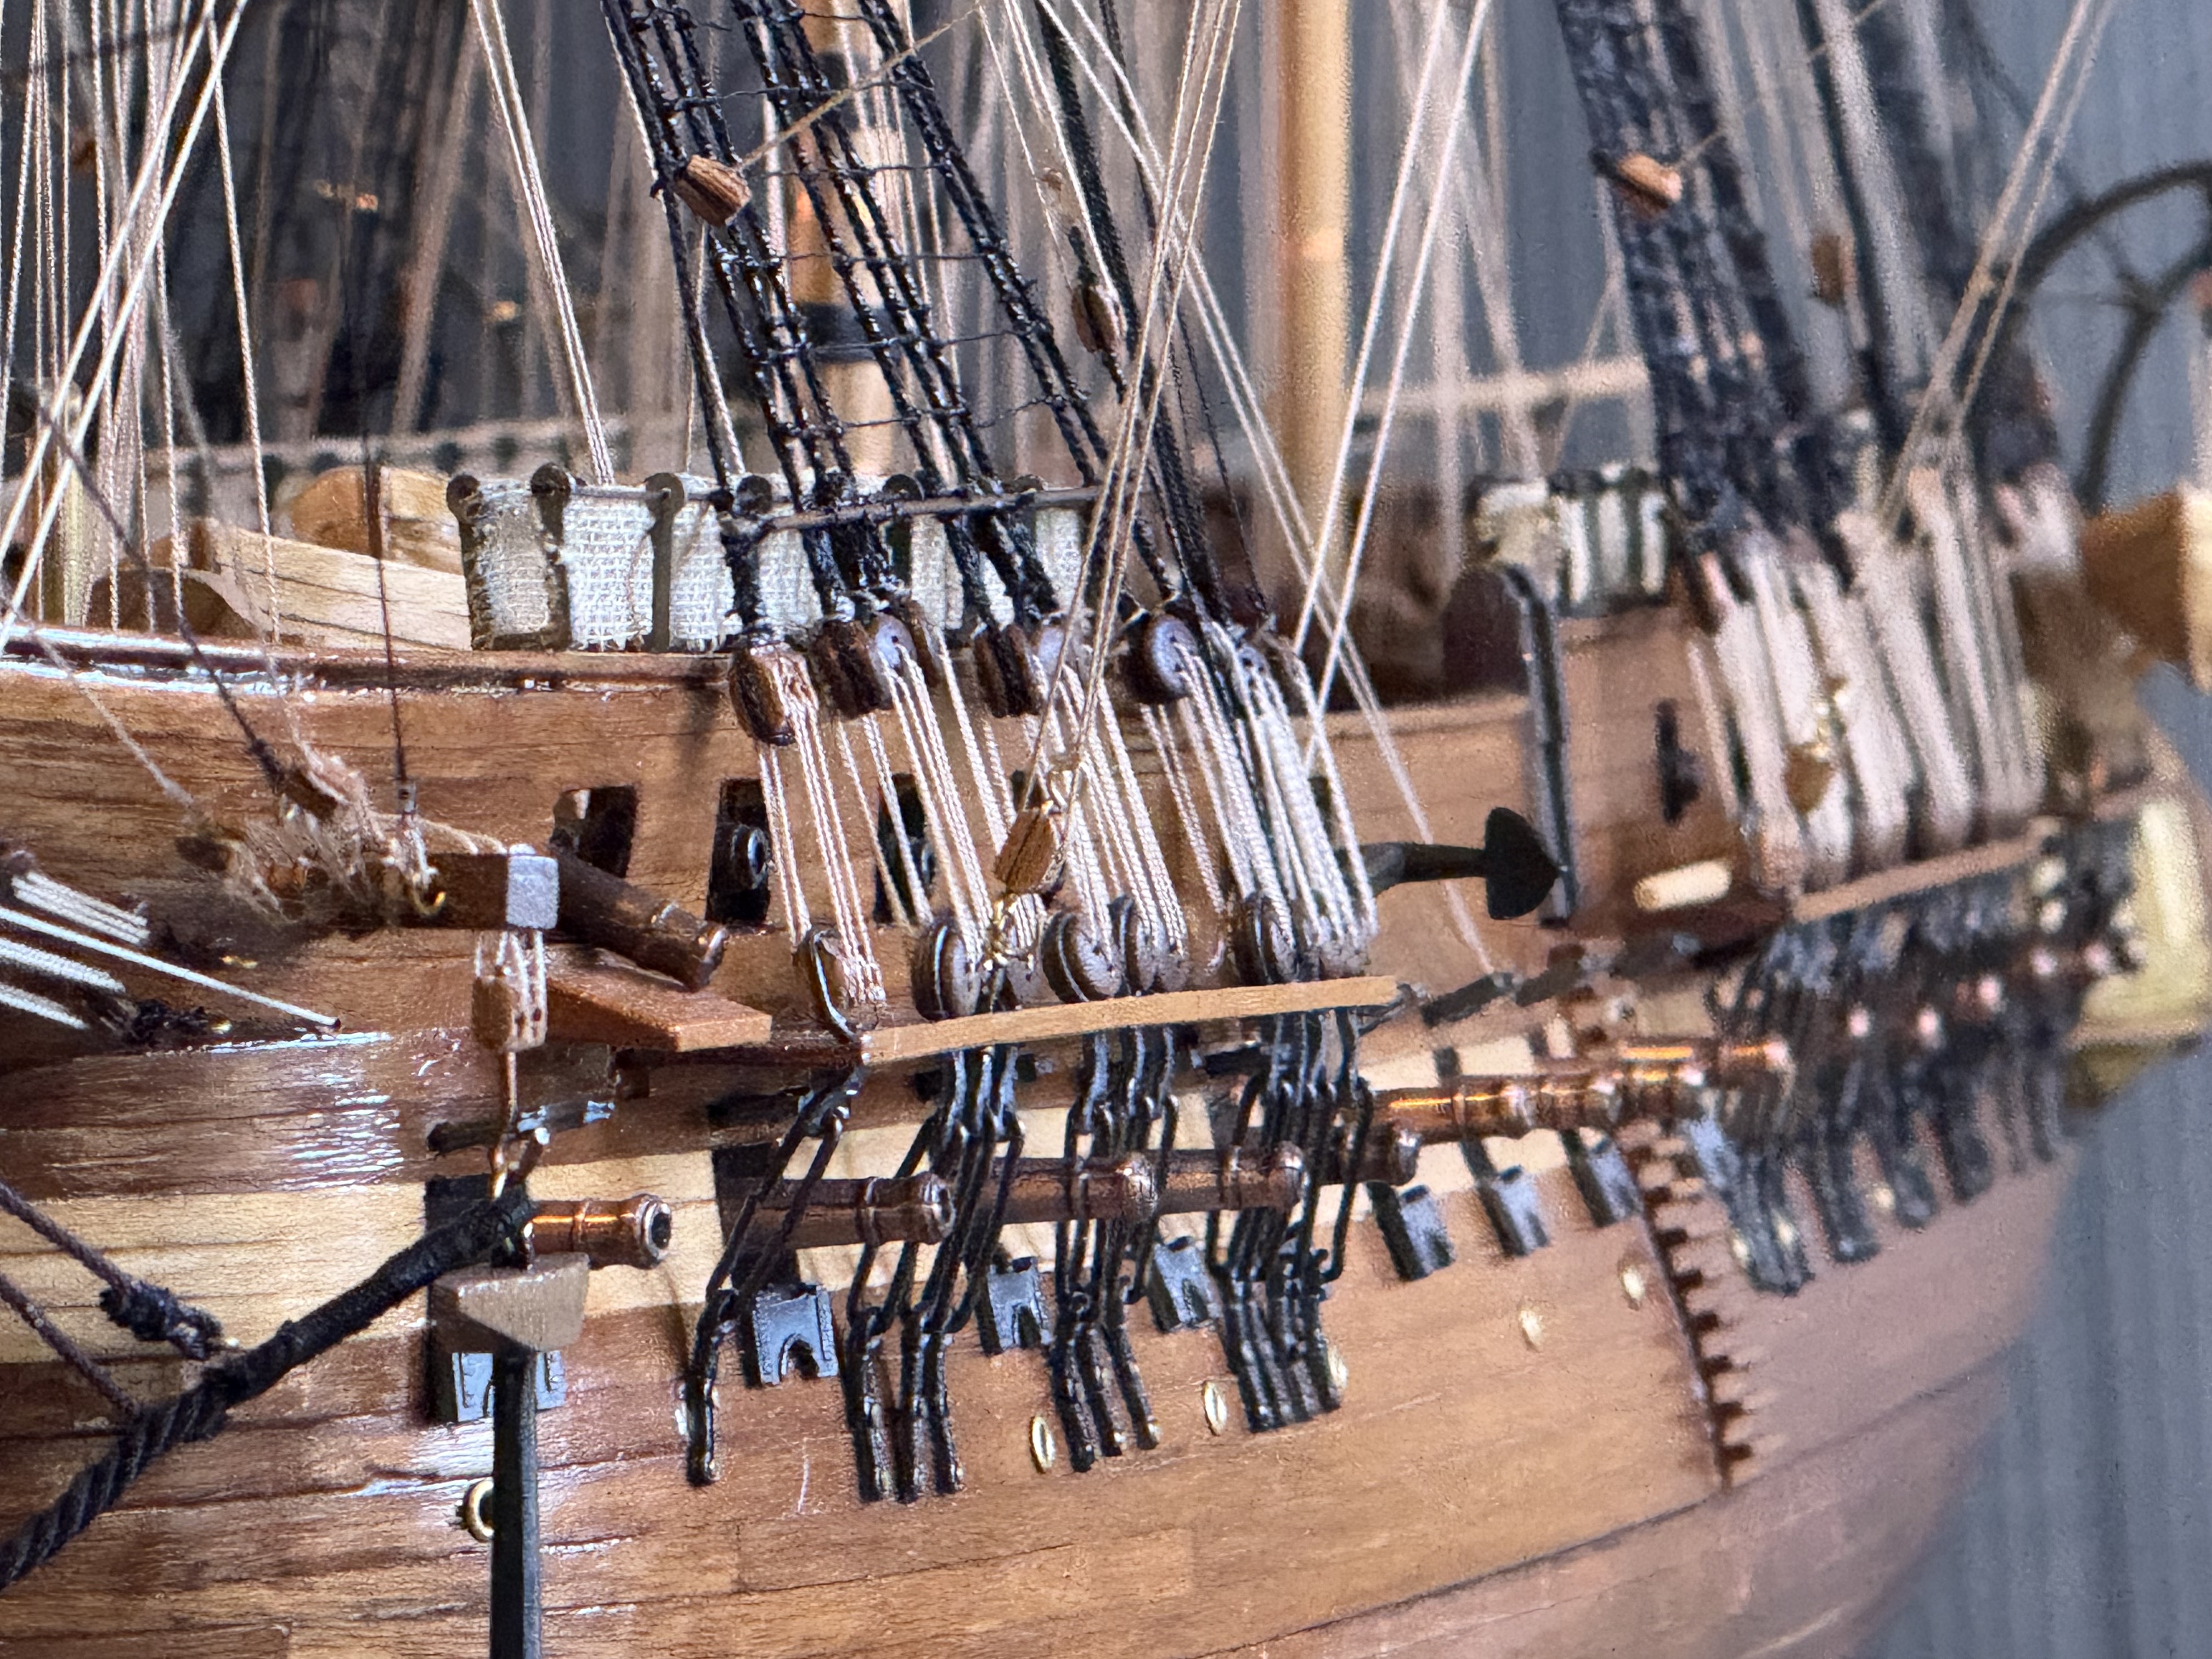
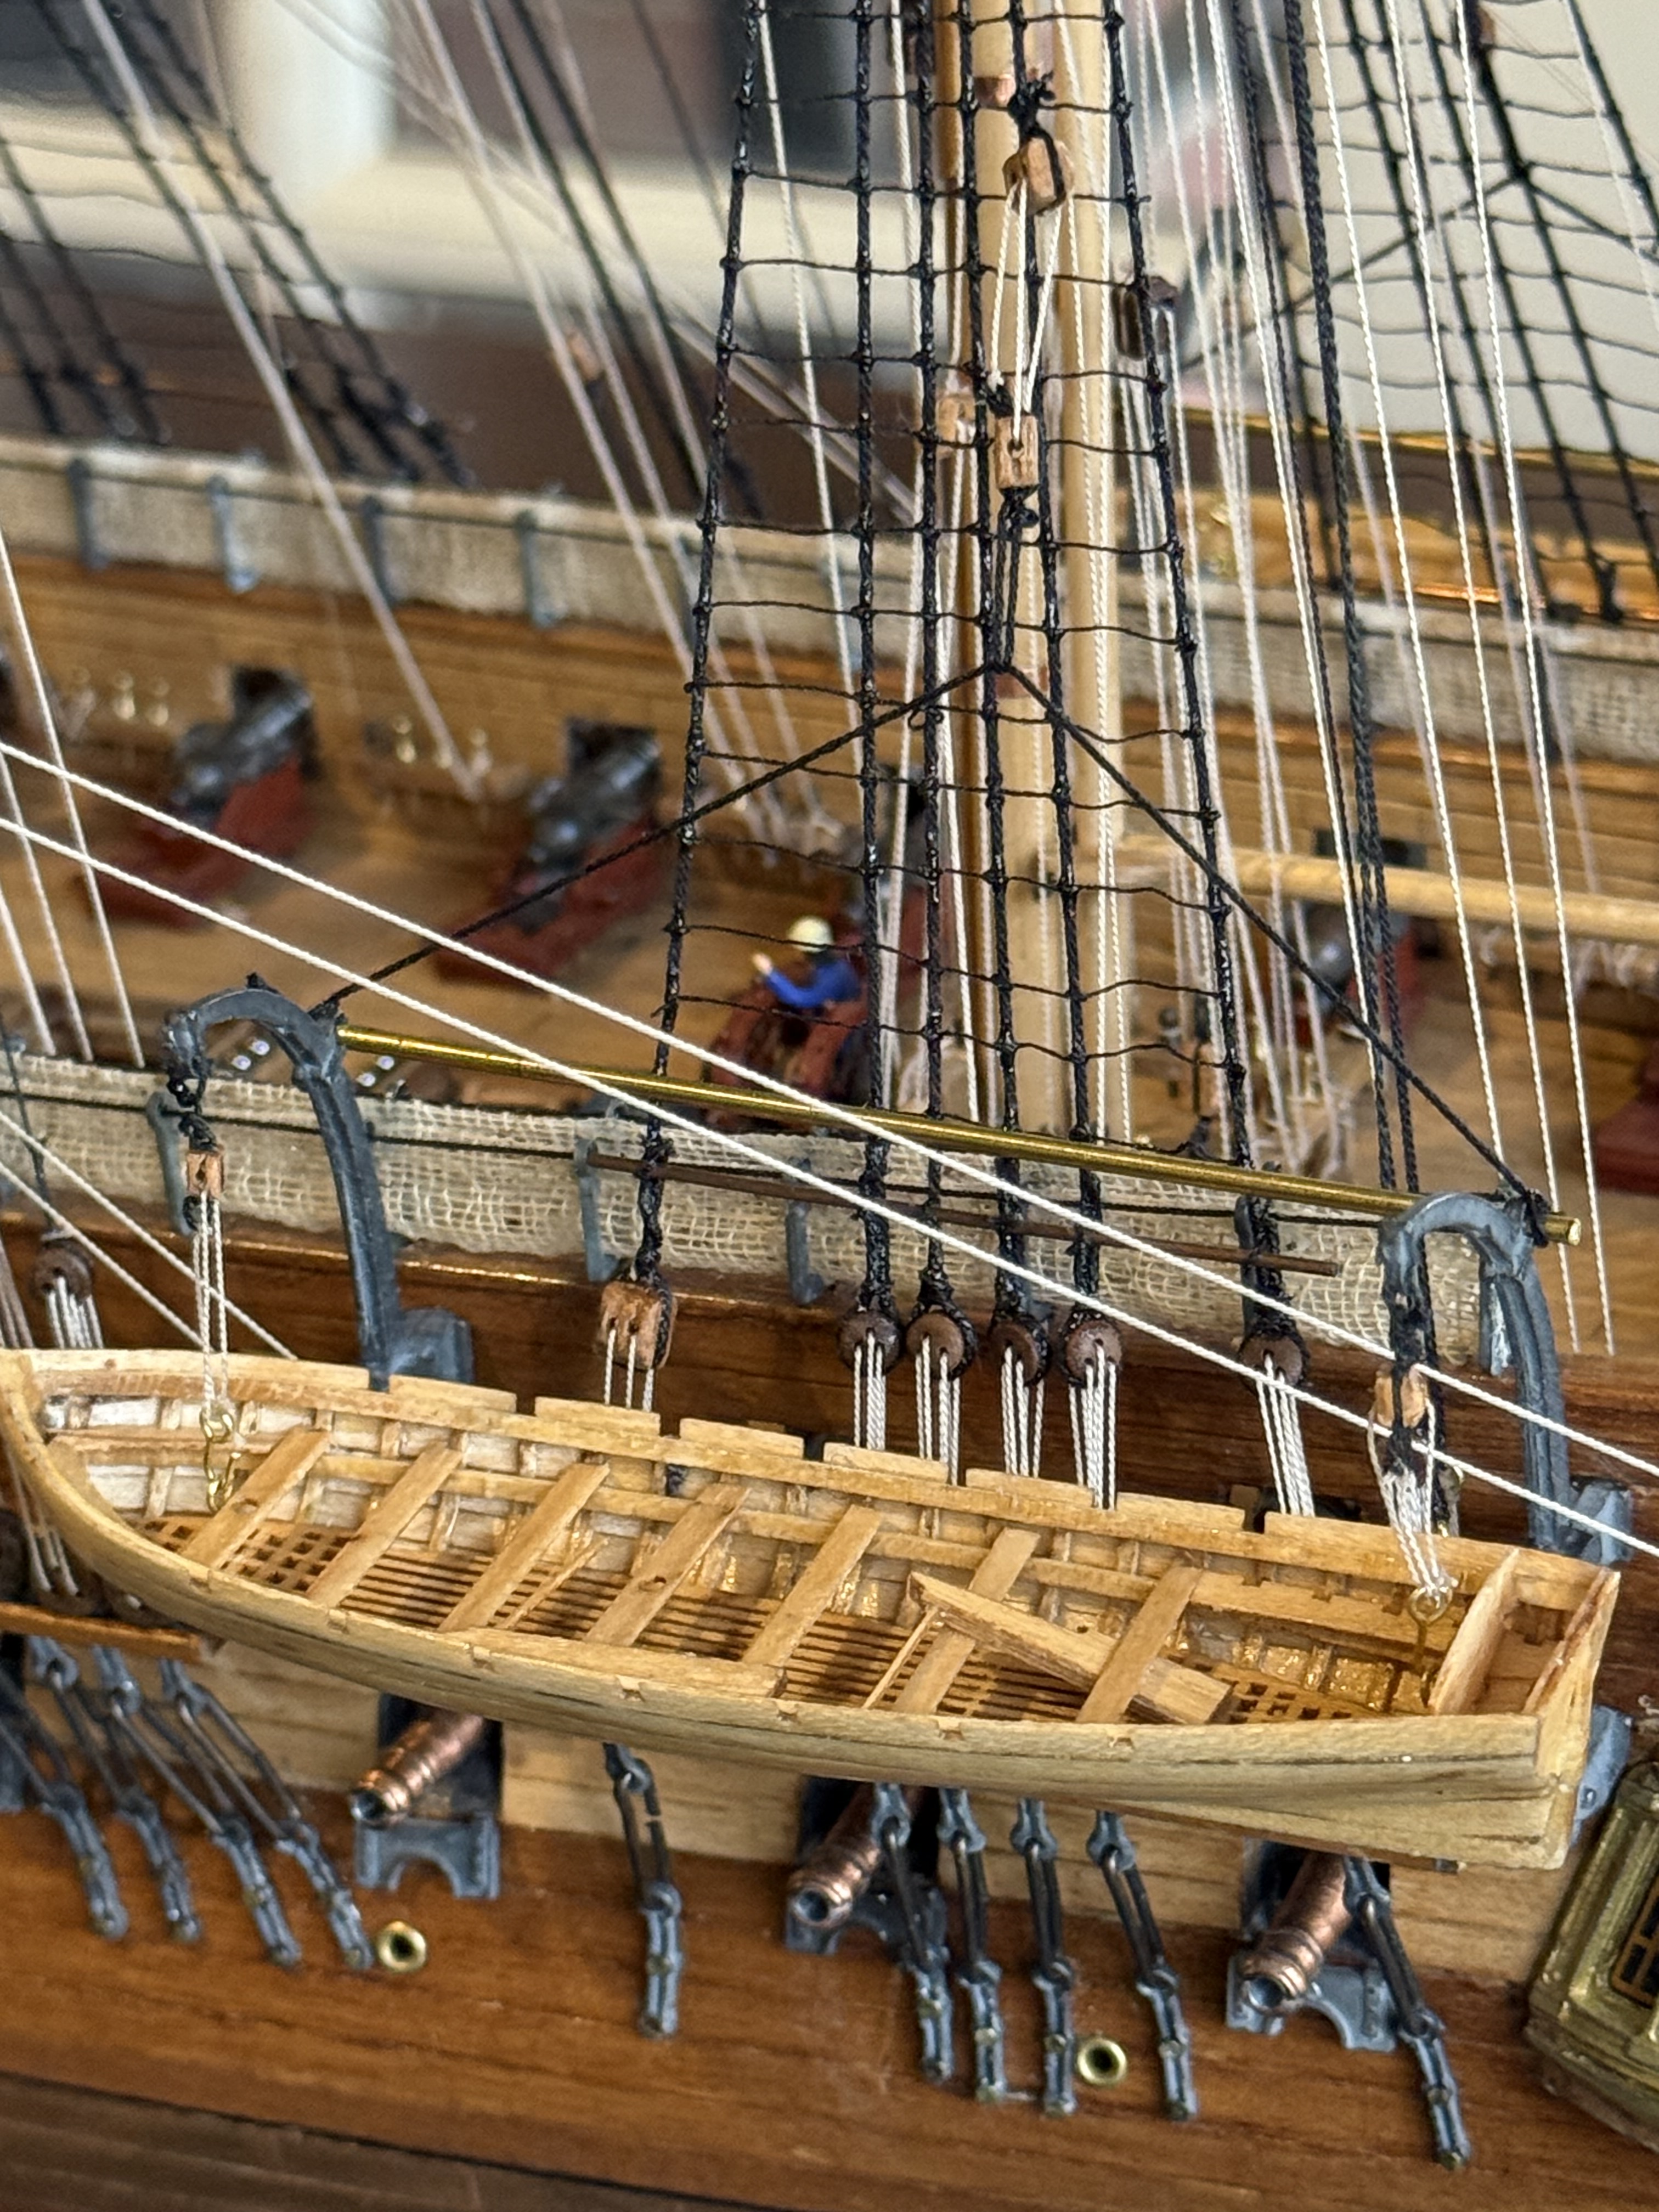
Magnified photos show warts and all. Like crooked gunport covers, gappy bulwark rail, bent channels. and a long gun which is aiming very low.!

The photo setup… black background, natural light, some telephoto. Gunport covers are in place. Looks OK from this distance?
The gunport covers supplied by Mamoli are soft metal. The originals were thick painted wood. I imagine that they had separate round covers to block the central hole in rough weather. I quite like the soft grey colour, so will not paint them. But the wooden anchor bar needs some metal bands painted on.
The plans for the barge davits had only single ropes, and the ropes for the blocks which attached to the boat were tied to shroud deadeyes. I could find no authoratative reference regarding these details. But I did note that Constitution currently has davits which are hinged, and when the pins are removed the davits are bent, moving the boat away from the hull and towards the water. I thought the boat crew could assist with the lowering using the tackle which is hooked to the boat, so I ended the ropes onto the boat. Rope coils will be added.
Rope coils will be added to the belaying pins also. I ran out of the Mamoli supplied belaying pins and purchased 40 new ones which are the same length, but thinner and shinier. The shiny ones will tarnish eventually.

I have mulled regarding the carronade ropes. My intention is to install breech ropes, just winding them around the carronade knobs. The carronades are mounted on carriages with recoil slides built in. So the breech ropes can be fairly short. Installing gun positioning blocks and tackle will be overly fiddly, difficult at the scale, and look too crowded on the model so they will be left out.
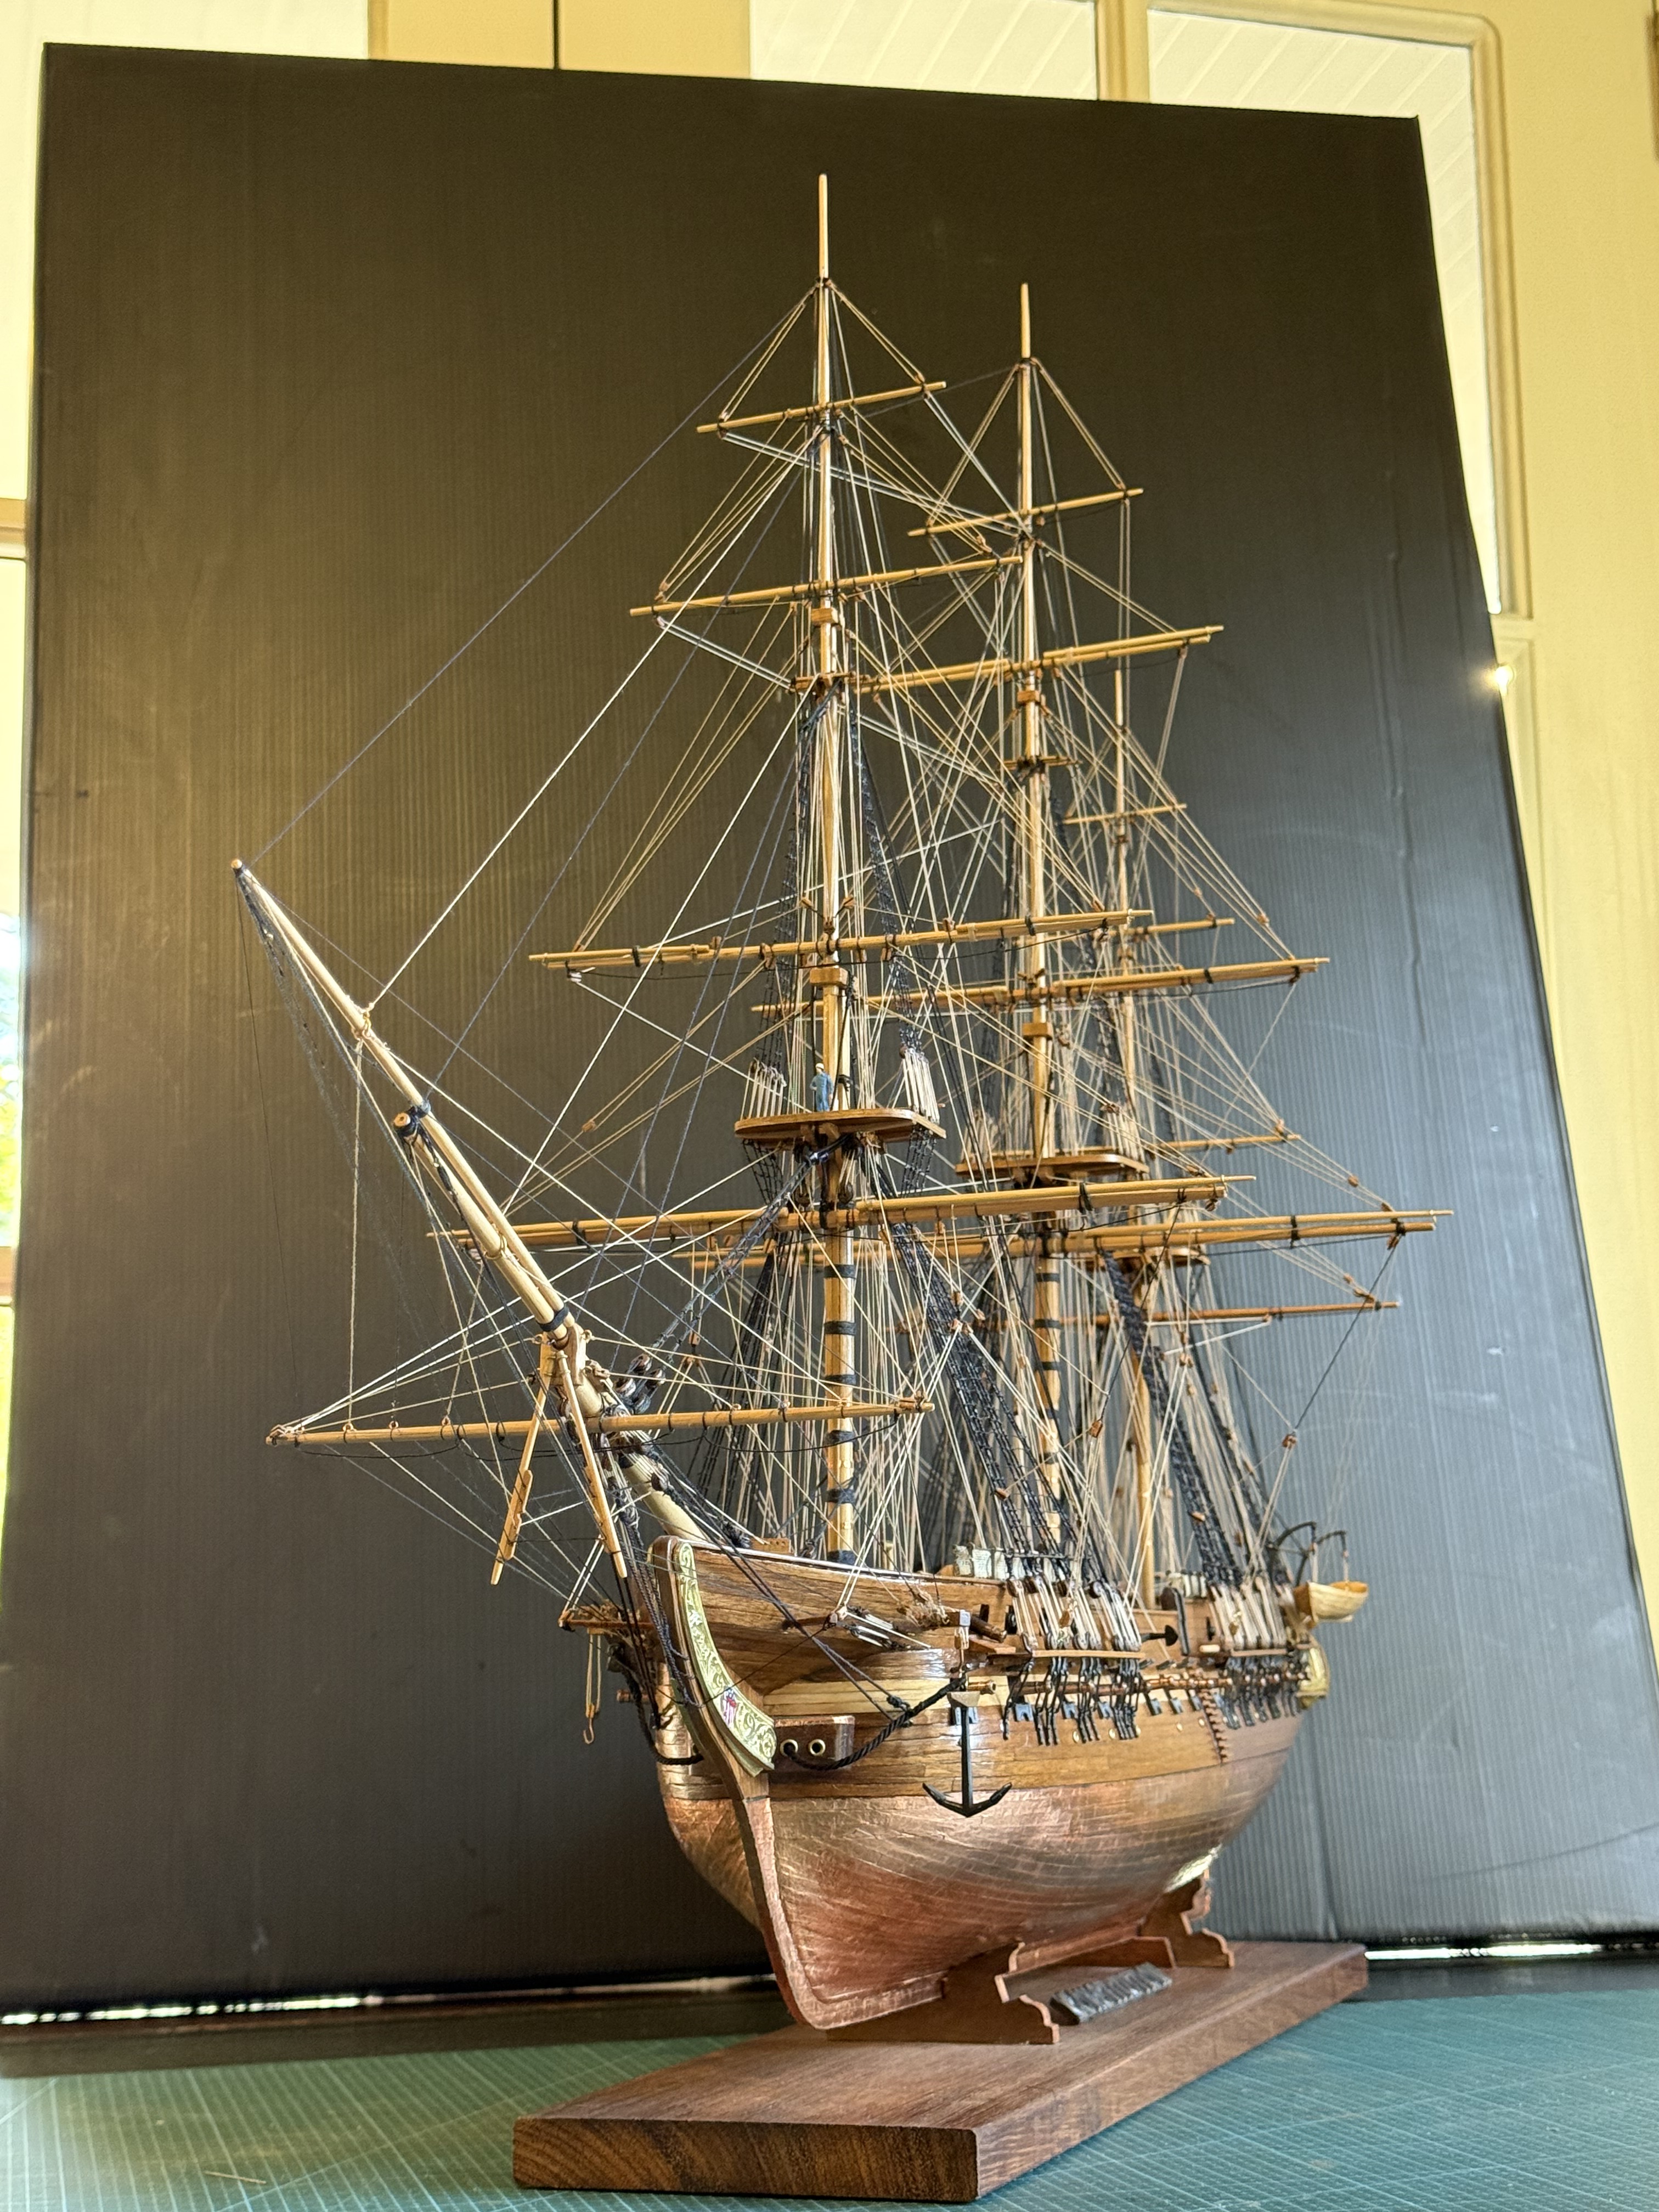
PART B. The Case.

I have vacillated about this. Already the model has accumulated more dust than I like, and I know from experience that the longer the dust remains the harder it is to clean off. So a transparent cover is required.

Glass is heavy and dangerous if it breaks. Dangerous to personnel and the model.

Polycarbonate is very strong, but expensive, and apparently scratches easily if incorrectly cleaned.

Acrylic is less expensive (roughly half the cost of polycarbonate), less tough than polycarbonate (not bullet proof, but this is Oz not USA), and slightly less transparent. But on balance seems the best option.

The design has been given considerable thought and research. I drew up plans using acrylic, fluted corner columns, wooden base and framed acrylic. Then the problem was solved from a different source.

SWMBO said…”it needs to be simple, and not compete with the ship. So just a plain glass box.” So that was that. Except that it will be acrylic not glass. My thought is that the walls and roof will be 4.5mm acrylic, glued together, and lifted on and off the base in one piece. The base will be thick black plywood with rubber feet. Sitting on top of the plywood will be some 10mm black gloss acrylic. I have used black acrylic layered with black painted plywood on another model (cannon), and it looks good. If I decide to add some LED’s and batteries, the thick plywood base could house the batteries and wires.

Just to show the black acrylic layered on top of painted plywood. I quite like the appearance but maybe customwood would give a smoother appearance than ply. Or maybe I should use 2 layers of black acrylic and hang the expense. The build of the 1866 Armstrong 80pr rifled muzzle loader was posted 5 years ago on johnsmachines.com.

Next decision, will I make it myself, of get it made professionally? Not yet decided. I like to have control of the process, and supervise the quality control, and it would be less expensive. Also I could buy sheets of acrylic, enough to do the 3 or 4 ship models in my possession and planned. (I have 2 model ships which I bought recently, so I can give one to each daughter eventually. And I intend to assemble the model of Pharaoh Khufu’s ship.

Constitution’s Small Boats

The small boats carried on USS Constitution (a) are not well documented and (b) certainly varied with different captains, missions and periods.

Most frigates carried up to 6 small boats. The Mamoli 1:93 model provides stock for carving 4 small boats.

Two of the wooden blocks provided by Mamoli for the modeller to finish.

I have examined many photographs of Constitution models to see how the issue of the small boats is handled. Where the blocks are carved and painted, the small boats invariably look crude and rough and of a poor standard in comparison with the Constitution model itself. So it was with some excitement that I found an Ebay Chinese supplier of 1:96 kits of 4 small boat models, which look compatible with the Constitution era.

The 4 kits make quite nice, detailed boats 65-110mm long. $US 110 for the 4 kits.

So, my 4 kits arrived about a week ago, and I spent 2-3 days making the 34 foot launch, the largest of the 4 models.

Let me state that these kits are not easy builds. The instructions are a series of drawings, and the only text is in Chinese. I made several mistakes as a result of my inexperience and the suboptimal instructions.

One A4 sheet, printed on both sides.

So, off I go. Now, do I go across the pictures, or down the columns?

The parts appear to be neatly laser cut. The tabs are tiny and easily cut with a razor blade. They click into place in the supplied base. So far so good.
The rubber bands add a bit of security to the setup. Then the ribs are bent around the forms, and secured with the tapered wedges as per the drawing. I broke the first two ribs, so soaked the next ones for 5 minutes in water…. no further breakages.
Hmm. Image will not rotate. Sorry. Ribs completed. Some are a bit crooked. I wonder if that matters. (spoiler. yes it does matter). Some slots will not accept wedges. I wonder if that matters. (yes it does matter.)
The keel is glued to the ribs. I used CA glue. The CA glue set very quickly against the damp ribs. CA glue is activated by moisture. Too late I realised that the keel was not quite in the correct position. I should have measured and marked the central position. Oh well, press on. See if it matters later. It does matter! The drawings seem to indicate that the slotted plank goes on at this stage, so it is glued in place. Later I realise that it should have been added later. And the bow looks crooked! Oh shit. Do I throw the whole model on the fire, or just continue. I continued. (Maybe that was what the Chinese instructions were about).

To cut this saga short, I applied the planks and finished the model. SWMBO thought that it is quite pretty. I thought “it was a learning exercise”. I ordered another kit from the supplier. An expensive lesson.

It looks OK from some angles.
As I said, from some angles.
And from a distance, in its position, looks good. But I have to admit that from other angles it is a rubbish job. I wont labour the point with photos of those angles. I will rebuild this one.

Oh OK. Here is a view from above.

That crooked keel has caused the asymmetric bow curve. I will see that every time that I look at it. I cannot see any way of fixing it, except to build another one, and do the job properly next time.

So, to summarise these models….

  1. They are not for beginners.
  2. The instructions are inadequate. The text is in Chinese only. There are no instructions about where the glue should be applied. The drawings are OK, but did not answer all of my uncertainties and questions.
  3. The model is small and fiddly, and too small to use clamps while the glue sets. The parts have to be finger held while the glue sets, and that means using CA glue. Very little time for adjustments.
  4. However, if properly assembled, the models will be attractive and enhance the full ship build. I look forward to making one properly. I have started the 32 foot barge.

And the rope maker is almost finished. I hope to have a video of making rope in the next post.