
HMS Bellerophon. 1- Making Plans
by John
I intend to make a model 74 gun ship, and I have decided to take a risk, and do a scratch build. i.e. to not make the 74 from a kit.
My first experience of using a wooden kit, was USS Constitution, from Mamoli. As a beginner, it was not the best choice. Many parts were not accurately cut. In fact they were obviously hand cut, with all of the inaccuracies that method entails. A later kit, for the Khufu pyramid ship, was much more accurate, and was a pleasure to assemble. It was laser cut.
And, as result of my own reading and “research”, I made various modifications to the Constitution plans. For example I made the ships boats from another supplier (Shicheng). And I made all of the model ropes instead of using those supplied.
For a first effort, the result was OK.

But there were mistakes, and misinterpretations of the instructions and plans.
The most satisfying parts of the build were the bits where I made parts from scratch.
So, my next build will be from scratch.
But, I want to work from plans.
So I have bought books (The Seventy Four Gun Ship by Jean Boudriot, Building The Wooden Fighting Ship by Doods and Moore, and quite a few other books); and plans (from Ancre, for an admiralty style hull, and HMS Vanguard from Victory Models).
Eventually I settled on the Victory Models plans. They are simpler and more suitable for my skill level, and will probably take a fraction of the time to complete vis a vis the Ancre/Boudriot plans. Even so, I expect that the build will take at least a year, despite my habit of working quickly.
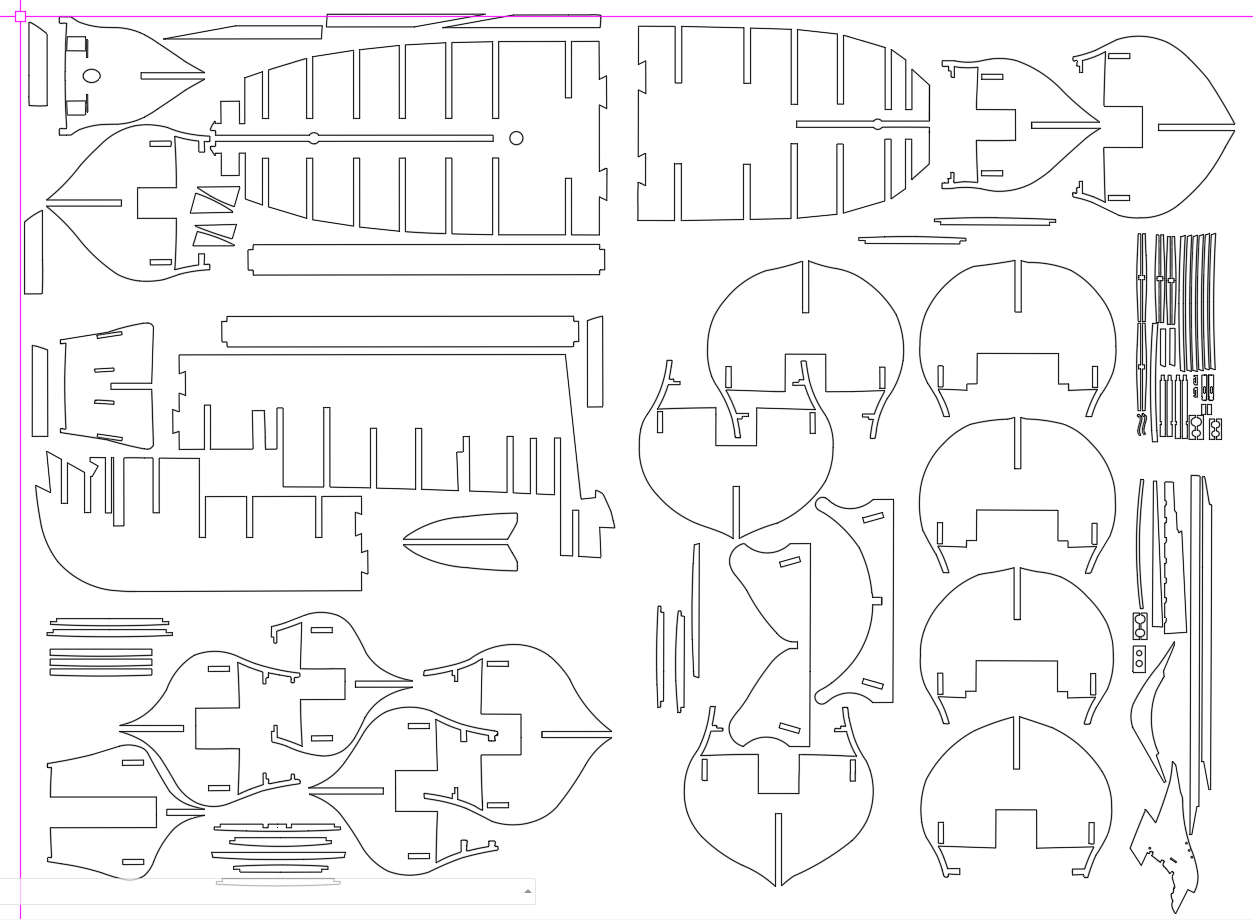
The first step was to get the plans scanned, a copy printed, and electronic copies on my computer. I chose to have the printed copy on heavy duty paper, almost cardboard, so I could make cutout templates if required. That was not cheap. 20 x A1 prints plus the electronic pdf’s was $aud275. When I felt the weight of the printed versions, I felt better about the price. They are quite substantially heavy.
Then I decided to have the keel, bulkheads, decks etc laser cut. I do have a scroll saw, and considerable wood working experience, but the speed and accuracy of laser cutting was persuasive.
My electronic version of the Victory Models plans was in the form of pdf’s. The laser cutting service requires dxf’s. I do not have sophisticated software to convert pdf’s to dxf’s, but I do have a simple free program called “Print2Cad”.
So I converted one page of the plans as an experiment.
Print2cad processed the plan quickly, and I saved the converted plan as a dxf.
AutoCAD 2024 opened the dxf. (Hobbiest version of AutoCAD).
It opened normally and superficially looked good. But when I zoomed into the parts there were multiple problems. Many sharp corners had converted to arcs. And many straight lines were converted to arcs.
So I was committed to spending many hours to tidying up the converted dxf.
Then a bigger problem surfaced. The bulkheads, keel, decks and beams were to be cut from 5mm ply. The slots and joins were planned around 5mm ply. So off I went to my local ply supplier, calipers in hand, to measure the exact thickness of their ply. 3mm, 4.5mm, 6mm, no problem. BUT NO 5mm!!
I went home and searched the net for other suppliers. No-one supplies 5mm ply. Except some packaging ply is said to be 5mm, but it looked rough and knotty, and the one which I measured was actually 4.5mm anyway, and not very rigid.
I mulled over this for a week or two. Revisited the idea of making an admiralty model from solid wood. Wondered about changing the Victory Model plans to use 6mm ply. That was going to take a lot of hours, and no doubt there would be unintended consequences from the changes.
I did consider getting the laser cut pieces as planned for 5mm slots, and widening the slots to 6mm as required, one by one.
However, at this point of time, I have spent most of the past 3 days redrawing the plans to use 6mm marine ply, widening the slots, and fixing the unwanted arcs into straight lines.
I realise that there will be unintended consequences of these changes, and I have tried to anticipate them as far as possible. Since all of these plywood parts are buried out of sight, I should be able to cut and fill where necessary, and even remake parts totally. With wood, one can use glue to add extra wood, pack with chips/sawdust or builders bog, or chisel and saw unwanted bits. There is always a solution.
Meanwhile I am waiting for a cost estimate from the laser service. (JR Laser, North Geelong).
Incidentally, the plans are actually for HMS Vanguard. I am intending to make HMS Bellerophon, which was almost identical in all aspects, except for decorations, figurehead etc. Both were Ardent class, ships of the line, 3rd rates. They were heavily armed, strongly built, reasonably fast ships. Complement 550.


hi John, sounds like a lot of work and potential frustration. A build as you go, in my experience, has always meant unforeseen modifications. Did you consider making your own 5mm ply from sheets of veneer. Just a thought. With your legendary skill and patience I know the result will be superb. Good luck.
Chris from Albany W A.
LikeLiked by 1 person
Hi Chris, that possibility had not occurred to me. But you have set me thinking. If my 6mm ply modifications turn out to be too frustrating I will try it. Thanks for the suggestion,
Cheers… John
LikeLike
Hi John,
I just subscribed today and am slowly working backwards through what you’ve posted. An interesting website you have, and some of our interests coincide. Scale model ships guns and artillery as examples.
Machining hardwoods to very accurate sizes, angles etc. comes with it’s own issues, and our usual metal working cutting tools just won’t cut cleanly, nor do we have the higher spindle rpms needed. Even the proper and full sized wood working power tools such as jointer’s and planners are unwieldy for modeling reduced sized parts and what we really require for accuracy and precision. Years ago I bought a couple of them from the original inventor in Tulsa Oklahoma who patented the tool back in 1957. But that company is now long gone. The tool was called the Wagner Safe-T-Planer. The copies today are meant for use in a drill press just like the original, and now mostly marketed more towards hobbyist luthier’s. There’s quite a few videos on YouTube showing them used on drill presses for anyone interested enough to do a search.
Frankly I think there extremely unsafe in any drill press without some type of extra guarding and material hold downs that still allow the wood to be hand fed under the tool that all those videos tend to gloss over. And side loading any cutting tool in a drill press without a proper drawbar we both know isn’t a good idea at all. But for people like us with actual machine tools, they can work exponentially better when used in a milling machine, held in a proper collet, and the wood to be precision machined just locked into any milling vise while supported on parallels. Think of it as a 3 inch diameter, 3 tooth face mill for wood. And most mills already have enough spindle rpm to use these rotary planers efficiently. https://www.stewmac.com/luthier-tools-and-supplies/types-of-tools/planes/stewmac-safe-t-planer/ Or if you or anyone else doesn’t trust random links, just Google the name.
In a mill, I think of and treat any hardwood as if it’s a biological grade and a different color of aluminum. The only addition and just like a wood router, is the exit side of the tool as it’s planing the surface needs to be backed up with any clamped on scrap piece of even construction grade softwood to prevent edge chip out. That and using a good shop vac to control the dust and chips isn’t in my opinion optional.
For my 1/6 scale civil war Napoleon 12 lbr. Much of the wood had to be very precisely cut and sized to allow exact matching to many of the additional metal parts. I’ve even set angles to be planed using gauge blocks and a sine bar to ensure that. In general, the tool still leaves very light tool marks around .003″ deep in most hardwoods. A few minutes of light sanding will easily remove those. With my powered table feed and dro, it’s almost like cheating. ☺
Pete
LikeLiked by 1 person
Hi Pete, and thankyou for your response. If you go back far enough you will come across my first cannon, which was wooden carriage mounted. I CNC milled the carriage from iron wood, and it finished quite nicely. Incredibly dense heavy wood. From memory there are several posts with “1779 Cannon” in the title.
And another past interest which we possibly share is making Spanish guitars, although they predate my posts on johnsmachines which started in 2014.
I would be interested to see your 1/6 12pr. My email is … Make a note because I will delete it in 24hrs. Stay in touch…. John
LikeLike
If a thickness sander is available you might be able to take 1/2mm off each side of the 6mm ply(depending on the lamination thicknesses). Also if large portions of the frames will not be visible once built, why not laser cut roman numerals or other labeling? Or leave tabs so that the whole sheet comes back in one piece. Then label them before you remove them?
Thank you for continuing to post these updates.
LikeLike
I did consider that possibility, but some parts were too big for my thickness sander. It might have been a better option otherwise. I did discuss labels with my laser guy, but he was only prepared to do full thickness laser labels i.e. right through the part. I thought that might weaken the parts too much, so dismissed the idea. He was not amenable to the suggestion of a first run at reduced power. I guess that I will have to spend some time identifying each part and labelling it with a sharpie. John.
LikeLike
Looking at your sheet, you are wasting wood. a program that I have found helps is https://deepnest.io/
It takes your parts and shuffles them into the smallest space it can. you can set the distance between parts and how it optimises it.
Good luck with the build will follow along with interest.
Andrew
LikeLike
The laser guy will use a program which does the same thing. Thanks for the link I will check it out. John.
LikeLike
Andrew, that is a very cool program! Thankyou for the recommendation. My laser service uses it or something similar. However I do a fair bit of CNC cutting and milling, and can see that it will be very useful. Thanks again. John
LikeLike