johnsmachines

machines which I have made, am making, or intend to make, and some other stuff. If you find this site interesting, please leave a comment. I read every comment and respond to most. n.b. There is a list of my first 800 posts in my post of 17 June 2021, titled "800 Posts"

Tag: 1779 cannon

More Scale Stuff

IMG_4482.JPG

There is the 1464 Turkish bombard (black), 17 tons, 307kg granite ball;  the 1779 long naval gun off USS Constitution or HMS Victory 24lb balls; and a 32lb carronade.  All 1:10 scale.  Interesting to see them together on my kitchen table?

A Matter of Scale

Before I get onto a brief reflection about scale, the photo below shows 2 cannon barrels.

The big one was what impelled me to converting a manual lathe into a CNC lathe.  That time consuming, costly, and ultimately very satisfying project, started because the CNC lathe which I used to turn the big barrel could only handle the job by doing it in two stages…. doing the breech first then the muzzle.  That was due to the big barrel being too long for the lathe, at 300mm (12″).

The small barrel was a test for the CNC converted lathe just finished, being the first complicated shape which I have made.   To save on material, I made it at exactly half the scale of the big one, ie 150mm long (6″).

IMG_4291.JPG

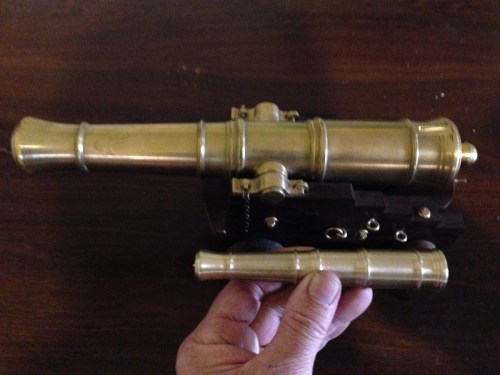
Comparing the two barrels reminded me, that if an object is twice as big as another, in all 3 dimensions (height, width, depth), it is 8 times as heavy.   And any projectile, and weight of black powder, would also be 8 times the weight.  But the wall thickness of the explosion chamber is only TWICE as thick.

My point is, that if scale is maintained, the smaller the cannon, steam engine, boiler, whatever…..  the less likely it is to explode.

Not that these cannons will ever be fired.  Just hypothetically.

Video of Making the Model Naval Cannon

Click on the arrow in the screen link below to connect to the YouTube video of the making of the 1779 model cannon.  Probably of interest only to machine aficionados, but it does feature some very pleasant music composed and played by Lis Viggers.

The labels appear too briefly, so use the pause button to read them.

The segment on boring the barrel is really boring. (really)

And a few editing errors appeared.  I typed cascobels when it should have read astragals.  Not prepared to delete, re-edit and re-upload given my very slow Internet connection.


And this is a link to another YouTube video with an excellent description of how these type of cannons were made originally.  Definitely worth watching.

Cannon Trunnions

I am unsure whether the trunnions are the semi circular holes in the carriage, or the cylindrical bits of the metal barrel which support the barrel.   I am going to assume that the trunnions are the part of the barrel.  (I checked.  The trunnions are the cylindrical parts of the barrel which support the barrel.)

So, today I made some trunnions and silver soldered them to the barrel.  In the full size original version they would have been part of the barrel casting.

But before that, I polished the barrel with a Scotchbrite type pad, impregnated with some polishing compound.  And it made the barrel sparkle!

cannon - 1.jpg

Then I attached the knob at the breech end, M4 threaded rod attachment.

cannon - 2.jpg

cannon - 4.jpg

Looks OK, Yes?  This protrusion would also have been part of the cannon casting.  It was used to attach the huge ropes which limited the recoil movement when the cannon was fired.  


cannon - 3.jpg

Turned some brass for the trunnion.  It was later cut into two pieces.

cannon - 7.jpg

Drilled the holes with an endmill in the barrel for the trunnions.  Stopped short of the bore by 3mm.  Jerry Howell specified threaded trunnions, but I decided to silver solder them in place.

cannon - 8.jpg

This is my silver soldering forge, for this project. (actually a hearth).   The barrel is still a hefty lump of brass, and I predicted that a lot of heat would be required to raise it to a suitable temperature.  The base is steel, and the bricks are fire bricks.  I used oxyacetylene as my heat source.

cannon - 9.jpg

After the silver soldering.  Not quite so pretty now.  I waited an hour before I could handle the hot item.  Note that the spigot in the bore which was Loctited in place, has come out.  Eventually, I became impatient, and applied wet rags to speed up the cooling process.

cannon - 10.jpg

Then a soak in dilute sulphuric acid for 15-30 minutes, to remove the flux.

1779 Scale Model Naval Cannon

cannon - 4.jpg

That bit of brass is 300mm long, 50.8mm diameter.

cannon - 1.jpg

And it weighs 5.1kg  (11.24lb).  Watch this space for progress.

1779 Cannon Bling

cannon - 3.jpg

Rings for attachment of ropes & pulleys, nuts and bolts, wheel pins and ferules, all made of brass in my workshop.  Note the square nuts.  Since this is a scale model, the originals would have been 50 x 50mm(2″x2″).

cannon - 7.jpg

The round bits are flat head bolts which secure the rear axles.

cannon - 1.jpg

Making the rings.  2.4mm (3/32″) brass wire is annealed by heating red hot, then wound tightly around a 3mm bolt.  The resulting helix is slit to form individual rings.


cannon - 2.jpg

The rings are flattened and adjusted using heavy pliers, then silver soldered to the threaded rods.  The hole in the smallest ring is only 3mm diameter.

cannon - 4.jpg

I intend to allow the brass to tarnish and darken.  The bright new brass is, I think, a bit glitzy.