BOXFORD CNC LATHE
About 3 years ago I decided that I wanted to see what CNC was about. I had read some beginners guides to CNC, and CNC programming, but it was obvious that I would need to buy a CNC machine and actually start machining if I was to make any real progress.
Initially I bought a second hand lathe which had been converted to CNC. It was a Seig C3, and stepper motors had been installed on the lead screw and cross slide screw. Some low end electronics connected to a PC, and the setup was controlled with Mach3.
Needless to say, this machine gave poor results. Poor finish, and poor reproducibility of dimensions. The lathe was low quality to start with, and the CNC components were low end. I was inclined to blame the lack of ball screws, but in retrospect, that was only one of the many problems. It did however give me a taste of the process of CNC programming, and finishing with a CNC turned item. I also developed some familiarity with Mach 3, and became a licensed user of the excellent software.
Then I saw a Boxford CNC lathe, owned by a friend in my engineering club (GSMEE). It was 30 years old, and had started life as a technical school teaching lathe. The original electronics and operating system were based on a CPM computer, pre-dating Windows, even pre-dating DOS. It ran on software which was loaded each session from a 5.25″ floppy disk, with a capacity of 180 kilobytes.
My friend had changed the operating system to Windows and Mach 3. That involved changing many of the electronic components in the lathe, and hooking up a PC.
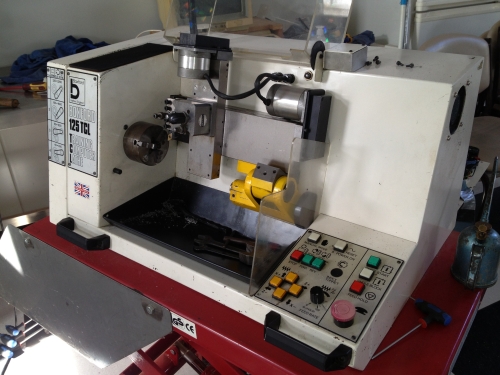
The lathe was an English Boxford TCL 125. The swing is only 125mm (62.5mm above the bed), and the maximum length which can be machined is also 125mm. The spindle is belt driven, and spindle speeds range up to 3000 rpm. The tool post is a very nice quick change Dickson. The spindle bore is 19mm. The whole machine has a quality appearance and feel. My friend was producing work with fine finishes, and consistent dimensions.
It was clearly a quality lathe, and I asked him if he was willing to sell. The answer, not surprisingly, was no. However, he did know of an identical machine which might be for sale. To get on with this story, I did buy the second machine. It had also been a training lathe in a technical school, and was 30 years old. It was not running, but the owner said that it had been in use until recently. Since I planned to replace most of the electronics I was not too concerned that it was not working. My friend, Stuart, had indicated a willingness to manage the upgrade-conversion, which was just as well, because it really did require a level of expertise with electronics which I do not possess. Stuart had been through the process, knew exactly what was required, and is indeed, an expert.

Boxford 125 TCL. The yellow item is the tailstock which swings up into position. 80mm Pratt Burnerd chuck. The control panel lower right was removed and replaced with a wireless pendant control.
It cost $AUD1500, which was a bit much, but the seller probably realised that I really wanted it, and priced it accordingly. I took the lathe, and the computer, and the 5.25″ floppy drive, and 6 tool holders home. I immediately put the computer and floppy drive on Ebay, and amazingly they sold for $AUD150 (to a collector of obsolete computers I presume).
We collected the various new electronic components over the next few weeks. I will list the components in the next post for your interest. Total cost of these was approximately $AUD800.
Under Stuart’s direction I removed the obsolete electronics, then in two half day sessions he installed the new ones. After some adjustments in the electronics, and in Mach 3, it was up and running.
In the subsequent 2-3 years I have replaced the ball screws (probably unnecessarily), and increased the number of tool holders to 30, and installed an ER32 collet chuck, and soft jaws on the 3 jaw Pratt Burnerd.
I have made many items and become increasingly comfortable with Mach3. I also use a very useful program called Ezilathe, which I will describe in a later post.


