johnsmachines

machines which I have made, am making, or intend to make, and some other stuff. If you find this site interesting, please leave a comment. I read every comment and respond to most. n.b. There is a list of my first 800 posts in my post of 17 June 2021, titled "800 Posts"

Tag: Colchester lathe

INSTALLING LATHE LEAD SCREW COVERS

I decided to install lead screw covers on my Colchester Master 2500 lathe.  The lathe is about 50 years old, so you might say that it is a bit late in its life to install covers now, but I really like my Colchester, and the lead screw appears to be in good condition, like the rest of the lathe.   And lately I have been turning some cast iron, which is quite abrasive.  And I occasionally use a tool post grinder.  So, protect the lead screw I bought some covers from DY-Global in South Korea.

To give DY-Global a free plug, the covers arrived at my home in Australia, from Korea, 48 hours after I paid for them.   With a hand written thank you note.  Fantastic service.

Anyway, back to the installation.  I had installed covers on another lathe a few years ago, and I was not looking forward to repeating the experience.   If past experience is anything to go on, the installer is lucky if afterwards he (or she) does not require skin grafts and a blood transfusion.

Handling the covers is like handling an oiled snake, which bites.

So this time, I thought about the job in advance.

And I made mental notes, which I am now setting down, for your benefit.  And mine, if I ever have to repeat the task.  I might add that the covers do not come with any installation instructions.  Nor could I find anything on the web which helped.  So this is how I managed.

IMG_5419

The unprotected leadscrew

IMG_5420

With the carriage moved to the tailstock end

Firstly, clean and oil the leadscrew.  This can be done after the cover installation, but it is a lot easier if done beforehand.

Also, take note of the dimensions of the lathe hardware where the covers will sit, to make sure that the covers will fit, and not obstruct the leadscrew nut or anything else.

IMG_5421.JPG

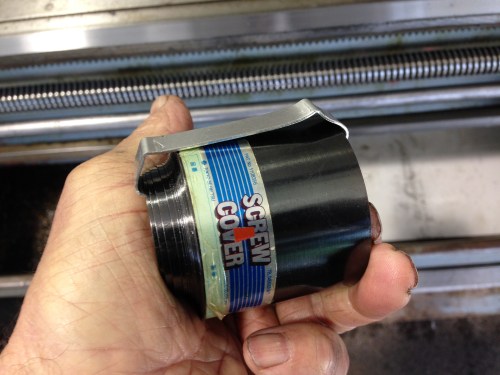
There are 2 covers for each leadscrew.  Take note of the outside and inside diameters, and the compressed length of the cover.

Then, wearing eye protection and gloves, compress the cover with one hand, while removing the metal clip with the other hand.  Then very carefully, allow the cover to expand to its full length.  WARNING:  the cover is under considerable tension (correction…  Should read “compression”).  Do not allow it to explosively expand.  How do I know this?   Do not ask.

The alternative method is to disassemble the lead screw, half nuts, leadscrew bearing mounts and most of the carriage.  It might be easier to do this, but I did not,  so I will press on with my chosen method.

The expanded cover will be about 1 meter long, depending on specifications.  It will be oily and slippery, and attract whatever dust and crap you have lying around your lathe.  I suggest that you wipe the exterior surfaces clean, to make subsequent handling a bit more like handling a dry snake than an oily one.   Re-oil it after installation.

Lay the cover near the leadscrew, in its intended position.  The carriage should be at one extreme end of the lathe.   You will note a big diameter end and a small diameter end.  In my case I decided that the small diameter should be at the carriage end.

The next instruction is the pearl in the description.  Read it carefully.

Using fingers, prise open the big diameter end of the cover and slip it over the lead screw about half way long the exposed length.  It will resist you, but be forcefull.

Then twist the cover to screw on the rest of it.   Simple!

I found that 95% of the cover went on in a few seconds, but the final 3 or 4 turns of the cover would not go on by twisting.  To get those last turns on, I used small flat screw drivers to lever them on.   Even better, I realised later, would have been to use bicycle tyre levers.

The cover then snaps into place, in a most satisfying manner.

IMG_5423.JPG

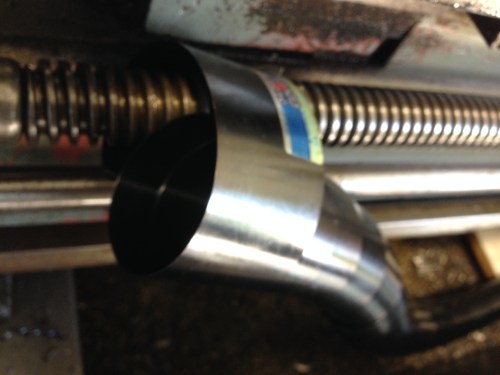
The big diameter end of the cover slipped over the leadscrew.

IMG_5424.JPG

Screwing the cover on.   Make sure to keep the small diameter coils inside the big diameter ones.

IMG_5429

One of the covers in place.  The one on the other side of the carriage is mirror reversed of course.

The compressed cover occupies about 50mm, so the carriage movement is slightly reduced.

The first time I installed these covers took me several hours.  And skin grafts and a blood transfusion.   Now that I have this technique it takes me about 5 minutes.

COLCHESTER LATHE BADGE REPAIR

Colchester  - 1.jpg

The corners had broken off and were lost.  The plastic badge was quite bent and distorted.  There were traces of silver paint on the surface of the lettering.

The two plastic badges on my Master 2500 were in a sorry state.

the Master 2500 label had corners broken off at the attaching screws, and the “World Turns On Colchester Lathes” round emblem had broken into multiple pieces, with some of the pieces missing.  The plastic material of both badges was quite crumbly.

I removed the badges, retrieved the larger pieces and wrapped them in packaging tape until I could deal with them.

Colchester  - 3.jpg

When I removed the disc it fell apart into multiple fragments

I considered my options…

  1.  Buy new badges.  None available from Colchester suppliers.  I have never seen any on Ebay.
  2. Scan the badges and print new ones with a 3D printer.  No one that I know has a scanner which would do this.  Also, the round badge is in pretty bad condition even for scanning.
  3. Draw up new badges and CNC them in aluminium or MDF.  I might end up doing this.  I have drawn up the round badge, but I cannot exactly reproduce the graphics.  I will keep this method in reserve.
  4. Patch the existing badges.   This is what I did.  It might not be the permanent solution, but it will do for the time being.  Read on.

Firstly   I glued the round badge together as accurately as possible.  This was difficult because the plastic was crumbly, and the plastic was distorted, not flat.

Then I cut some 3mm aluminium sheet slightly larger than the existing badges.

Then I used 5 minute Araldite to glue the original badges to the aluminium sheet.  I do not know what the plastic type is, so I am not sure that the plastic will adhere with the Araldite to the aluminium, but I did score both surfaces.

Colchester  - 4.jpg

Gluing the badges to the aluminium backing plates.  I used a generous volume of Araldite to fill the gaps.

After the Araldite set, I used a linisher to reduce the aluminium edges level with the plastic edges.

I used epoxy metal repair to fill the gaps.

Colchester  - 6.jpg

I used a sharp knife to trim to shape, before the epoxy set hard.  After it set hard, I used a file to shape it further.

Colchester  - 8.jpg

Epoxy filler.  The aluminium backing adds to the security of the repair.

colchester - 7.jpg

Some of the letters were missing.  I used a sharp knife to shape the replacement letters.  Not perfect, but not bad?

colchester - 10.jpg

After a couple of hours of delicate work, it is not looking too bad?

I decided to paint the entire badges.  I had found some traces of silver colouring on the letters, so I suspect that the originals were painted.  Maybe just the raised surfaces were painted.  However I decided to paint the entire surface, thinking that the paint would add some integrity to the patches.  ie…  held together with paint.   Hey, if it doesn’t last I will go to plan B,   OK?

colchester - 11.jpg

The badges with some primer.   I quite like this colour.  It does go quite well with the lathe.    Some of the cracks still show, but it is not too bad. Yes??

I will post some pics of the badges on the lathe next time.

A Collet Chuck for the Colchester Lathe

I recently bought a blank chuck backing plate on Ebay, hoping that it would fit my Colchester lathe.  It was $AUD110 plus postage, which, if suitable, would be an excellent price, but it was a gamble.  It was old new stock.

When it arrived I cleaned off the old, hard grease, and nervously presented the backing blank  to the lathe headstock.  It fitted perfectly!  The seller had another identical blank backing plate, so I bought that one too.  Components for the Colchester are not readily available, so I was very happy with this find.

I had a use in mind for both of the backing plates, and a few days ago I machined up the first one as per the following photos.


IMG_3330.jpg

The cast iron backing plate blank had a tough skin which a high speed steel cutter would not penetrate. So I use a carbide insert tool cutting 1mm deep to break through the skin. I finished the contact surface with a HSS tangential tool. (A diamond cutter from Eccentric Engineering)


IMG_3331.jpg

The C5 collet chuck.  I have had this chuck for a few years, purchased from CDCO Machinery (USA), but rarely used it because I was not satisfied with the accuracy.  I was very interested to see whether a very careful installation on the Colchester lathe might be more satisfactory than on the previous lathe (a Chinese lathe).  


IMG_3332

Checking the runout off the newly installed collet chuck. With a piece of 10mm diameter silver steel, the total measured runout was about 0.005mm. Good enough.  The backing plate is larger than required, but I will leave it as is in case I ever use it for another, larger chuck.   C5 collets will hold round stock 2-26mm diameter, and some common square and hexagonal sizes.   Very useful.

Lathe Spider

What!  More dangerous wildlife in my workshop? (see the previous post  about the tiger snake).

No.  Not this time.  Thank goodness.  No more highly venomous snakes wriggling between the lathe and the milling machine.  Mind you, we have red back spiders and white tail spiders in abundance here.  (both very nasty, to explain to the non Australian readers).

But in this case, a lathe spider is a tool.  Used to repair worn lathe chuck jaws.

I wondered why my beautiful Colchester lathe would not part off thin brass rod.  Should have been a doddle.  Closer examination revealed that the jaws in the Colchester 3 jaw chuck, were “bell mouthed”.  That is, worn in their outer extremities.  That is where lathe chuck jaws wear initially.

Solutions?   Buy new jaws….   none available,. anywhere that I could find.   Buy a new chuck….  a new quality chuck of this size (200mm diameter) costs between $500 and $2000.  A second hand chuck might have the same problem.

Another solution, which I have used successfully previously, is to regrind the jaws with a tool post grinder.  I have a tool post grinder, not used with this lathe, but should be suitable.

So, I spent a half day fitting the tool post grinder to the Colchester lathe.  No big deal, but it needed 2 complex bush-washers and a new tool post bolt.    It also needed the internal grinding spindle to be fitted to the grinder, a first for this grinder.

I had made a lathe spider a few years ago, for a different lathe and chuck, and it fitted the Colchester!

IMG_3099

The 200mm Colchester lathe chuck, and the spider, made years ago, which fitted!

I spent another few hours fitting the spider, grinding the jaws, and the measuring the run out of the chuck.  The spider permits the jaws to be tightened inwards, against pressure, then the jaws can be reground using the tool post grinder.

Using the tool post grinder to resurface the jaws.

Using the tool post grinder to resurface the jaws.

A very frustrating few hours!!!

Despite multiple runs, grinds and measurements, I could not get the runout to acceptable levels.  The best was 0.1mm which is totally not acceptable.

I wondered whether the spider was just not accurate enough.

I also noted that the runout was better (0.05mm) if the jaws were not tightened heavily in the measuring phase.  I wondered if the chuck scroll was badly worn, which would mean a new chuck!

So, I searched the net.  And found a picture of another style of lathe spider,  and I determined to give it a try.

Today, I used the CNC mill to make the new spider. Actually, 3 parts which are fitted individually to the chuck, to give the same effect.

IMG_3095

CNC Milling the lathe chuck spider components.

The new version lathe spider bits, clamped to the lathe chuck

The new version lathe spider bits, clamped to the lathe chuck.  This spider is made from 6mm thick aluminium.  This photo was taken after the jaws were reground, as you can see.

I ran the grinder in and out a few times, re-measured the runout.   Zero, zilch, nada, niente.  No movement of the dial indicator.  So the indicator must not be touching the test piece, or pushed in so hard that it cannot move.

So I checked the positioning of the indicator, and ran the test again.

Again, NO MOVEMENT AT ALL!

So the runout, at least at this diameter, is zero!

So I tried a smaller test piece.  Same result.

So I tried really tightening the jaws hard.   Again no movement.

I must point out that when I tighten the jaws for measuring, I always tighten the jaw which is nominated by Colchester.  I tried tightening the other two jaws, and found 0.1mm runout.  So, the nominated jaw tightening really works.  It is not bull shit!

And this lathe chuck spider method really works!  It just needs to be made really accurately!  (did I say before that I really love CNC).

Next step.  Totally disassemble the chuck, and carefully and fastidiously clean every component, then reassemble it with new grease.  To rid it of every trace of grinding wheel dust, which could destroy it in no time at all.

I was delighted to see that the internals of the chuck looked perfect!   No signs of wear at all.  Very happy.

The disassembled lathe chuck

The disassembled lathe chuck 

Digital Read Out (DRO) for Colchester lathe, and problems with Apple Mac

WTF is going on with Apple?

Since Steve Jobs died, I have had nothing but difficulties with My Mac.

I upgraded to the latest operating system for my Mac, and since then I am unable to insert photographs into my Word for Mac.  And it is a real hassle trying to insert photos into this blog.   That is one reason why my posts have been less frequent lately.

There has been a couple of patches for the latest Mac OS, but still problems.  Are they competing with Microsoft to be the most user unfriendly OS?

Anyway, I have not done much on my Triple expansion steam engine.  Any spare time in the past few weeks has been spent on the Colchester lathe.  The quick change tool post from the USA has been a big success.  I have been installing a digital read out for the past few days.  Finally hooked it up today, and it works.

IMG_2986

It is not CNC, but is the next best thing.  The imperial lead screw and imperial dials are much less relevant, when you have a DRO, which is set to metric.  And I really like setting the cross slide to diameter mode, being able to set the micrometer readings on the workpiece to match the readings on the X axis on the DRO.  Of course the Z axis readings remain set for actual movement, mm=mm.

The DRO came from China via Singapore, from thedrostore.  I have bought several DRO systems from thedrostore and they have always been relatively cheap, well packaged, fast, and with comprehensive instructions.   Thanks Scott!

The installation of cross slide scale on the Colchester was problematic, due to limited space, despite buying the “mini” scale, and I eventually positioned the scale on its side.  Said to be OK by thedrostore instructions.

I do not have space to install the Colchester in my workshop, so it is still sitting in a storage shed, on a pallet.  I am supposed to sell some other lathes, to make space for the Colchester, and to appease SWMBO.  But I have a real problem.  I just cannot part with any of my other lathes.  I obviously have a disease.  What to do?

New (to me) Toolpost for the Colchester

I have been looking for a replacement tool post for the Colchester Master 2500.  The one which came with the lathe was broken, and it had only 2 tool holders.  Hmmm…  Surely I would have noticed that during my fairly detailed inspection.  Other small bits were missing from the pile of accessories on the pallet too.  I should have taken photos.  The photos on Ebay were distant and blurred.  (I wonder why….).   Buyer beware.

So I have been checking Ebay Australia.  Only Asian copies, and not cheap.

Ebay UK.  A few genuine Colchester tool posts on offer, but very expensive.

Ebay USA.  Again, a few on offer, and one in particular looked interesting.  A Dickson style tool post, with 6 tool holders.  Said to be suitable for a US version of the Colchester, but a larger lathe than mine.   So a quick question to the seller about postage costs (where does Ebay come up with their estimates?  The Ebay estimate was double what I finally paid) and the seller agreed to put the items in two  “Flat rate boxes”.  I paid his buy it now price.  I took a gamble on the apparent lathe size discrepancy, figuring that I could resell the items on Ebay Australia if they were totally unsuitable.

4 days later, the parcels arrived.  I have bought quite a few items from the US, and invariably the service has been fantastic and fast.  I do feel a bit guilty about the energy and pollution involved with buying tools from far off countries, but there is no viable local alternative.

IMG_2957

The tool post was exactly the correct size.  The exterior  had been cleaned up, but the workings required some freeing up.  The tool holders were the same size as the two I had already, so now there are 8 tool holders….   a goodly number.  The brand label had worn off, but it appears to be exactly the same as the original Colchester.

The final cost?   $US250, plus $US125 for postage.   All up about $AU500.  Pity about the exchange rate.

Colchester Master 2500.

When buying a machine which is about 45 years old, one expects to find problems.  My inspection prior to purchase showed no dings, no broken gear teeth, and quite minimal backlash.  I could see that the leadscrew was a bit worn.  And the graduated dials would not rotate independently of the handles.  And the entire machine was very dirty.

I have been taking a much closer look since getting it onto the shed floor.   It has been cleaned, handles freed up, snd examined.  So far I have been very pleasantly surprised.  No nasty discoveries.  Not yet run under power, actually cutting, so I still have some reservations.

I did note that the Colchester tool post has only one functioning tool station, and there are only 2 tool holders, so I have factored in the purchase of a new quick change tool post and some tool holders.  I also intend to install a digital read out on the 2 axes.

But overall, so far, I am really pleased with its condition.

IMG_2864

The Colchester Master 2500.

IMG_2867

The plastic labels are crumbling with age.  I am planning to CNC some new labels in aluminium.  If any reader happens to have a spare label, or a scanned image, I would like to hear about it.

IMG_2865

IMG_2868

BUYING A LATHE

I decided to buy another metal lathe.  For a few years I have been using a Chinese heavy duty machine, a GBC,  which was 1000mm between centres and a swing of 400mm.  It is a heavy duty machine, weighs 2 tonnes, and does its job.  For turning large objects, up to 400mm diameter, and taking off large amounts of swarf quickly, it is excellent.  But I must admit to a lack of pride of ownership of this machine.  Particularly after being exposed to British workmanship in my small Boxford.

So I had a look around, and settled on a Colchester Master 2500.  It is less than half the weight, and physically smaller, although the work dimensions are similar to the GBC.  I persuaded SWMBO that if I sold the GBC, the small Taiwanese lathe, and the 2 Smart & Brown lathes which I had restored (see earlier posts), I would just about break even, have more space in my workshop, and there would be less stuff for her to get rid of if I happen to cark it at some inconvenient time.  Also, the Colchester should not be difficult to resell.  It has an excellent, almost legendary, reputation, and as I discovered, commands high second hand prices.

This process was actually jogged by seeing a Colchester on ebay which was of interest.  It was cheapish, no bids, and the photos were awful quality.  So I rang the owner.  He had bought the lathe 3 years earlier, but had never used it because he did not yet have 3 phase power.  The owner before him had used it to make hinges or something similar, as a backyard industry, and before that it had been in a school.  In my experience, school lathes tend to show little wear, but often show evidence of crashes.  The owner sent me photos of the bed, which did show dings from crashes, but nothing terrible.

So, full of optimism, I hooked up the tandem trailer to the old Landcruiser and drove the 250km to the other side of the state.  To cut the story short, the lathe looked OK, but when I removed the gearbox cover, first the oil was old, black, and thick, one gear had a tooth missing, and another was severely worn.  I took the owner at his word that he did not know about this condition (possibly correct), thanked him for his time and went home.  It had been a pleasant drive.

(note added 23 June 2015.  The seller is still advertising his lathe, same price, no mention of the broken and worn gears.  I am inclined to think less charitably about someone who would let a buyer drive 500km and not be honest about the item being sold.)

Next stop was a machinery second hand dealer.  They had 7 Colchesters, from a University workroom closure.  They were much more expensive, had been nicely cleaned up, had all of the chucks, steadies, tool holders, manuals etc.  I did seriously consider one of these, which had a few dings on the bed, but otherwise looked good.  I decided to sleep on the decision.

Next day, I visited two more ebay sellers with Colchesters.  I have racked up about 800km looking at possibilities.  The first was from a factory close down.  It was dirty, old, and had only a 3 jaw chuck.  Despite its industrial past, it showed little visible evidence of wear.  But the reversing handle would not stay engaged.  No big deal according the owner, just a spring to be replaced.  Hmm…..    The price was OK, but not negotiable.  I would think about it.   Quite tempted with that one.

Then a tollway trip to the other side of Melbourne.  My last option.  In case you were wondering, this plethora of Colchester lathes is very unusual.  I have been looking for this model for about 2 years, but have never seen more than one Colchester Master 2500 advertised within striking distance at one time.  So having 7 or 8 to examine has been fantastic and unusual.  Maybe everyone is wanting CNC these days.

The last one was an ex Department of Defence machine.  It was midway in the price range, but negotiable. I could not fault it.  It was tight, no dings at all, had clean oil in the gearbox, gears all intact, and had a full range of chucks, faceplate, tool holders, steadies etc.  No manual.  Needs a repaint.  Probably 25-30 years old.  (note added 23/6..   more like 45 years old!) Being DOD, it would have been fastidiously maintained.  So what was the catch?   I could not find one.   I negotiated a lower price, and shook hands.

Next to pick it up.   Then to sell my existing lathes.

Watch this space.