machines which I have made, am making, or intend to make, and some other stuff. If you find this site interesting, please leave a comment. I read every comment and respond to most. n.b. There is a list of my first 800 posts in my post of 17 June 2021, titled "800 Posts"
I never imagined that coppering the hull of my HMS Bellerophon model would run to SEVEN posts! Well here is number 7, and I imagine that there will be another one or two after this one.
Yesterday I started laying the embossed copper strips, starting at the keel.
But after applying 2 strips on the starboard side I decided that I would then apply the matching strips on the port side.
But that involved changing the embossing wheel on the jig. Doesn’t sound like much, but it does involve some mental gymnastics and could foresee that if I made a habit of changing sides every few strips, eventually I would stuff up the setup.
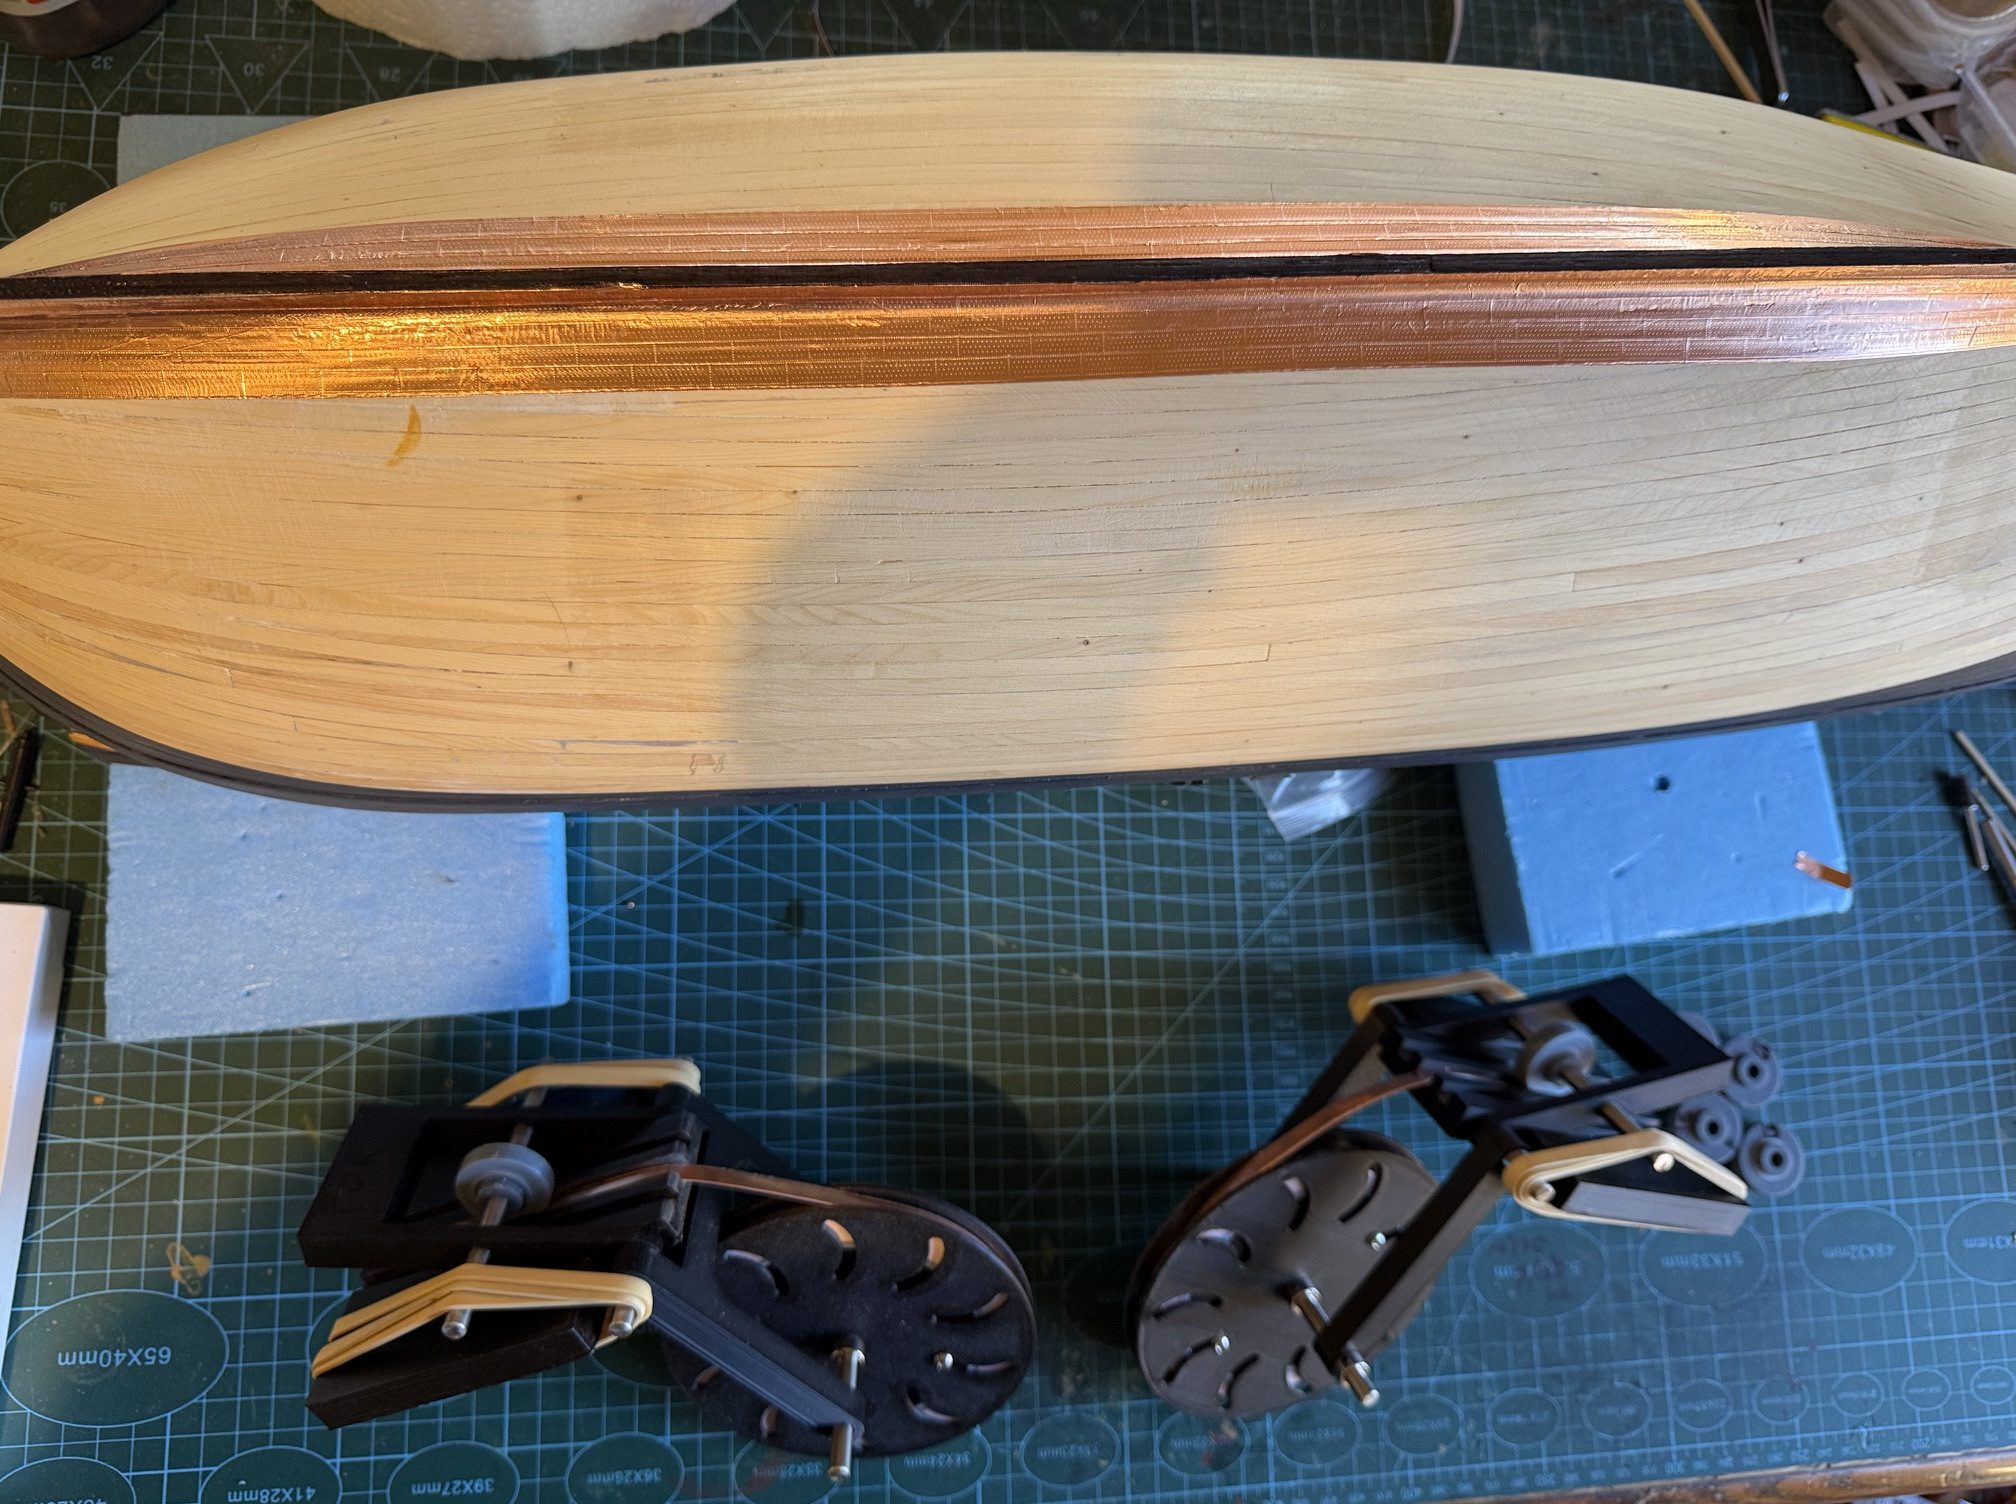
So, I stopped, and printed another jig. So now there is one jig for port and another for starboard. And in the process I made some improvements to the designs for the new jig, and then had to make the same improvements for the other one. All in all, it took about a full day.
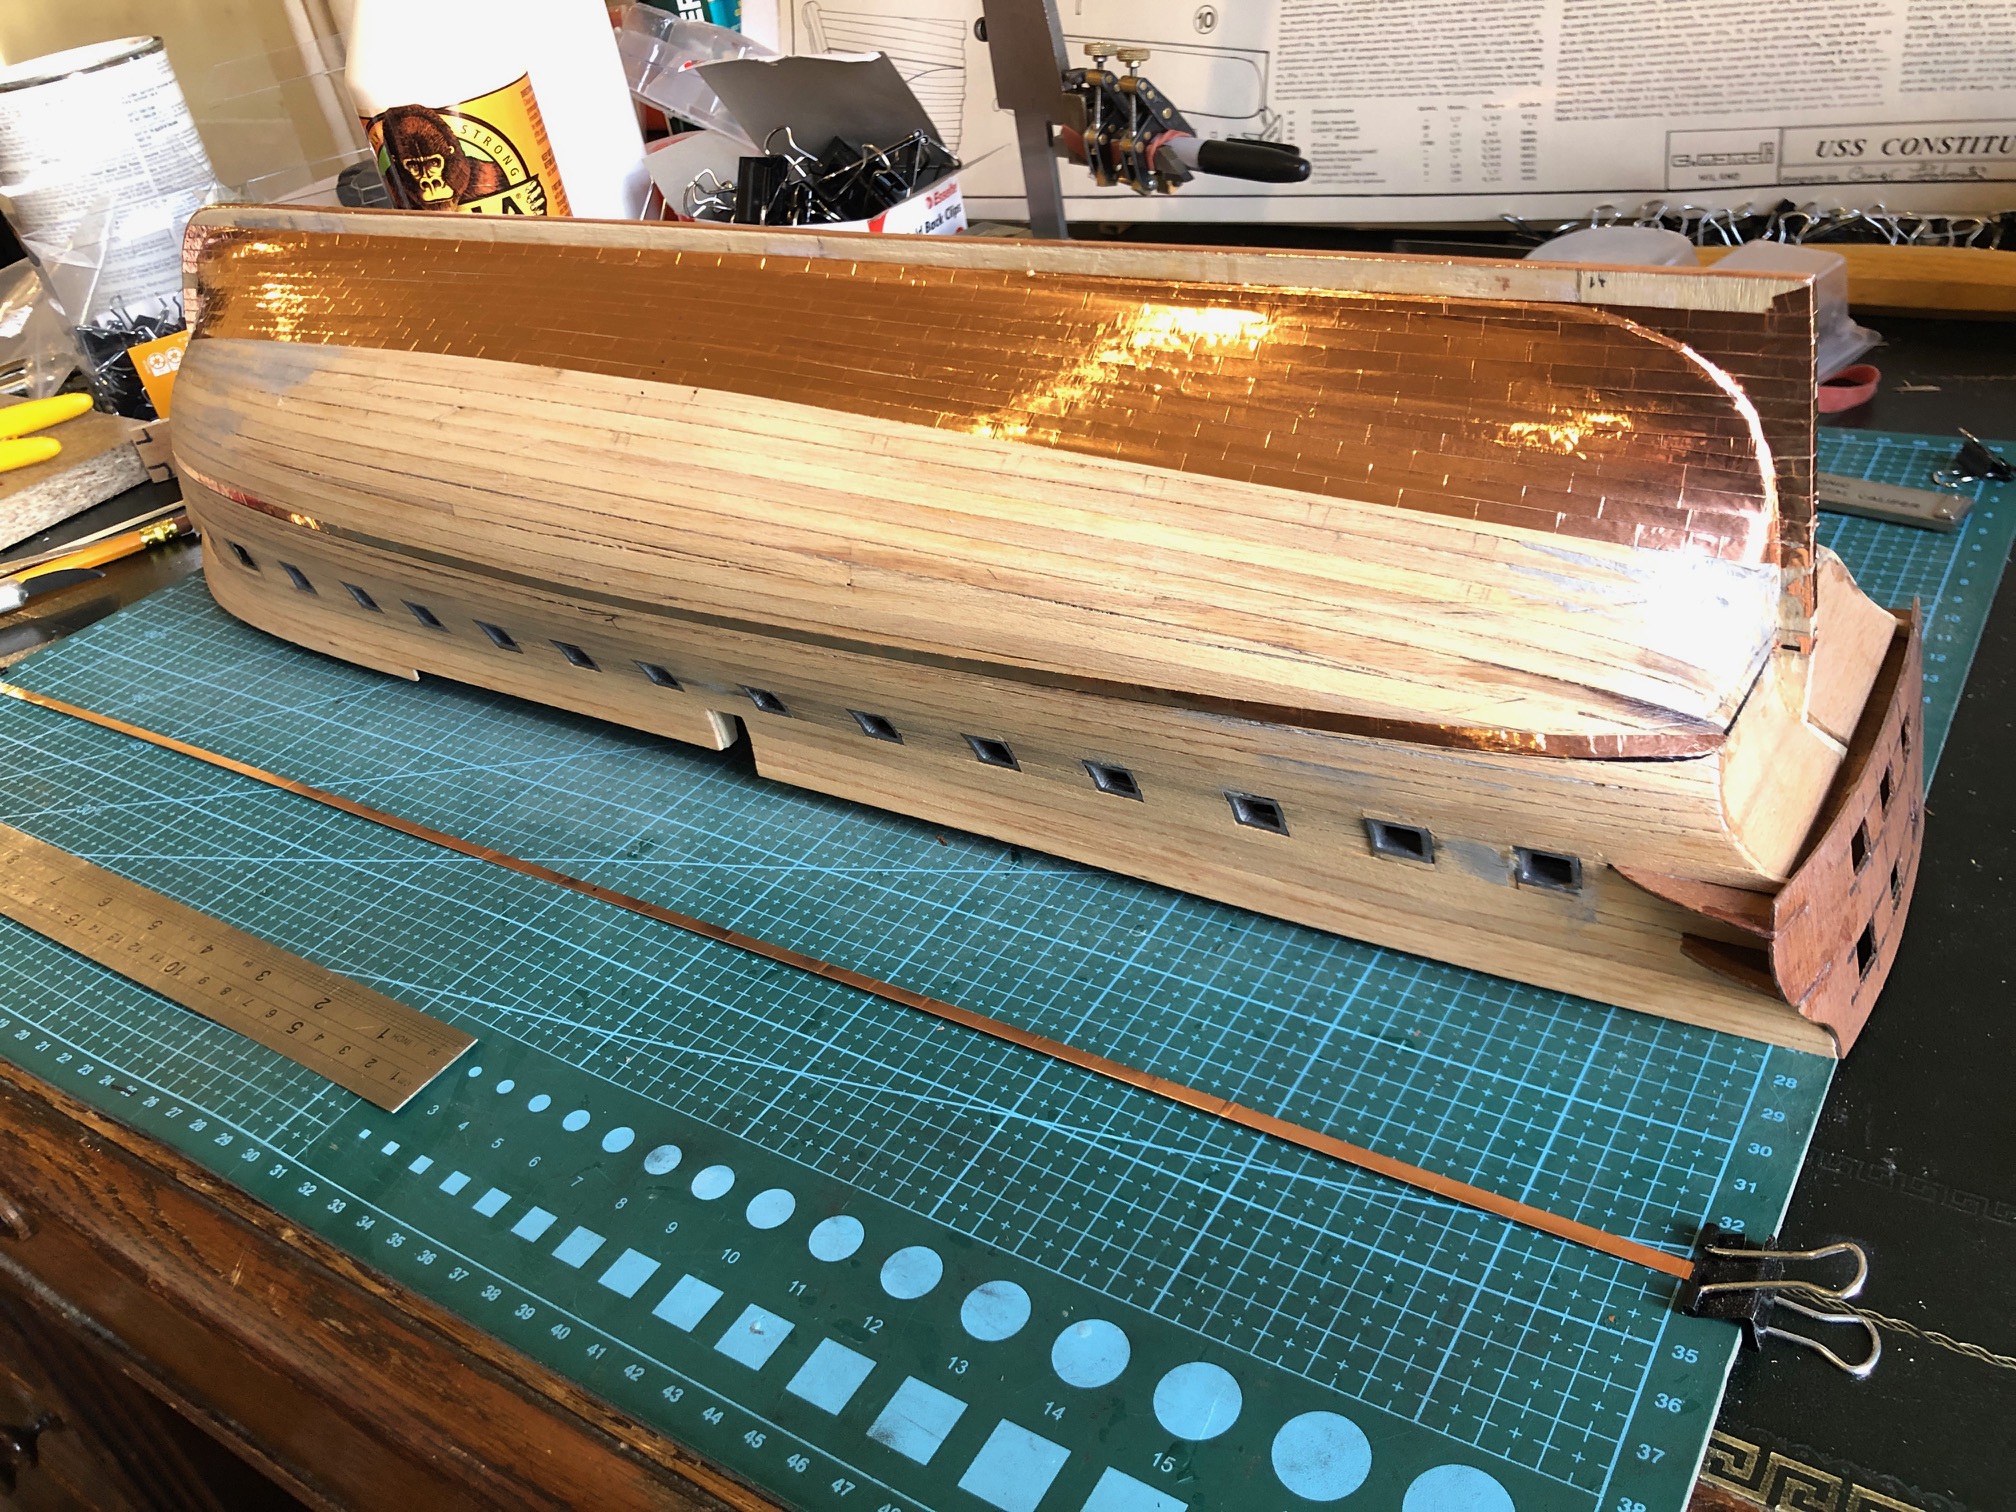
But after lunch today I made and applied 5 strips on each side. And touch wood, it all went pretty well….
The first 2 strips on each side were the most difficult, and I do admit to scrapping a few strips. The next 3 on each side went on much more quickly, but then I lost the light, so stopped for the day.
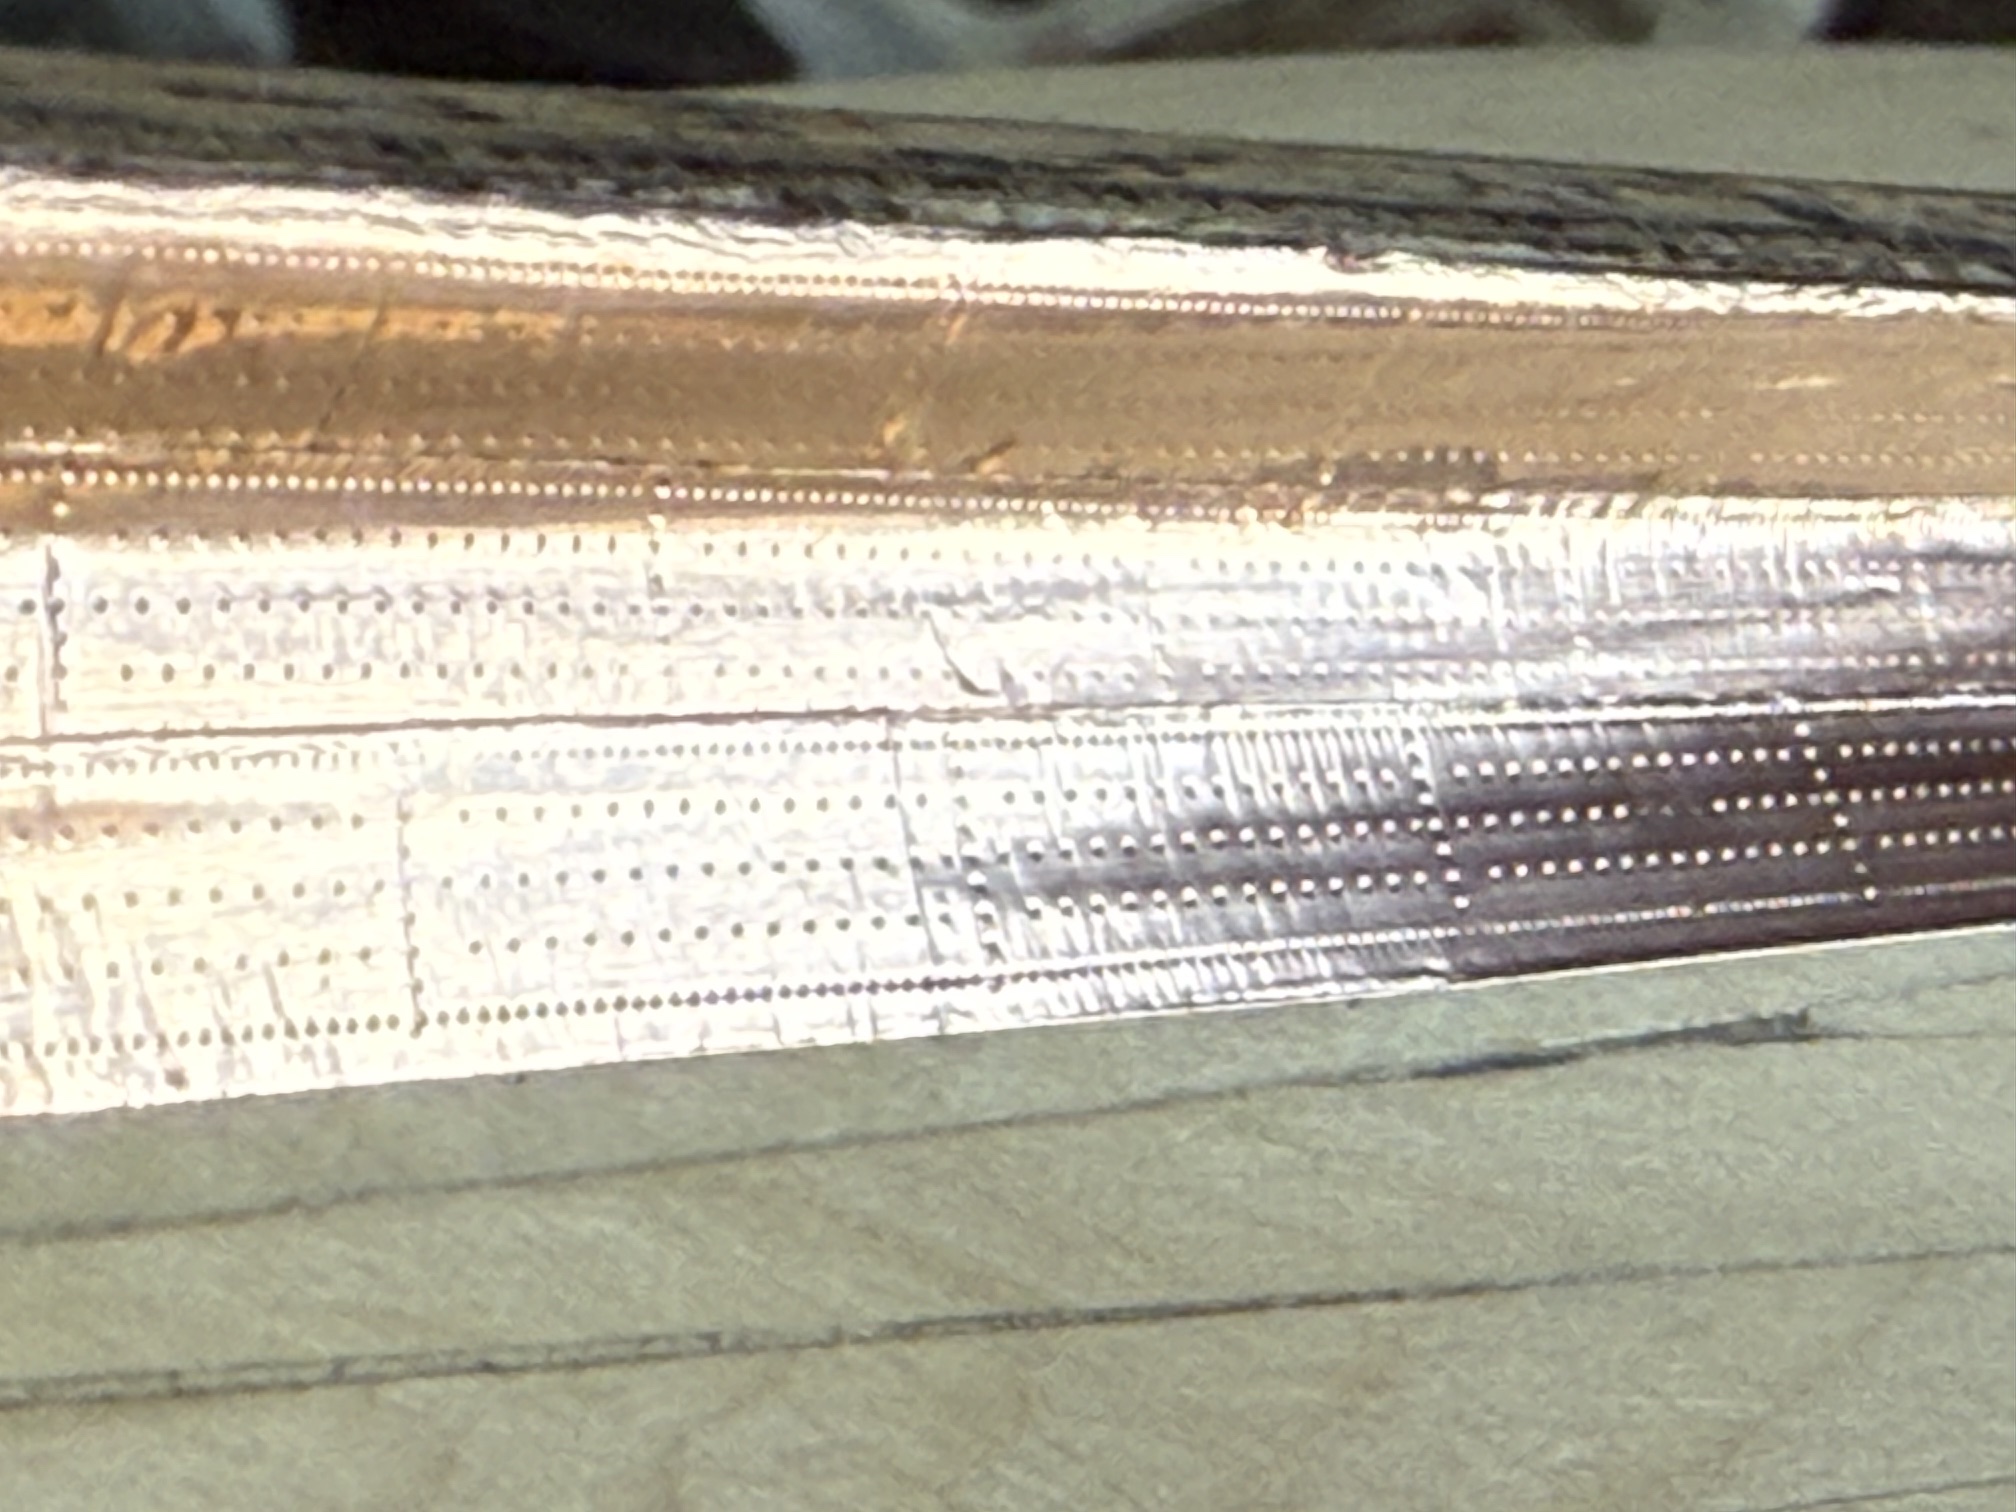
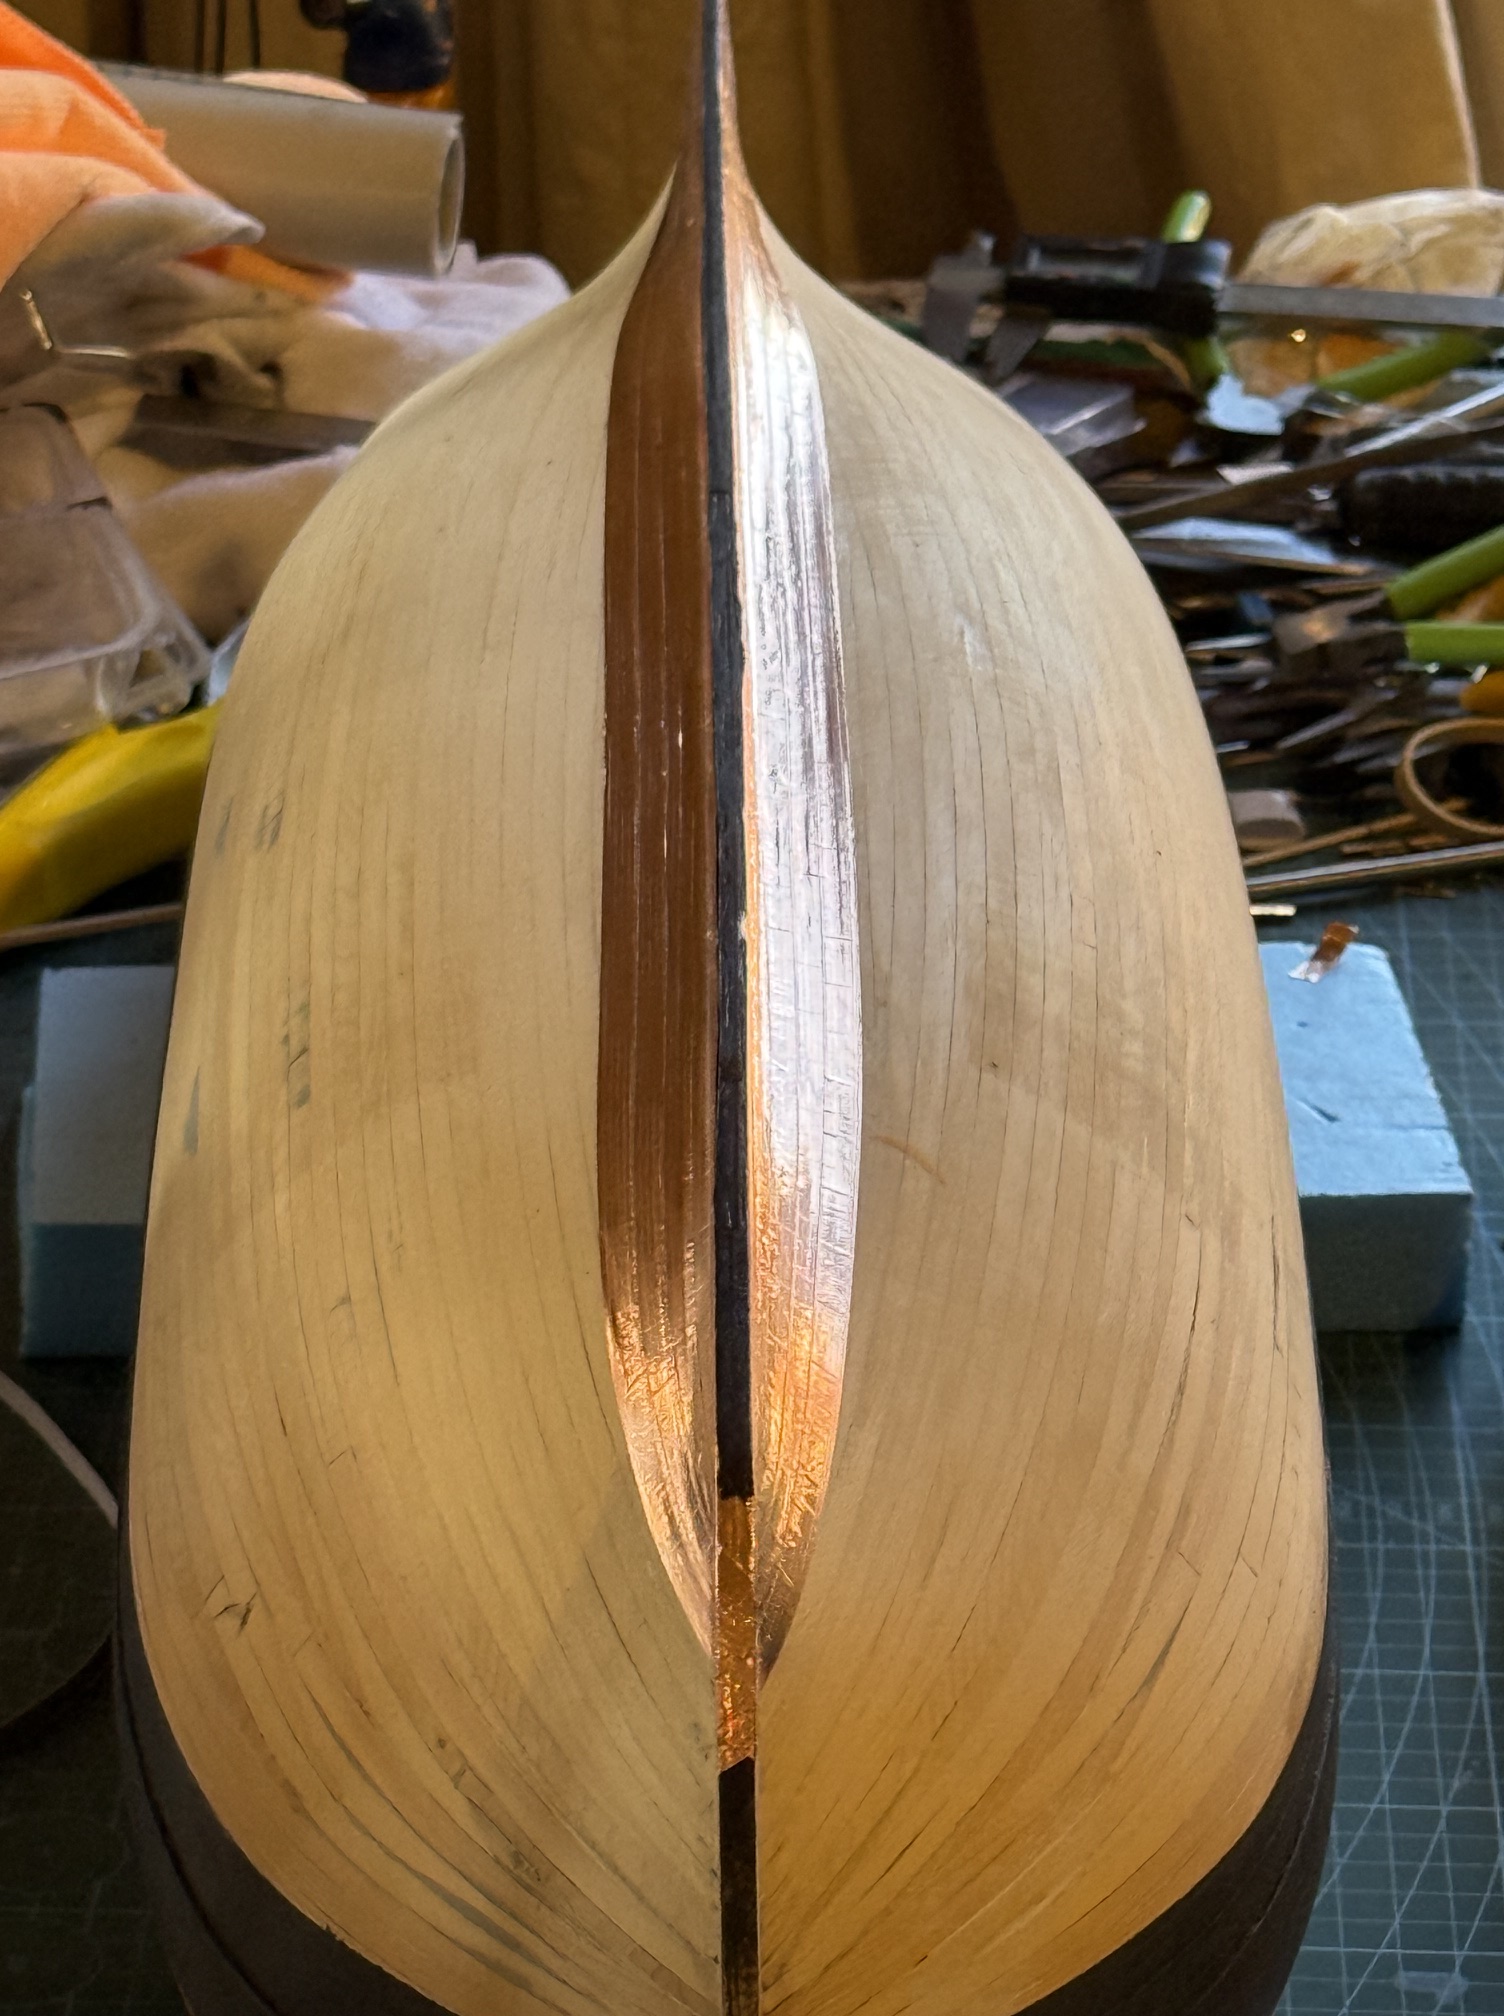
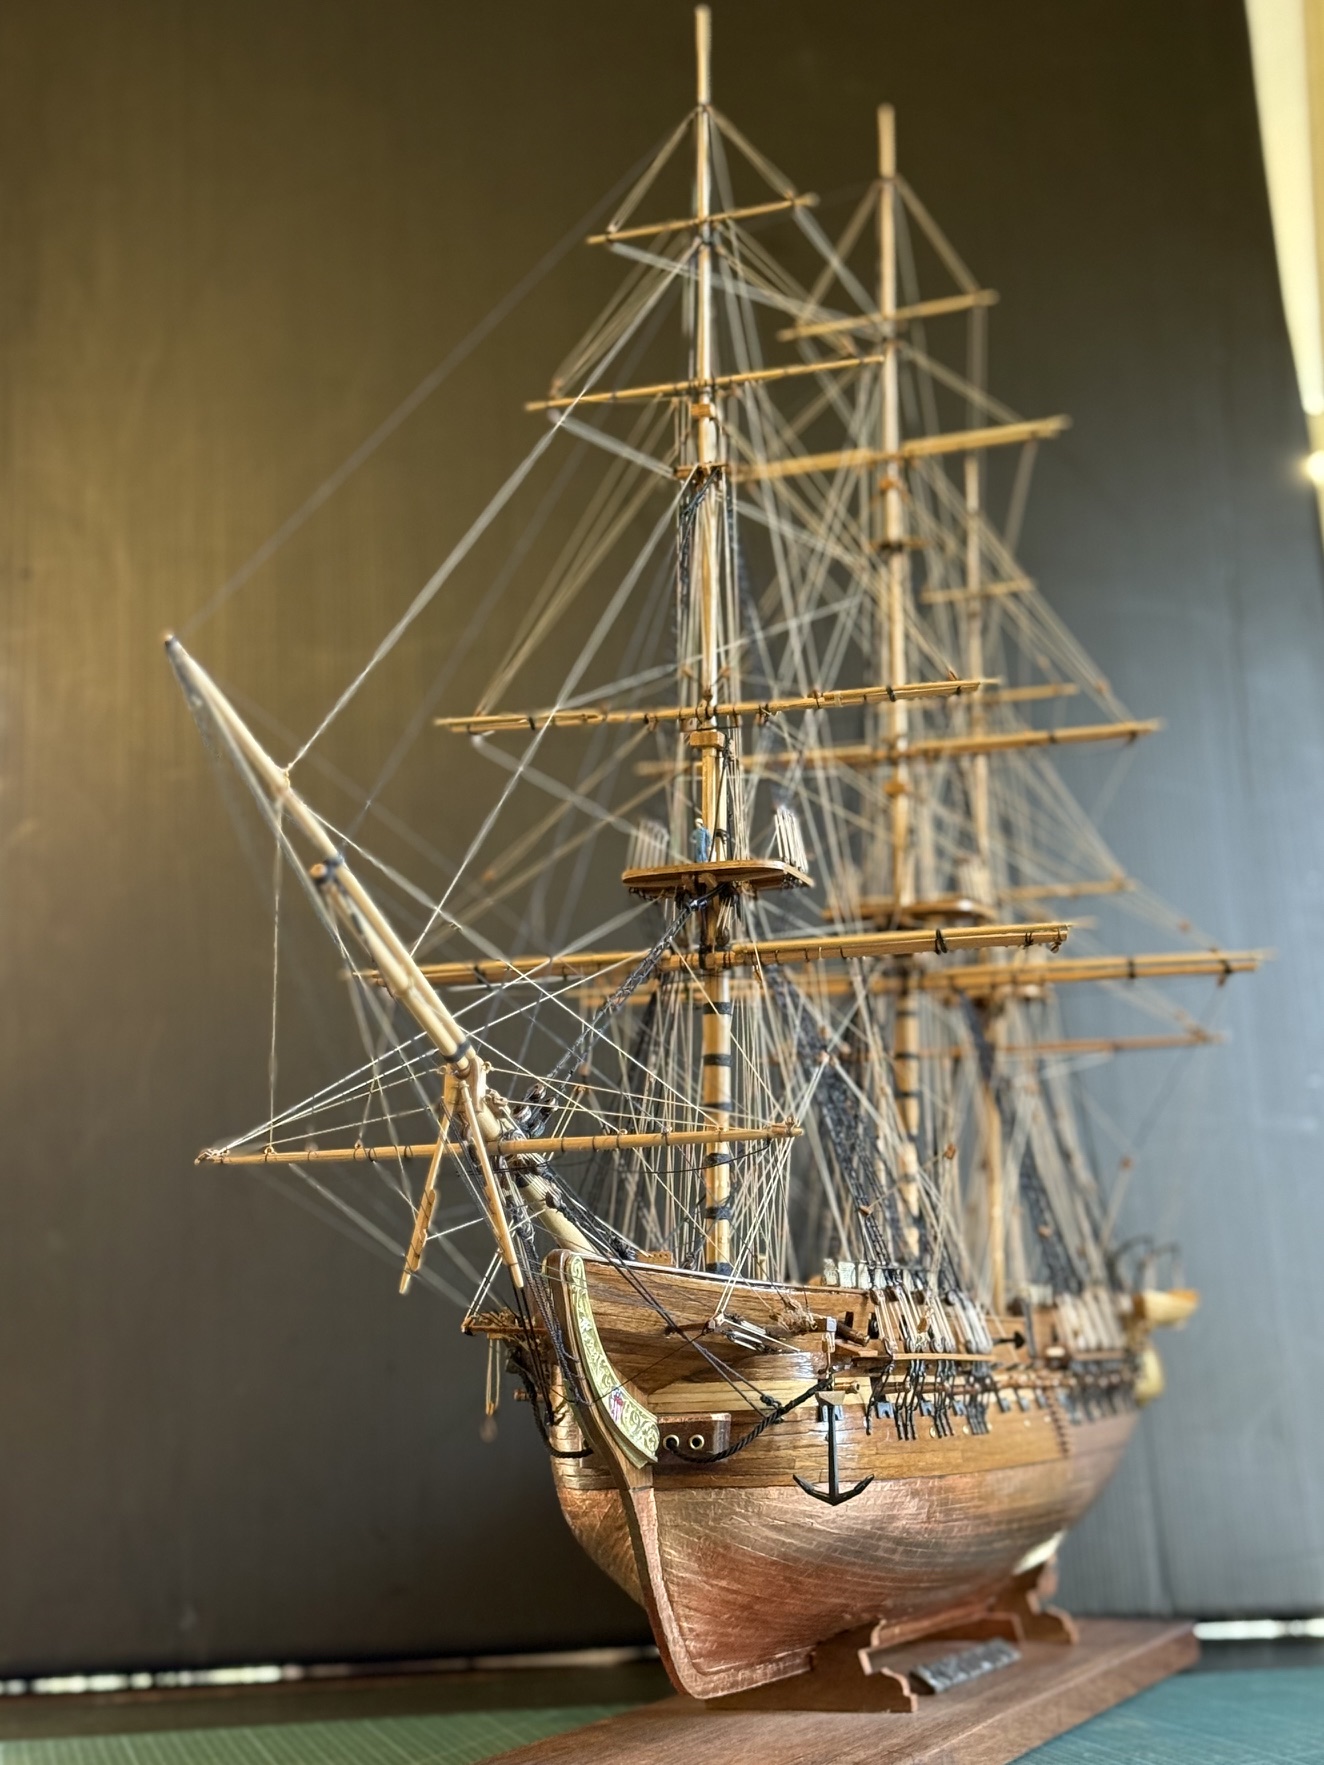
The two embossing jigs, and 10 embossed copper strips applied. From this distance the nail heads and individual plates are not very visible but in some lights they are quite visible. The bottom of the keel was not sheathed in the original, because it had a separate rubbing strip, a wear item. It did have closely spaced copper nails in the wood to discourage the teredo worm.This is the appearance I was aiming for. The copper is rather shiny, but I expect that it will dull and tarnish in time. Meanwhile I rather like the shiny bling.
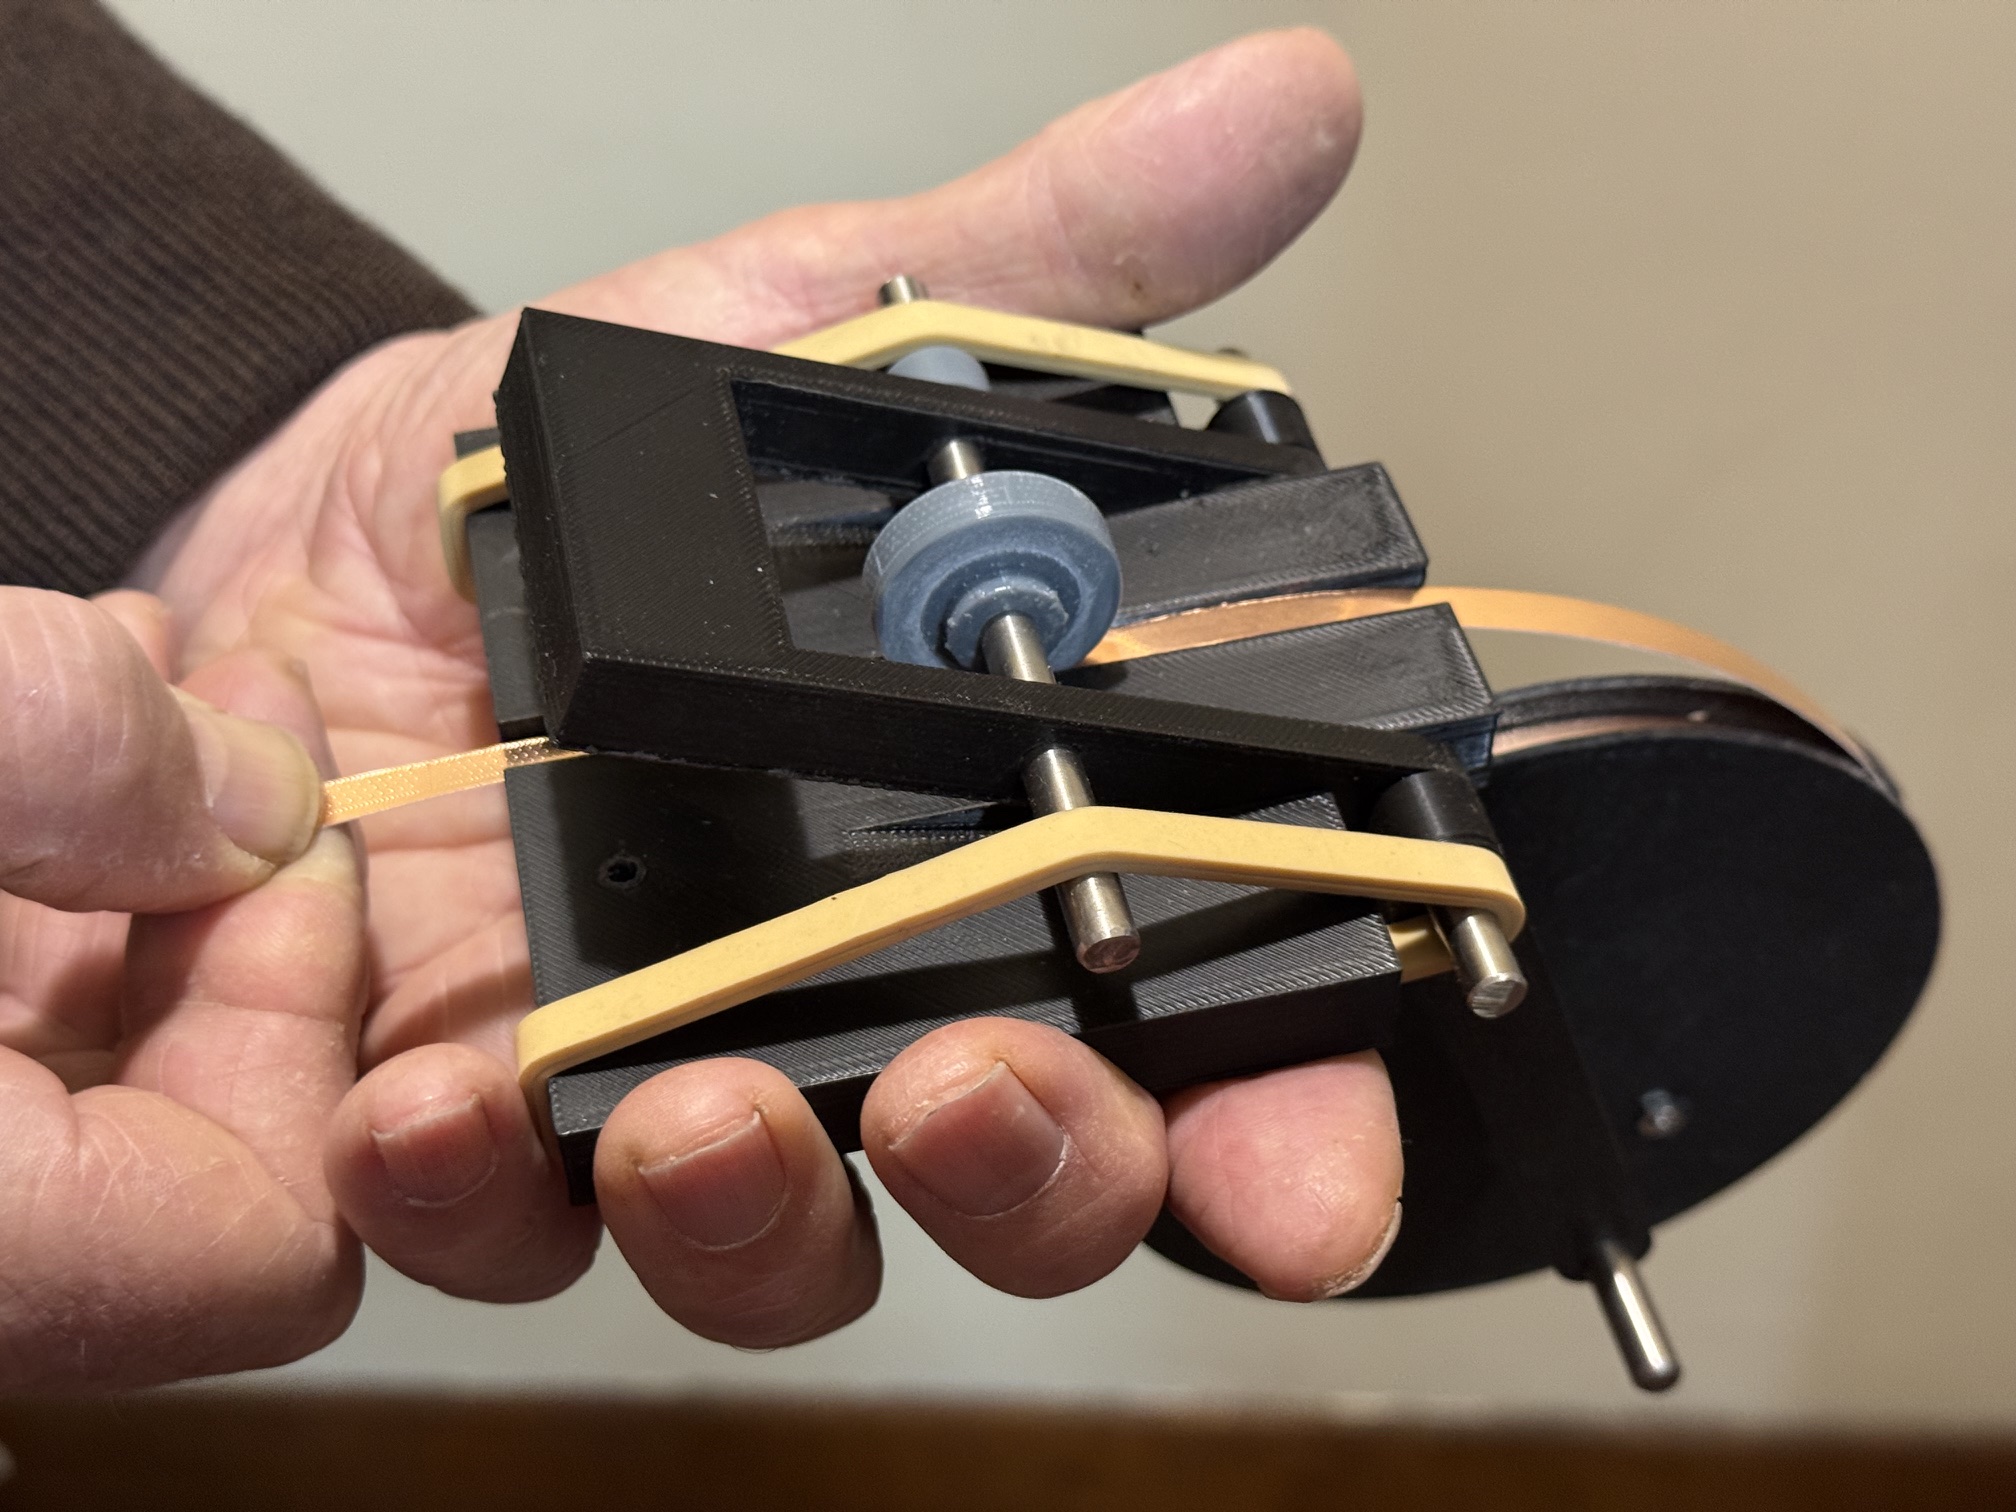
I have made some changes to the structure of the copper tape impressing jig, and think that it is now quite good.
The arms supporting the feed wheel have been beefed up; the feed wheel itself now has 2 bolts with nuts squeezing the sides together, and the impression wheel gantry has been stiffened with a bigger flange. The collars are not necessary and have been removed.
You will also notice that I am holding it in my hands, rather than using a bench top or vice to support it. The control is better in my hands, and I can use my underneath finger to put put a little bit of pressure on the feed wheel to stop the tape from unravelling.
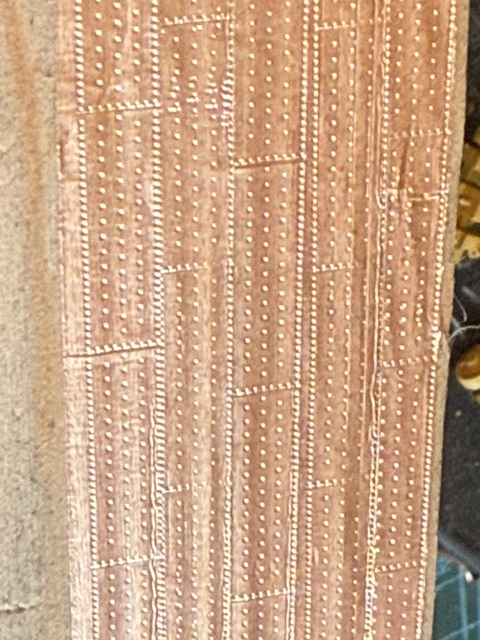
And I have had a little practice session, applying the tape to a piece of scrap wood…
Hmmm. Might need a bit more practice with controlling the overlap? Some of the crinkles are due to the rough wood surface.
And maybe those nail heads are too big? The impression wheel protrusions were deliberately made twice as big as the 1:72 scale dictated for reasons of strength… I dont want the protrusions to break during use. But the spacing is correct and the peripheral heads do look crowded?
Another resin print run of some smaller impression sizes impending.
I think that I am a day or two away from coppering my Bellerophon.
I have decided that I will again use electricians adhesive copper tape to copper the hull of my 1:72 model 74 gun ship Bellerophon.
I used 5mm wide copper tape for my model USS Constitution in 2025 and it was reasonably effective.
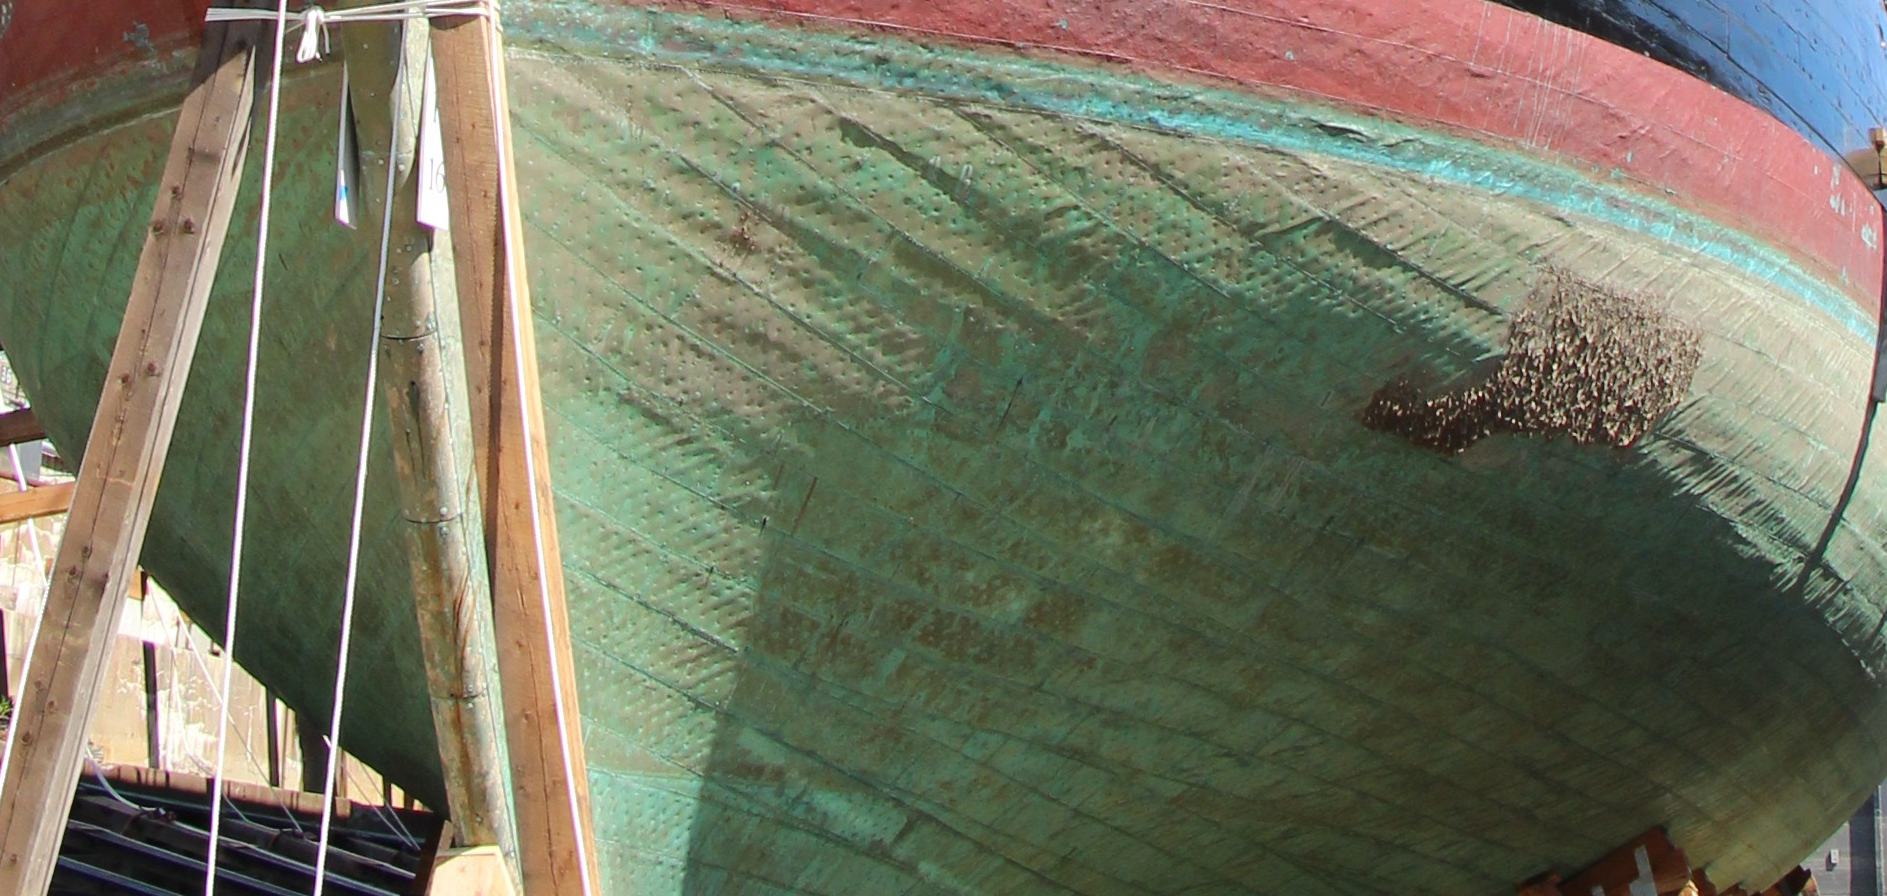
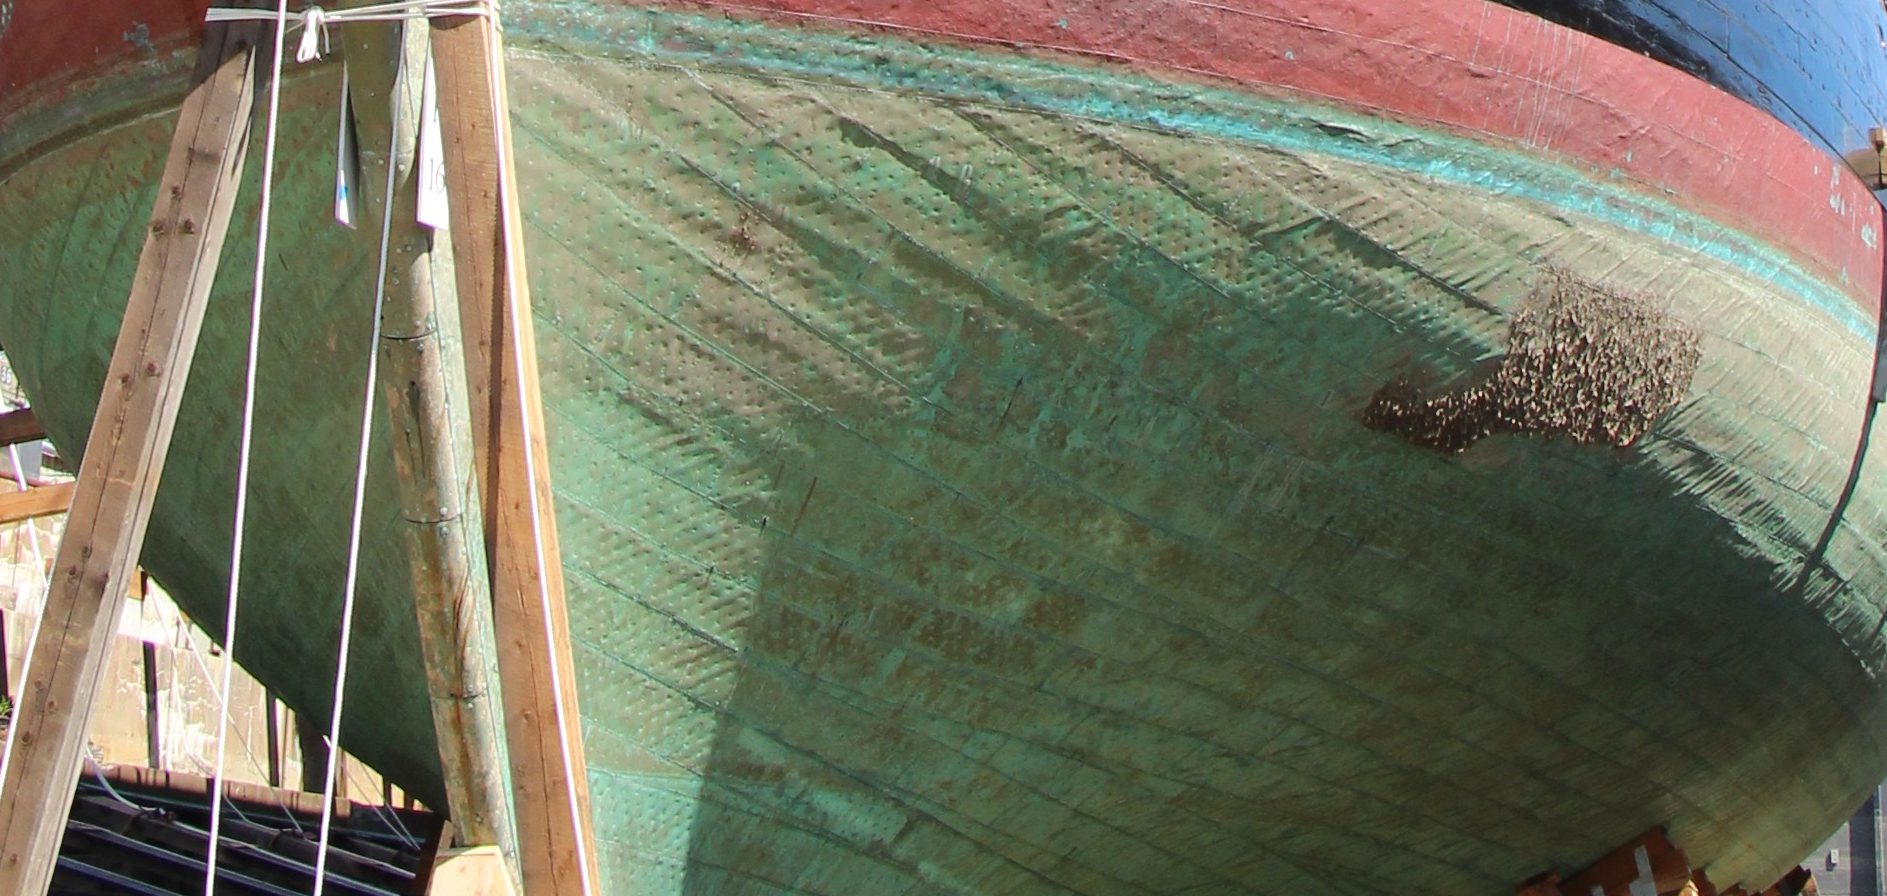
I was persuaded that at 1:93 scale the nail impressions would not be visible on my Constitution copper plating, but in researching the topic for Bellerophon I came across this photo of HMS Trincomilee, a frigate made 1817 in Bombay for the British navy.
HMS Trincomalee is still afloat, although this shot was taken when she was in drydock for repairs. Even though the coppering is not original it does show the nail positions by the dimpling which the nails produce in the copper sheets. Somewhat confusingly, it also shows the upper sheets overlapping the lower ones, which was not the practice for British ships of war in the original era. From this distance of a few meters the dimpling is clearly visible.
So I decided that my Bellerophon model would have nail heads showing on the copper sheets.
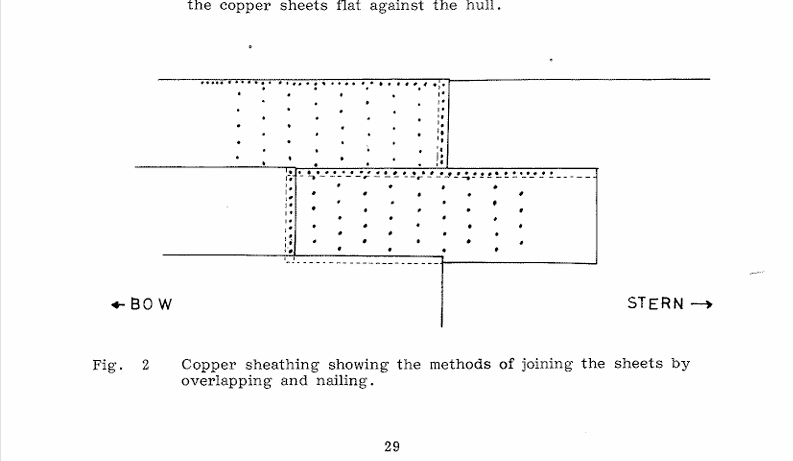
For the nail pattern I used a diagram from Mark Stanforth’s monograph “The Introduction and Use of Copper Sheathing – A History” which shows the front sheets overlapping the rear ones AND the bottom sheats overlapping the upper ones. This overlap apparently only occurred in Royal Navy ships. On merchant navy ships the upper plates overlapped the lower ones. I can find no explanation for this difference.
The diagram also shows the location and nail spacing of the edge nails compared with the centrally located ones.
While not copying this diagram precisely for my Bellerophon, it was very influential.
I removed every alternate nail impression of the edge nails because at my 1:72 scale they would have been only 0.5mm apart. I might yet reintroduce them because one eagle eyed member of my model engineering club imediately spotted the difference today.
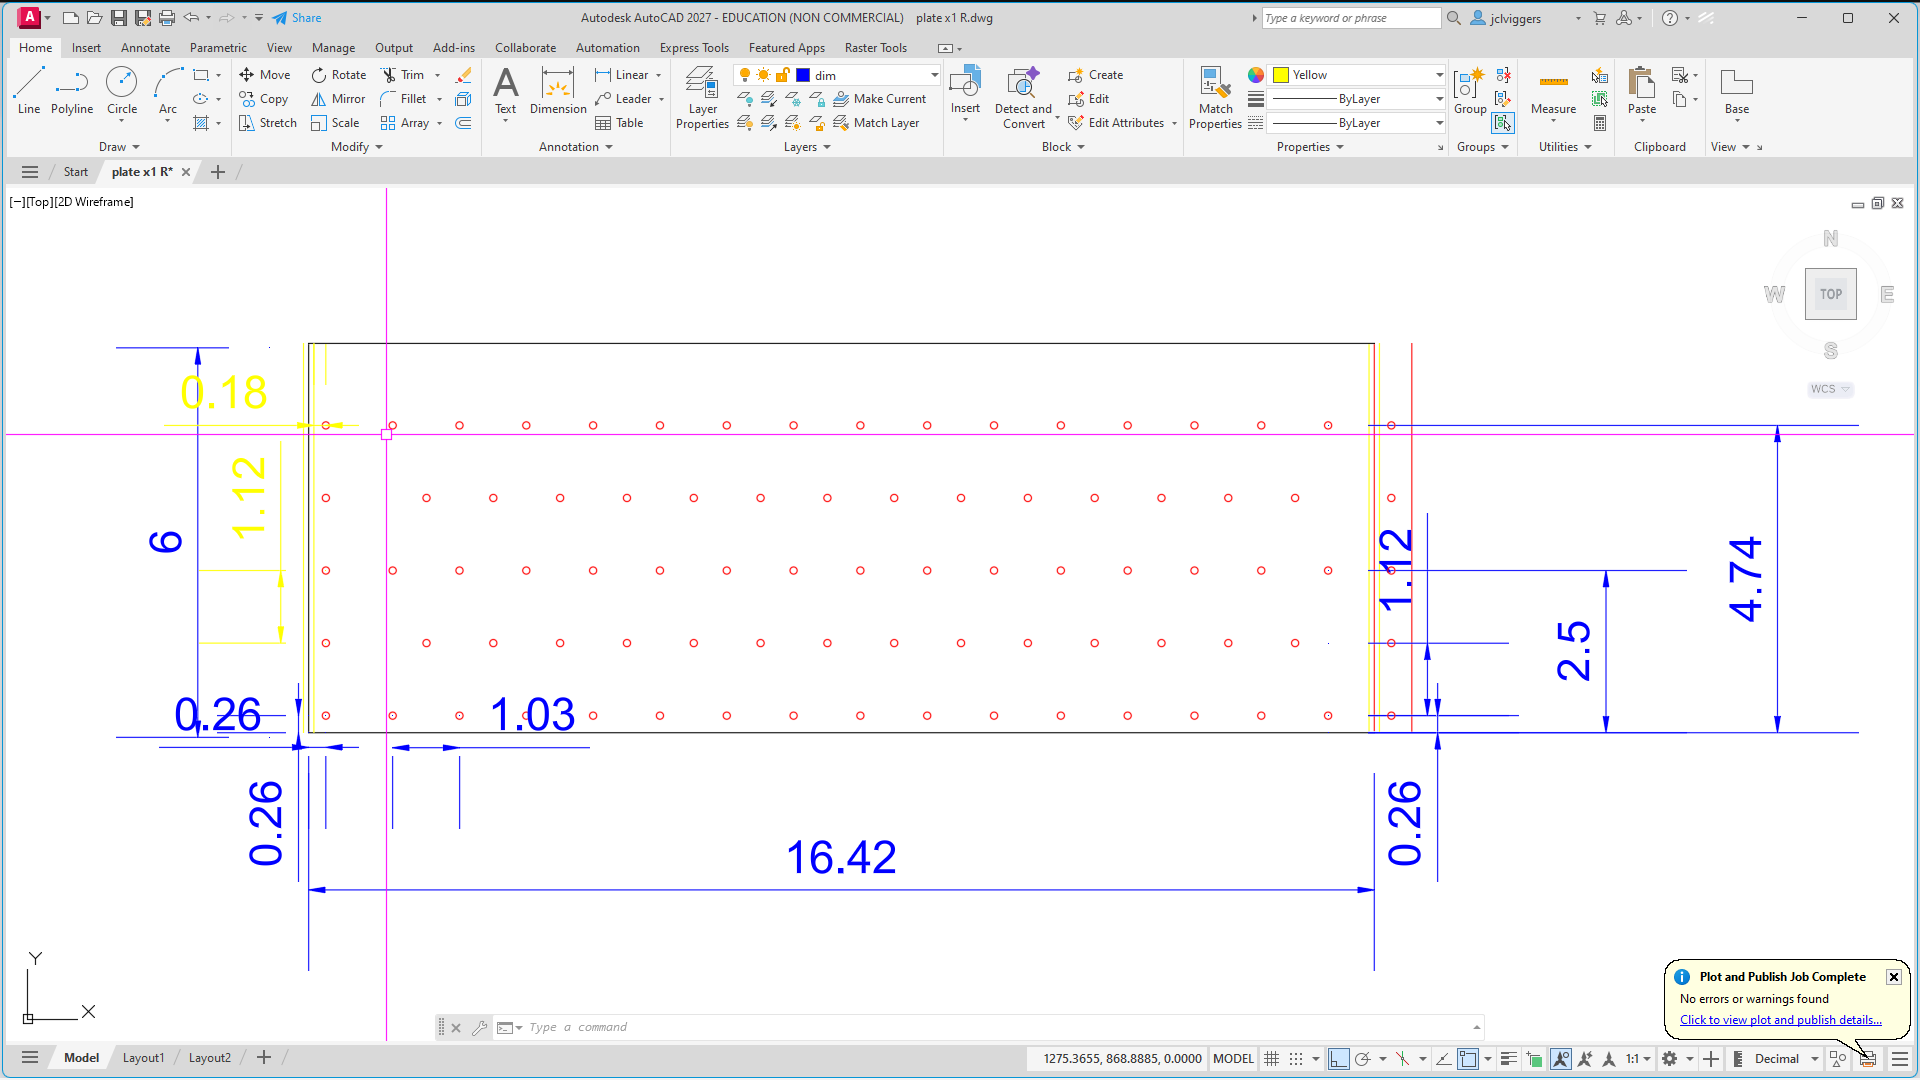
As you can see I drew up the pattern in AutoCAD, saved it as a dxf file without the dimensions and borders….
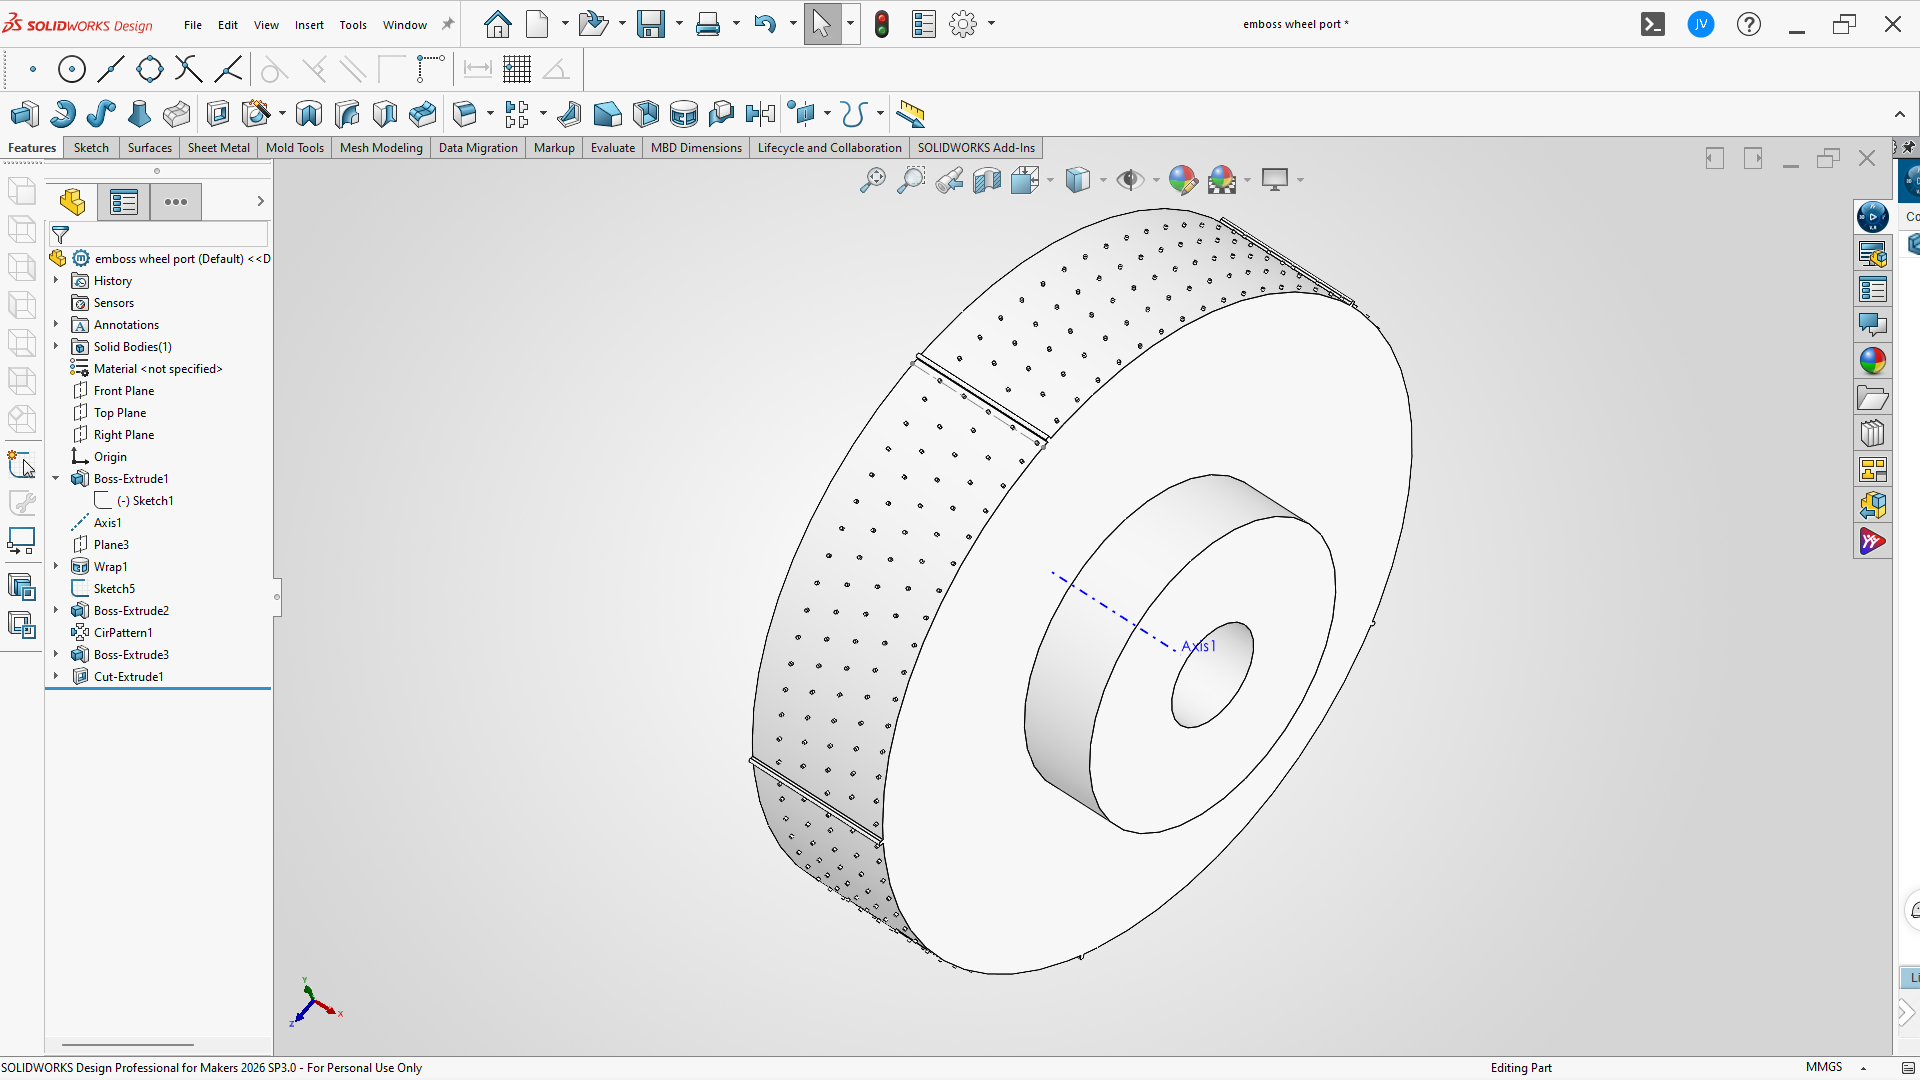
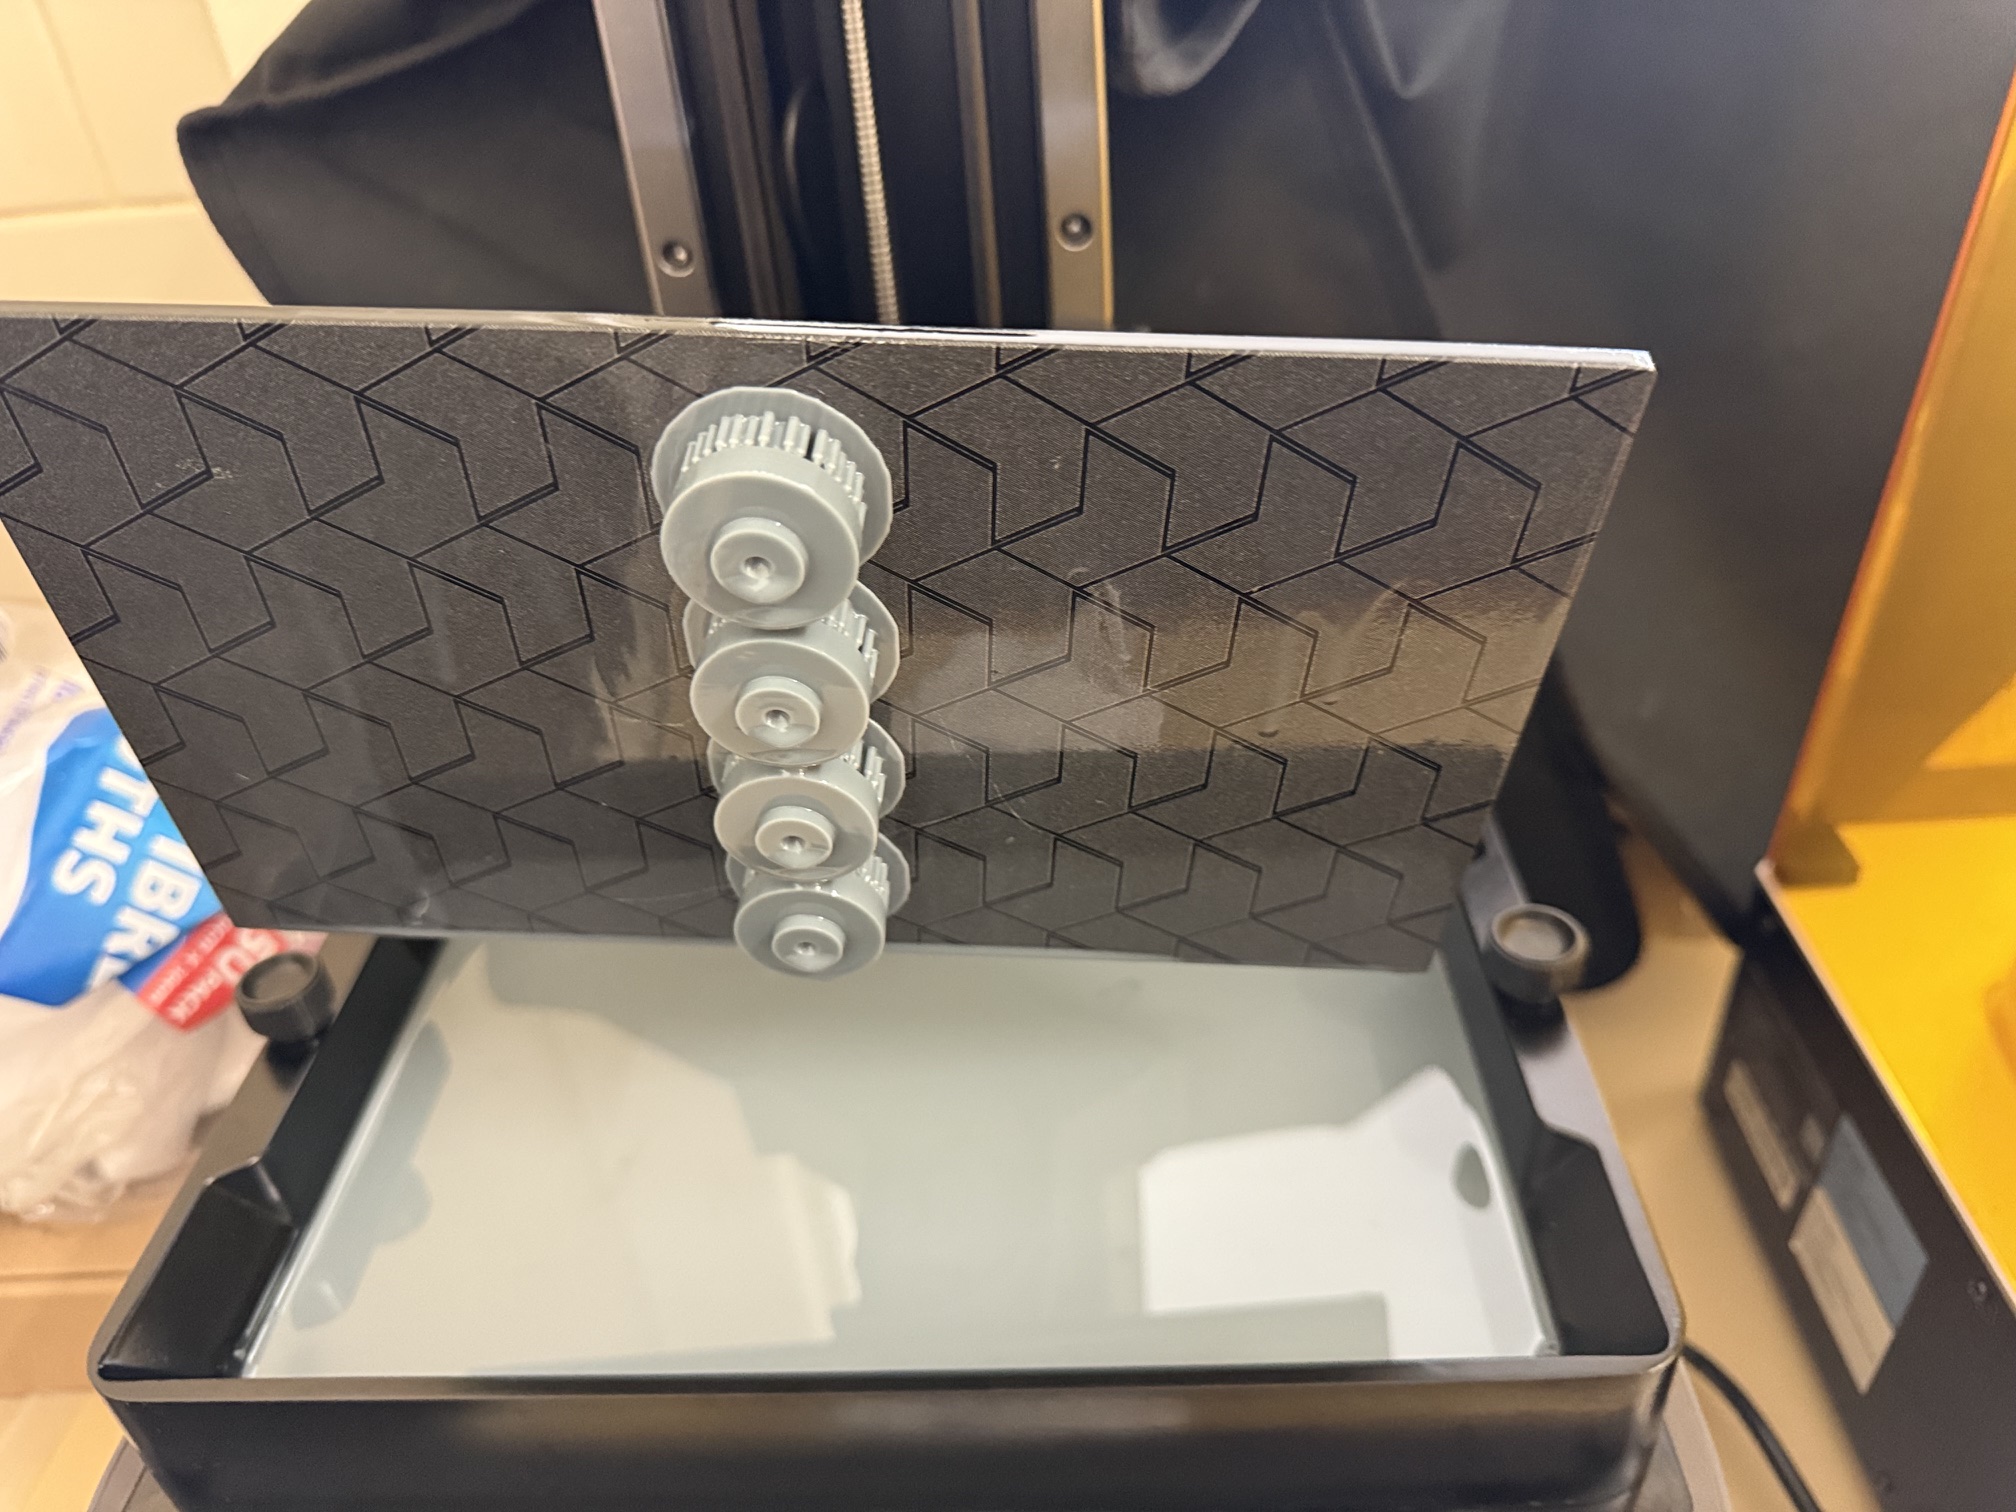
…. and imported it onto a tangent plane of a 3D impression wheel modelled in Solidworks, then used the wrap with emboss option to wrap the nail head impressions around the wheel, which now has tiny projections for the nail head embossing (tiny … 0.1mm high and 0.1mm diameter) and slightly higher for the plate divisions (about 0.12mm high). Saved the model as an stl file. Printed one wheel, modified the resin print settings, and then printed 2 port and 2 starboard wheels in basic water washable resin. The resin print runs took 1.5 hours each.
Draining the unused resin back into the printer tray.
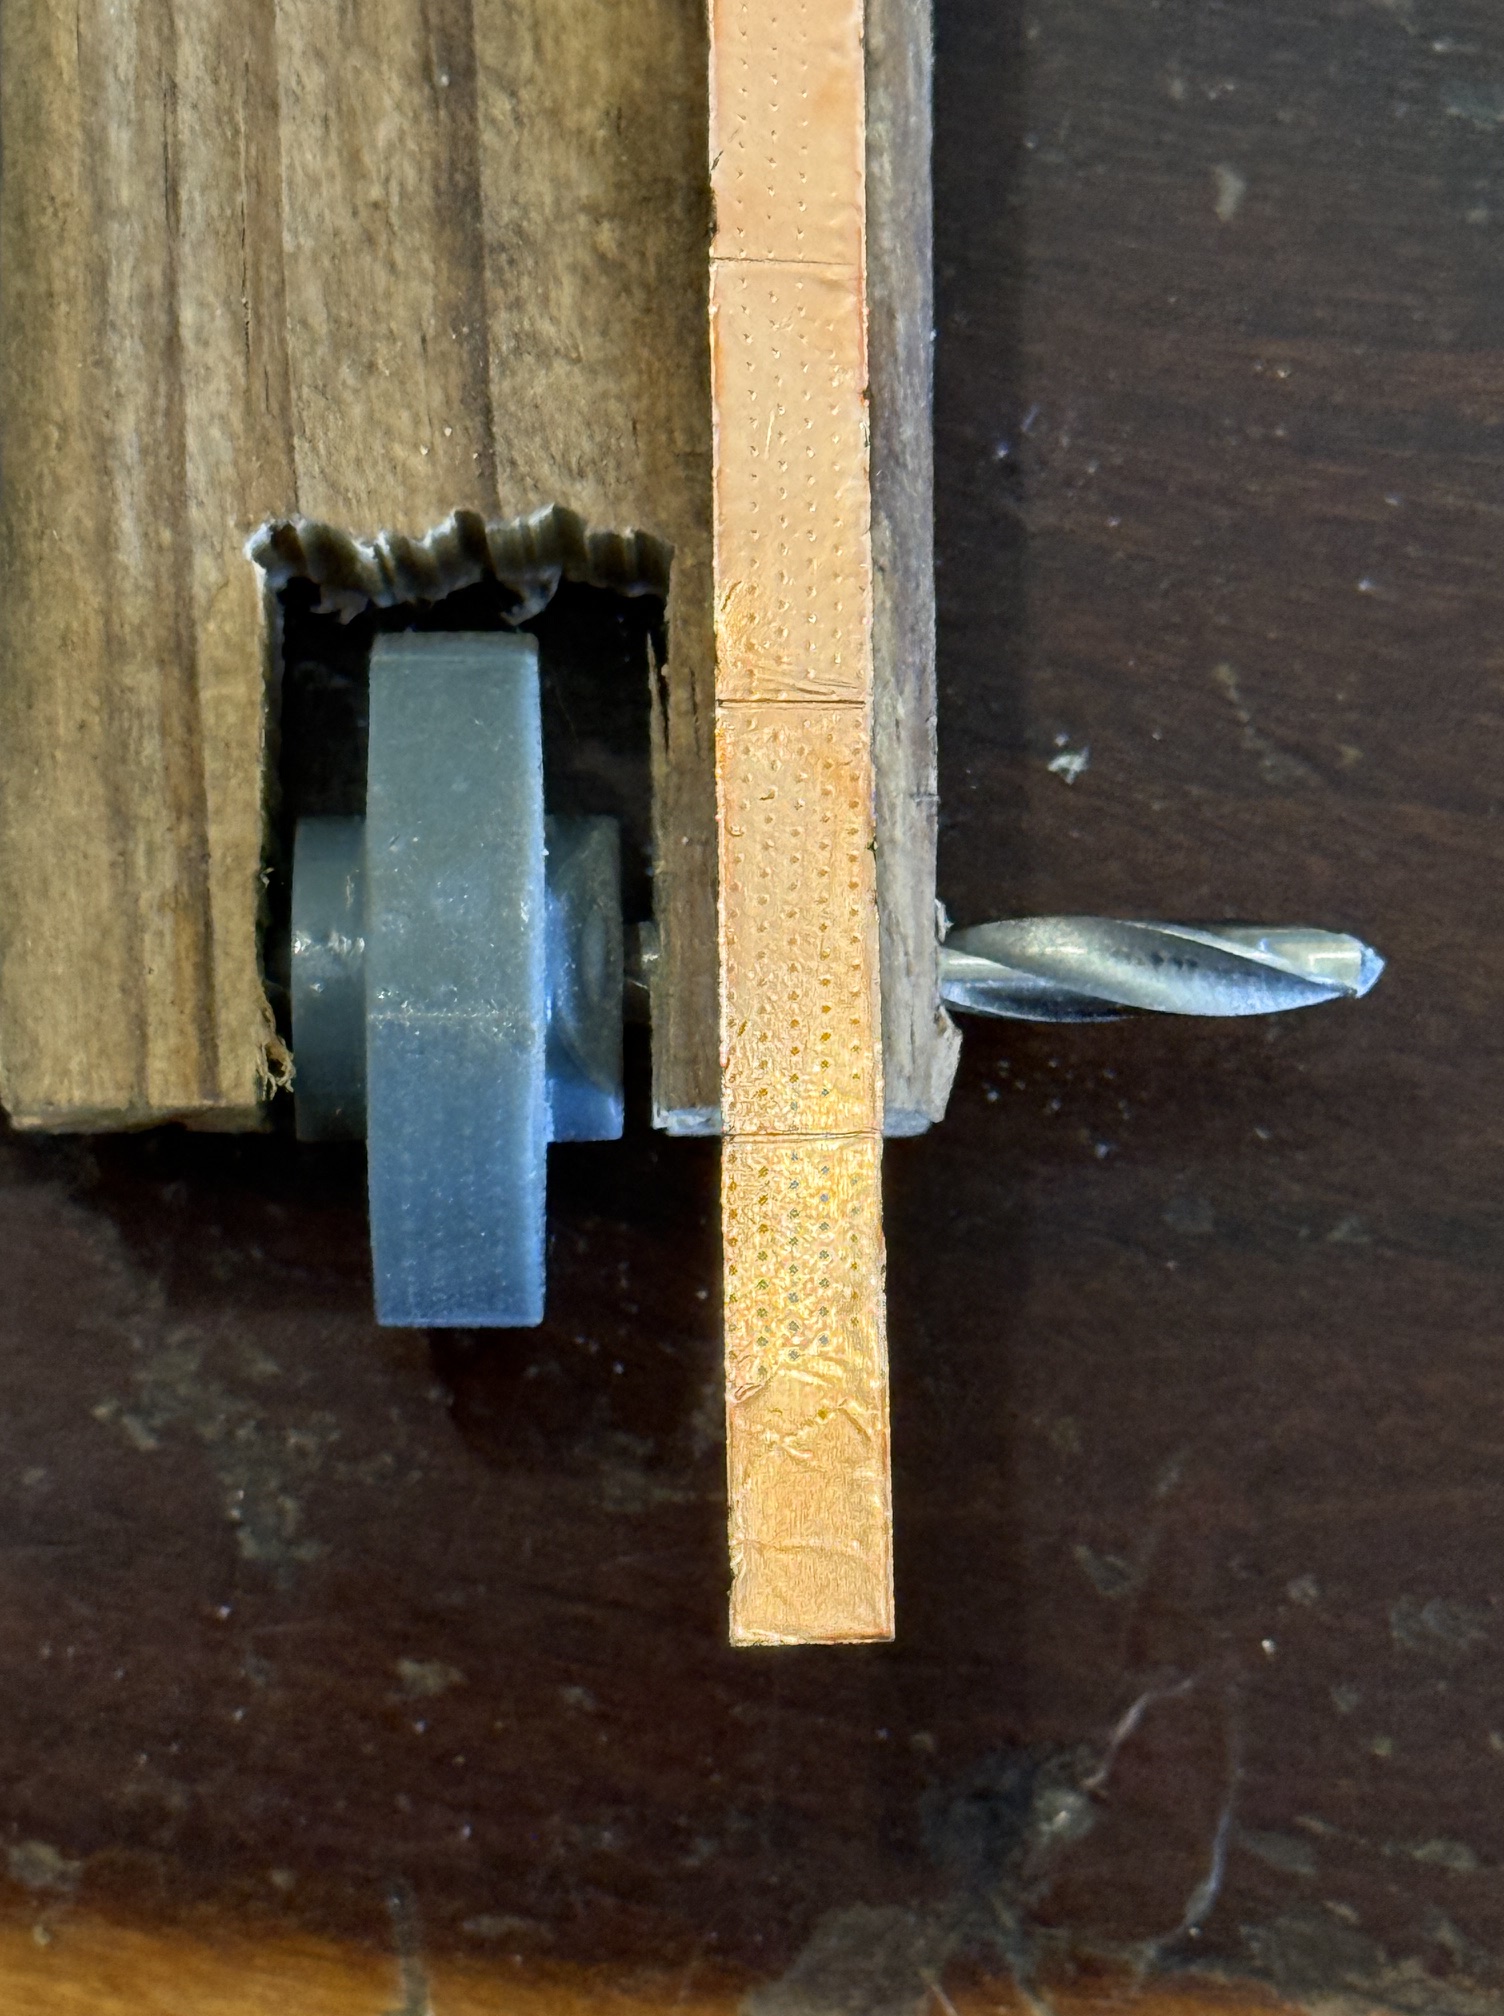
After washing, de-supporting and curing the wheels I made some test patterns in some laser cut strips of copper tape. At this stage I just used a rough handle to hold the wheel. When my 25 meter 6mm wide tape rolls arrive I will make a proper jig to position and spring pressure the wheel onto the tape and make accurately positioned strips for their embossed patterns.
This was the first printed wheel and first wobbly copper tape impression. The 26mm diameter wheel was printed at a 45 degree angle to the build plate, but some pins did not print properly, hence the imperfect impression pattern in the test tape. The later 4 wheel printed wheels were printed with the side faces parallel to the build plate, and the minute pins came out perfectly. I used a 0.02mm layer height.
So, waiting impatiently for the rolls of 6mm wide tape to arrive, so I can finalise my design for the jig to print 65-70 strips 800mm long, and then to attach them to Bellerophon. Why 6mm tape for 5mm coverage? I will overlap the tape strips by approx 1mm .
Most British war ships in the Napoleonic wars had a layer of copper sheets attached from just above the waterline to (but not including) the false keel. It had been discovered that the copper prevented infestation by the Teredo worm which could cause major damage to the wooden hull planks and frames, even to the point of causing ships to break up and sink, or at least cause major costly and time consuming repairs. The British navy had experimented with various metals and paints and fasteners over the decades, and copper was found to be the most effective solution, albeit the most expensive.
As well as the problem of the Teredo, the copper also dramatically slowed the infestation of barnacles and weeds, which caused the ships to gradually become slower. Careening the hull of barnacles and weeds was possible at substantially increased intervals, if coppered, allowing ships to stay longer at sea, sometimes for years at a stretch during the blockade of French ports during the Napoleonic wars.
The copper sheets were typically 14-15″ x 48″ x1/4″ and weighed 22-32 oz per square foot, which in modern units equates to approximately 350-380mm x 1200mm x 6.3mm and weighing an average 2.8kg per sheet. A 74 gun ship required about 2700-2800 plates which weighed a total of approx 7.5 tonnes. The copper plates overlapped each other by about 30-40mm. They were held in place by copper nails 38mm long, 5mm shaft, 8mm dia head, approx 100 per sheet. Initially iron nails were used, in ignorance of the salt water electrolytic effect between the iron and the copper, with the inevitable loss of the copper sheets. And damage to iron bolts in the ship’s planking and frames. The copper nails were also problematic, being too soft, but a later copper-zinc alloy proved succesful.
The nails were spaced 25-38mm apart around the plate borders. Later, the central areas of the plates were also nailed. As far as I can ascertain, the central area nails were in rows, staggered. But I could find no existing examples of original copper plating. Nor any repaired museum ships with copper plating which definitely retained the old patterns of nailing. USS Constitution has had her hull planking and therefore the coppering, replaced and I could find no record that the pattern was the same as the original. HMS Victory seems to have no coppering at all now. HMS Trincomalee, constructed in India to British frigate plans, is coppered, but again I think that it is unlikely that the coppering is original. If any reader has information to the contrary I would be very happy to be corrected.
HMS Trincomalee in drydock. A nice view of aged copper and nailing patterns. It would be great if the copper is original, or at least an accurate reproduction. Does any reader know?
Now. At 1:72 scale, the Bellerophon model plates measure 17x5mm and 0.08mm thick. They overlap each other approx 0.5mm. The vertical overlaps are front plate overlaps the rear. There is confusion about the long horizontal overlaps. Some authors state that on British warships the lower plate overlapped the upper. That seems a bit counterintuitive to me, particularly when authoratative authors state that coppering started at the keel and worked upwards. Merchant ships of the period, including later clippers, the upper plate overlapped the lower. In the above Trincomalee photo, the upper plate overlaps the lower. I am yet to decide what happens in my model.
I will use copper on my model. I know of no model ship parts supplier who has accurate coppering designs. So I will make my own. I will probably use electricians copper tape again, but I need to do some experimentation regarding nail marks, nail head sizes and patterns. Awaiting some supplies to arrive.
The Mamoli plans and instructions call for applying wooden rectangles dyed green to substitute for copper metal plates on the hull. On the original ship the plates were 48″ x 14″ x 1/4″ each. And there were 1700 of them, each one fastened with ~100 copper nails.
The wooden blocks in the kit were basic, a bit rough and way too thick for the scale. The scale is 1:93. Let’s say 1:100 approximately.
1/4″ = 6.35mm. At 1:100 the copper plates would be 0.0635mm thick. About 2.5 thou”.
I wondered if I could find some narrow thin copper strip with adhesive backing on Ebay. And sure enough I found multiple suppliers on Ebay and Temu. The thickness was always the same, about 0.05mm, close enough. And pretty close to the scale thickness of 1/100th of 6.35mm/1/4″.. And various widths 3-6mm were available. And 20 meters was only $AUD15 inc postage. So I purchased 2 rolls. About double what I required, I calculated. I figured that if the copper strip was unsuitable I could revert to the wooden blocks supplied.
After finishing the first layer of hull planking, I spent some time sanding the hull reasonably smooth, then used a wood filler to fill some concavities and cracks. I was happy with the curves and contours of the hull. I retrospect I should have been more particular.
When the filler hardened I used a sealer to paint the planks and filler in preparation for the next phase, which was applying copper strips and the second layer of planks.
The Constitution hull with the first layer of planks, cracks and divots filled with “Multifill”, and painted with “Peel Stop” sealer. The sealer just vanished into the wood as it dried.Marked the border of the copper plates, slightly above the water line. A good use of my mini Kant Twist clamps and Mitutoyo height gauge.
Next I started applying the adhesive backed thin copper strips. Each strip was 4mm wide, and 0.05mm thick. It did take quite a lot of effort and time to learn how to handle the copper strip. Think of the worst properties of fly paper, fine clock spring steel, and tissue paper. The adhesive backed copper strip has all of them! I had to throw way early efforts. I did gradually improve.
The hull with a dozen or so strips applied. Each strip had to have a dent made at 15mm spacings to simulate the copper plates. I found that clipping the length to the cutting board made the job easier. The photo shows the starboard side which I applied from the keel upwards, with a marker strip at the finish line.To simulate the plates, after clipping the strip to the cutting board, I pushed the end of a steel ruler into the copper strip, making a permanent mark. Too much pressure and the strip was transected. Too little pressure and the mark was too faint. Quite tricky.I marked the application line prior to handling the adhesive backed strip. The peeled off about half of the backing, and gradually applied the strip. Not easy. It took 2 days, of about 10 hours/day, to apply all of the strips. Then a few hours more to fix the mistakes.
And then end result was not too bad for a first effort!
I have not yet decided whether to fully cover the false keel with copper, or just paint it black. I suspect that the false keel was regarded as a wear item to be replaced from time to time, and not covered with (expensive) copper plate. Do any of my readers know?
Next step is to add the second layer of planking to the bulwarks and hull above the water line.