johnsmachines

machines which I have made, am making, or intend to make, and some other stuff. If you find this site interesting, please leave a comment. I read every comment and respond to most. n.b. There is a list of my first 800 posts in my post of 17 June 2021, titled "800 Posts"

Tag: machining

CNC Lathe Conversion- final

Before I am hung, drawn and quartered, for operating a lathe without guards, here is the proof that I have been sensible.

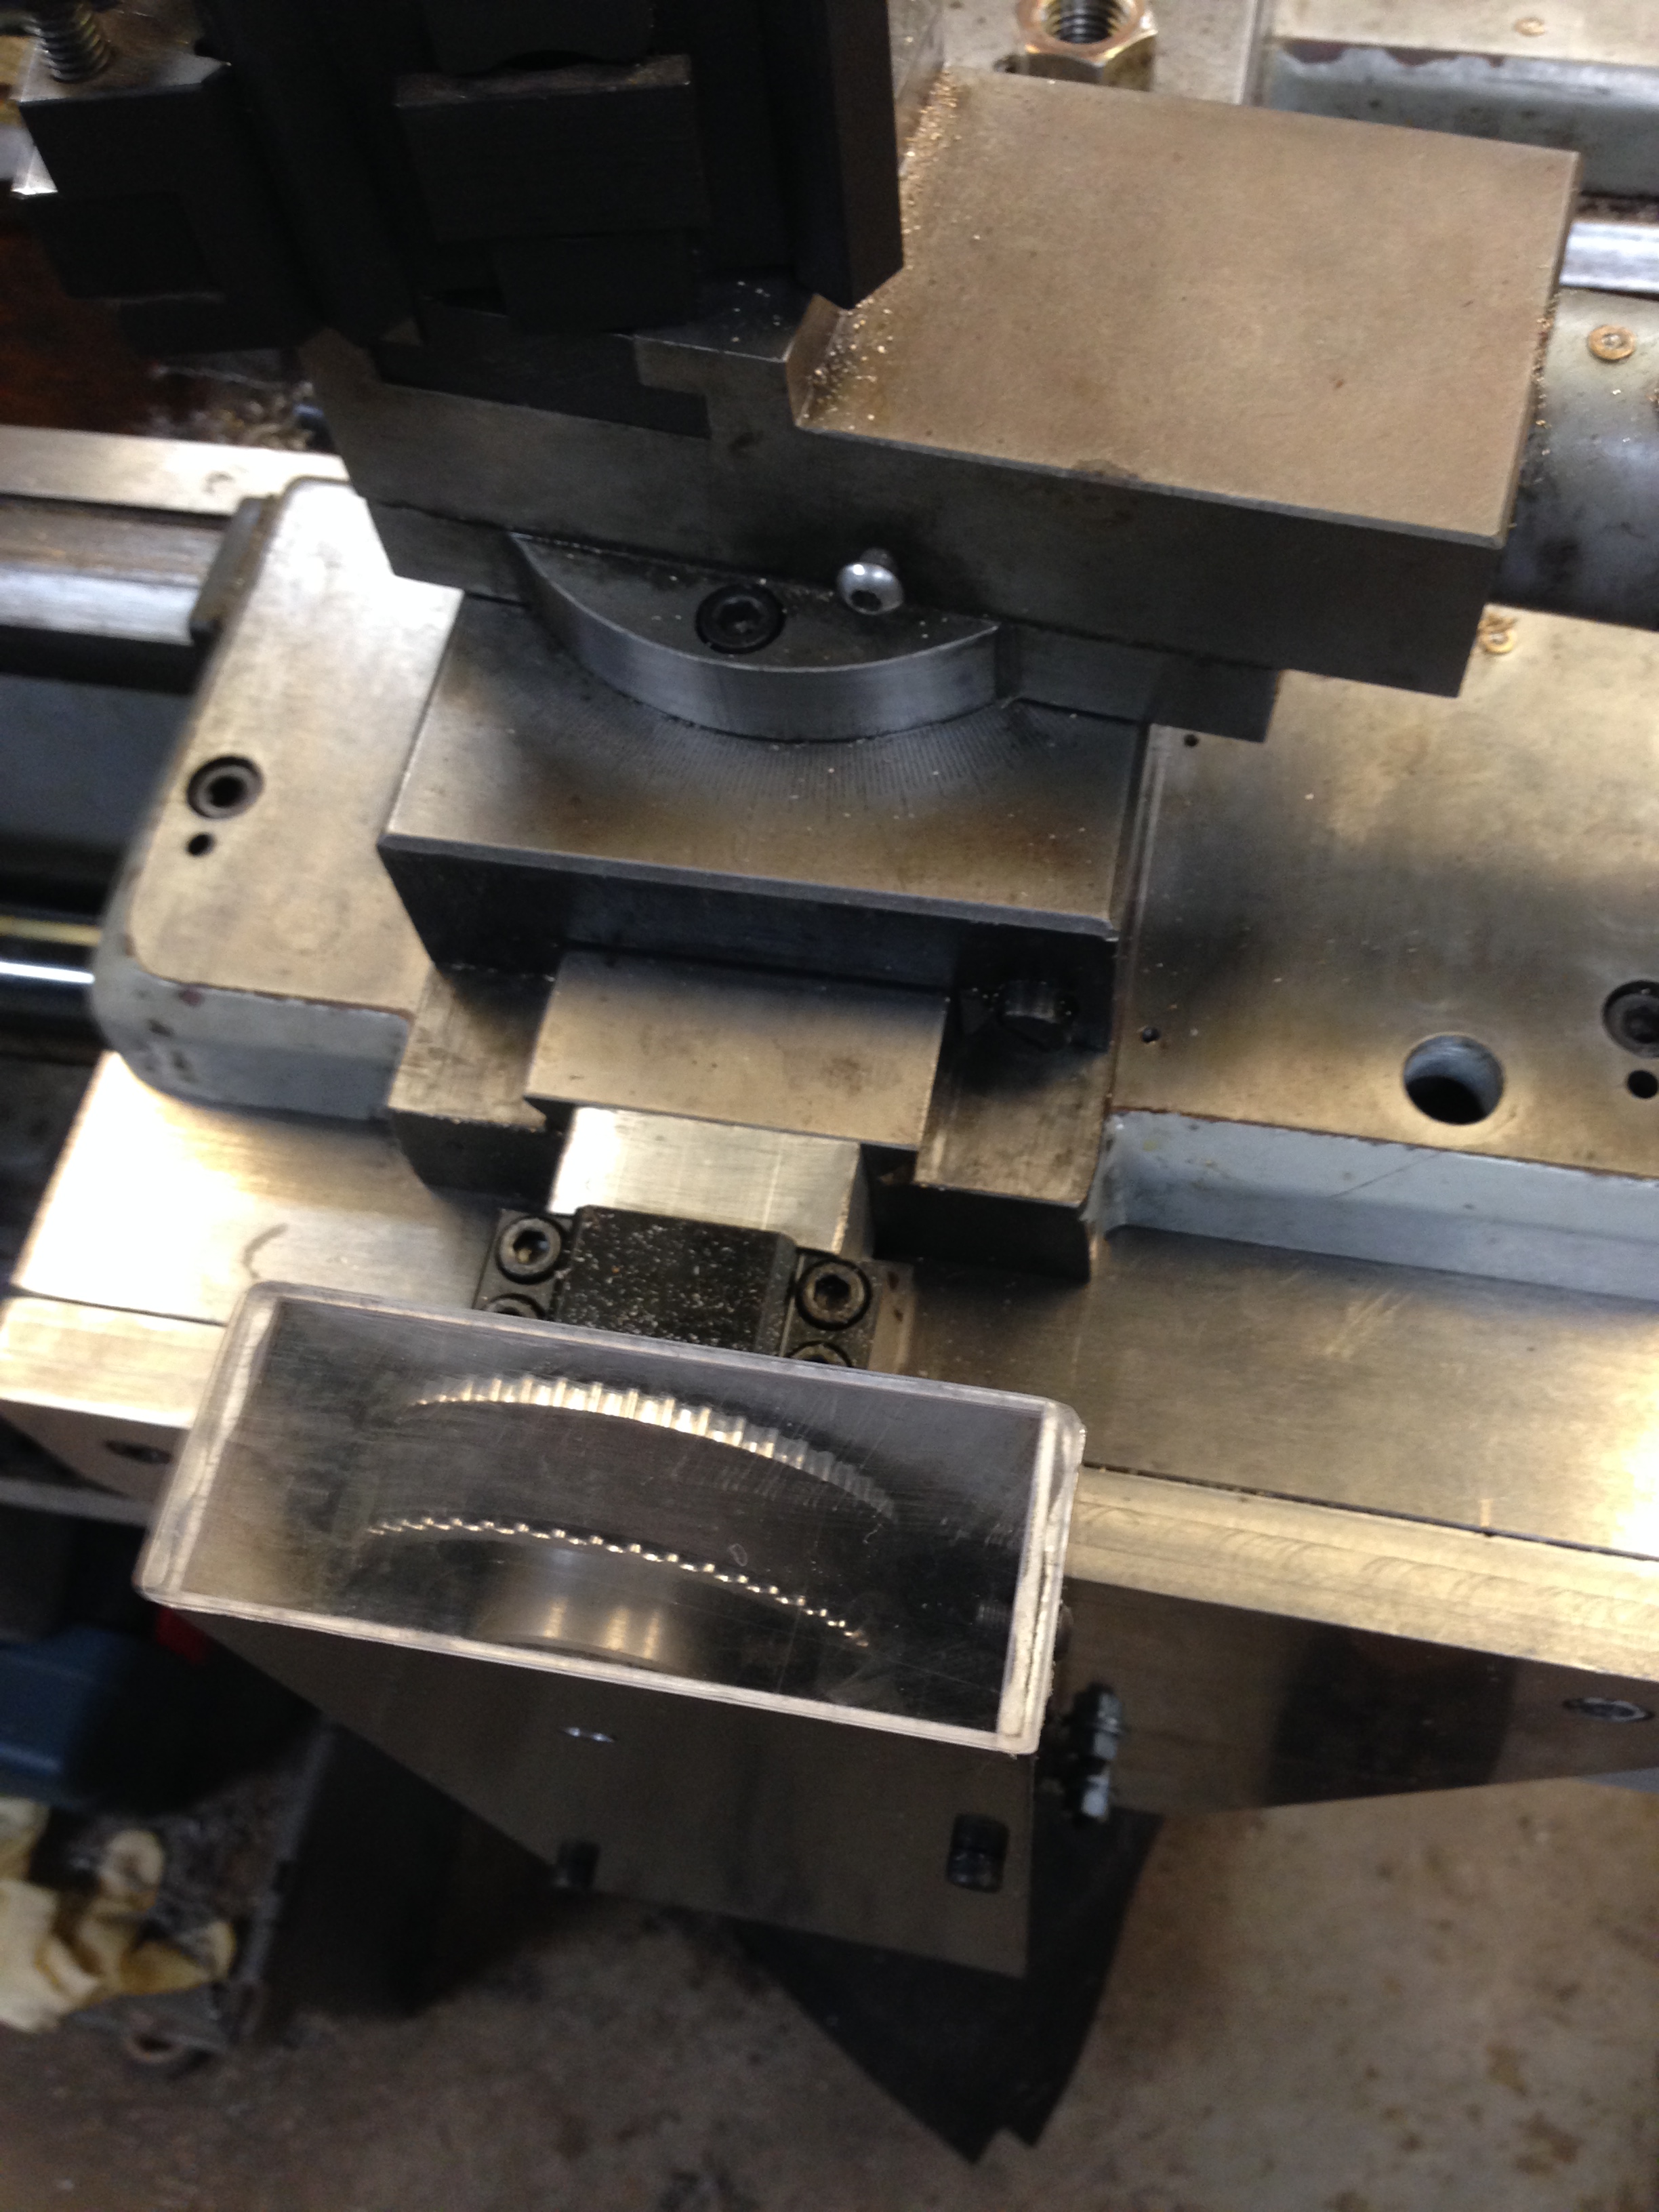
IMG_4292.JPG

Guard over the X axis pulleys.  I like to watch the wheels going round and round, hence the transparent top.   Also note the cover over the exposed ball screw.

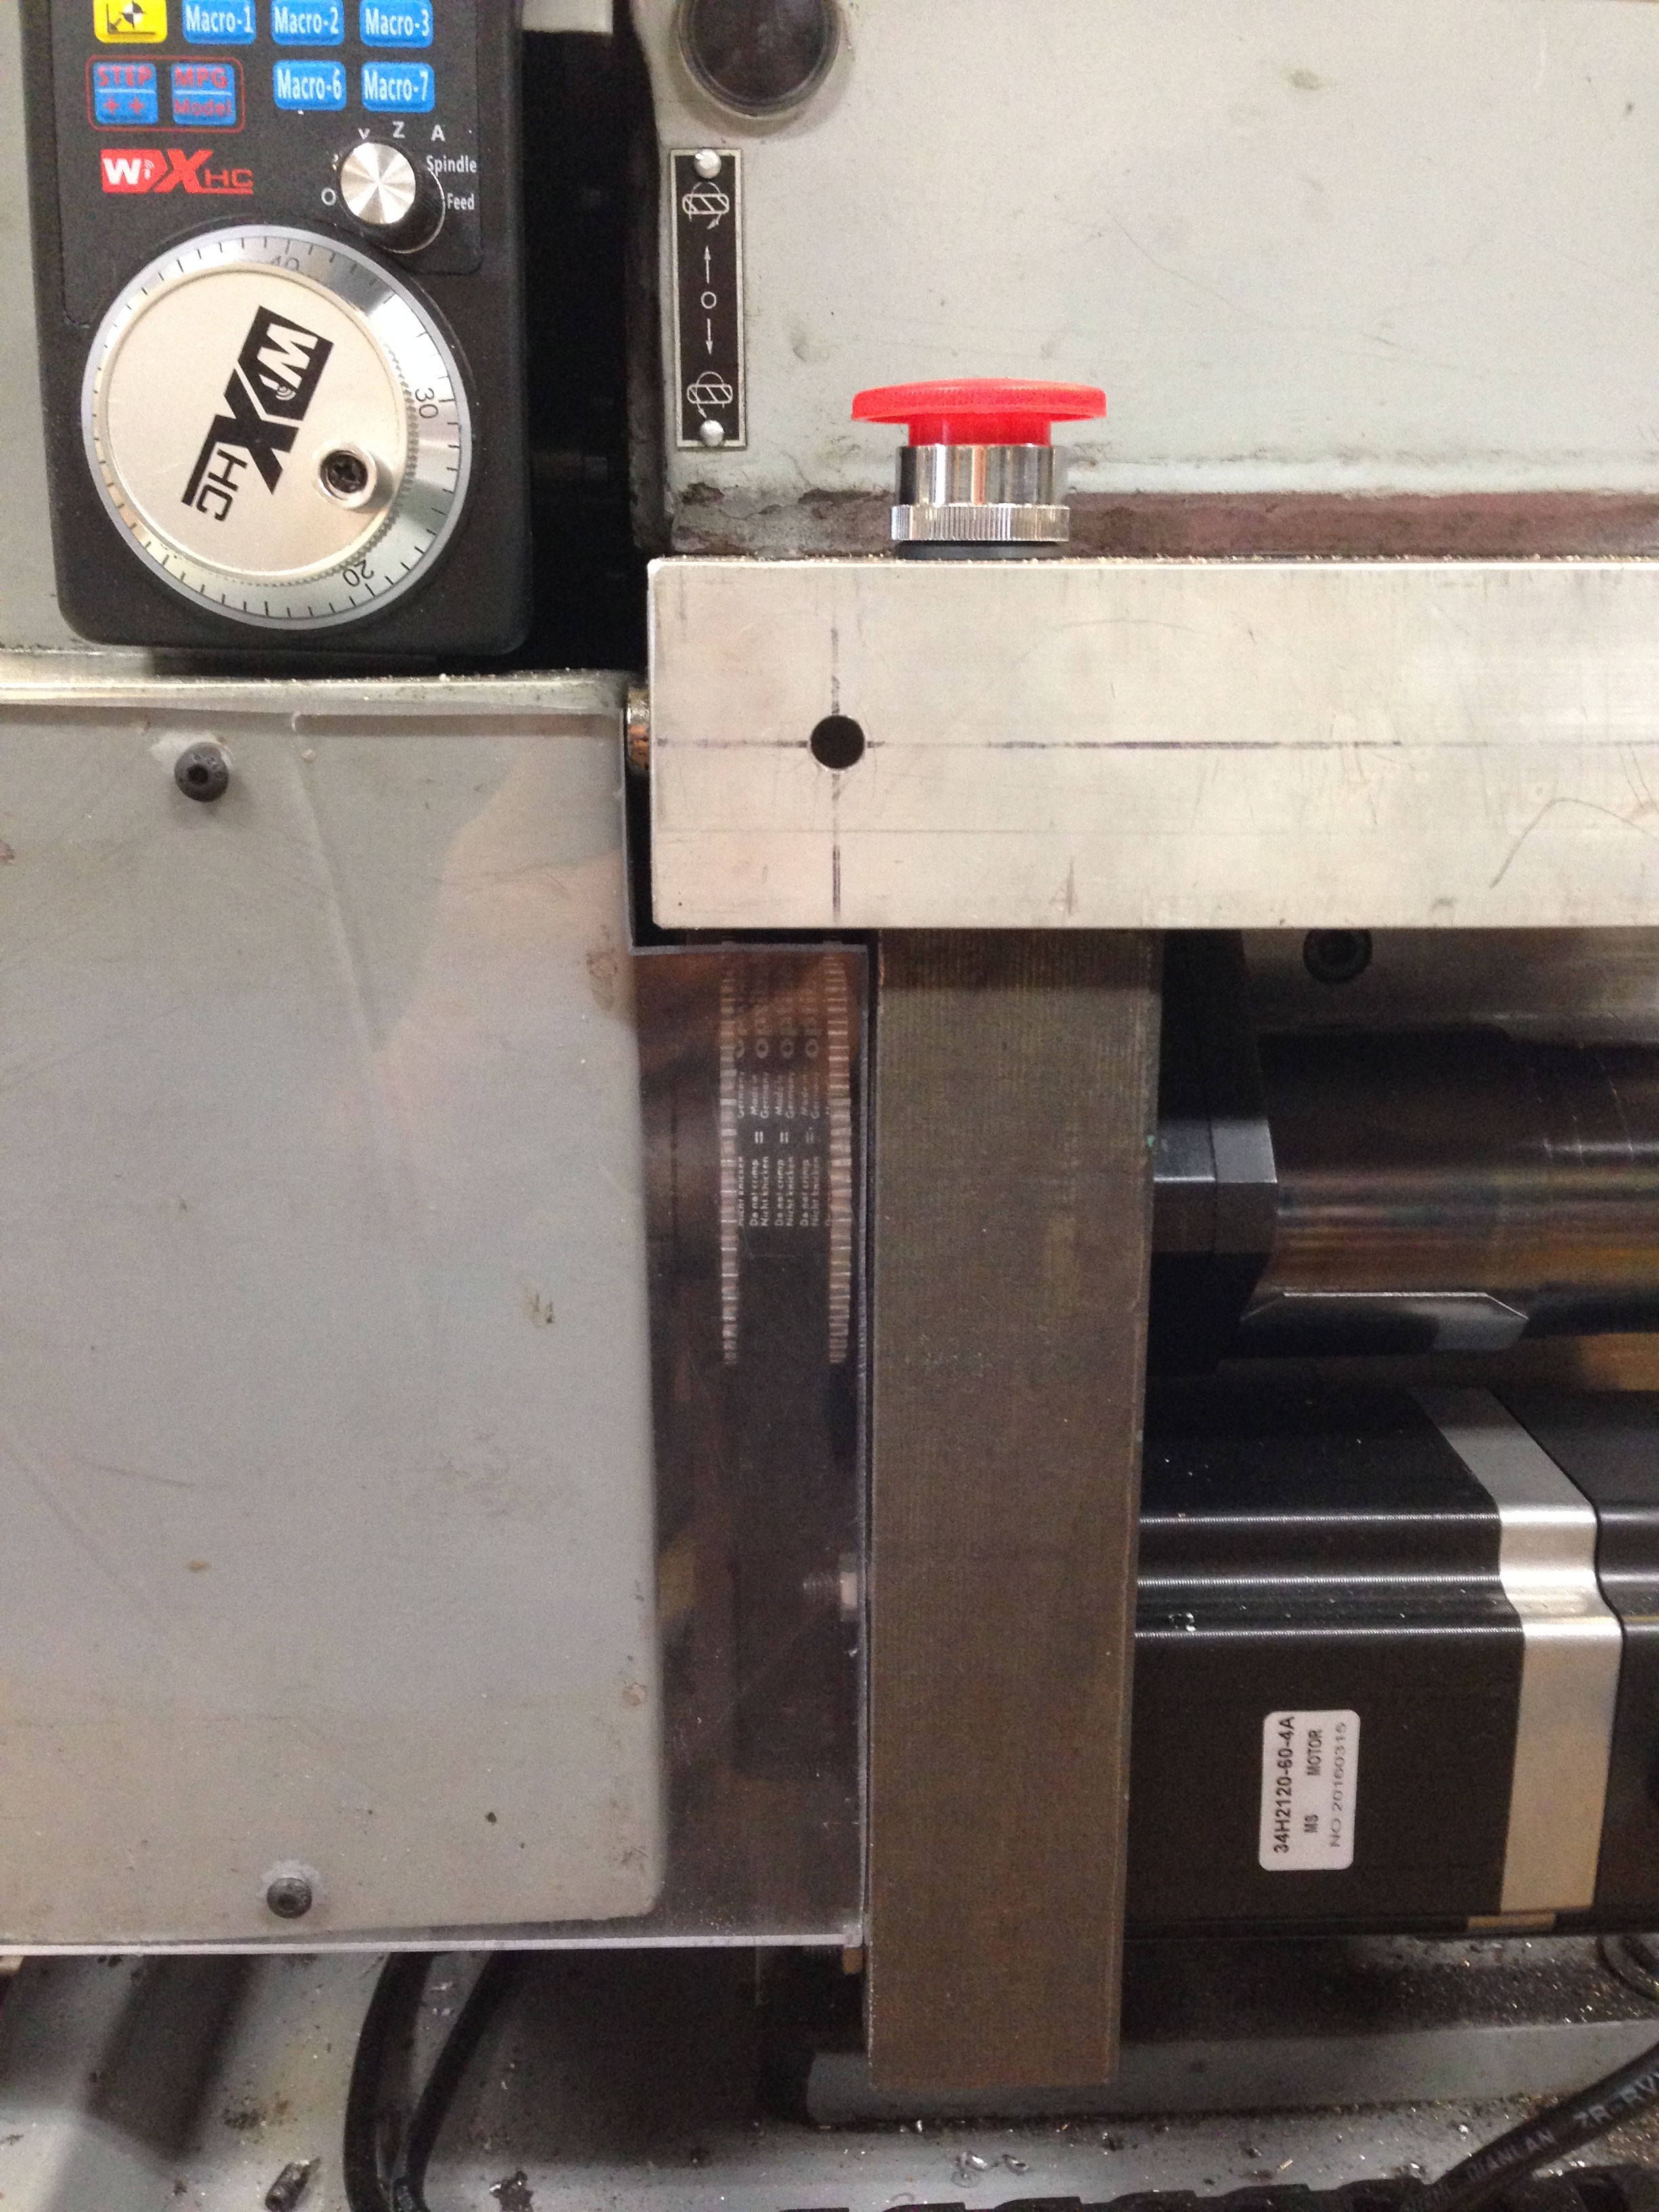
IMG_4293.JPG

Cover over the Z axis pulleys and belt, again transparent.  If I wore a watch it would be transparent.

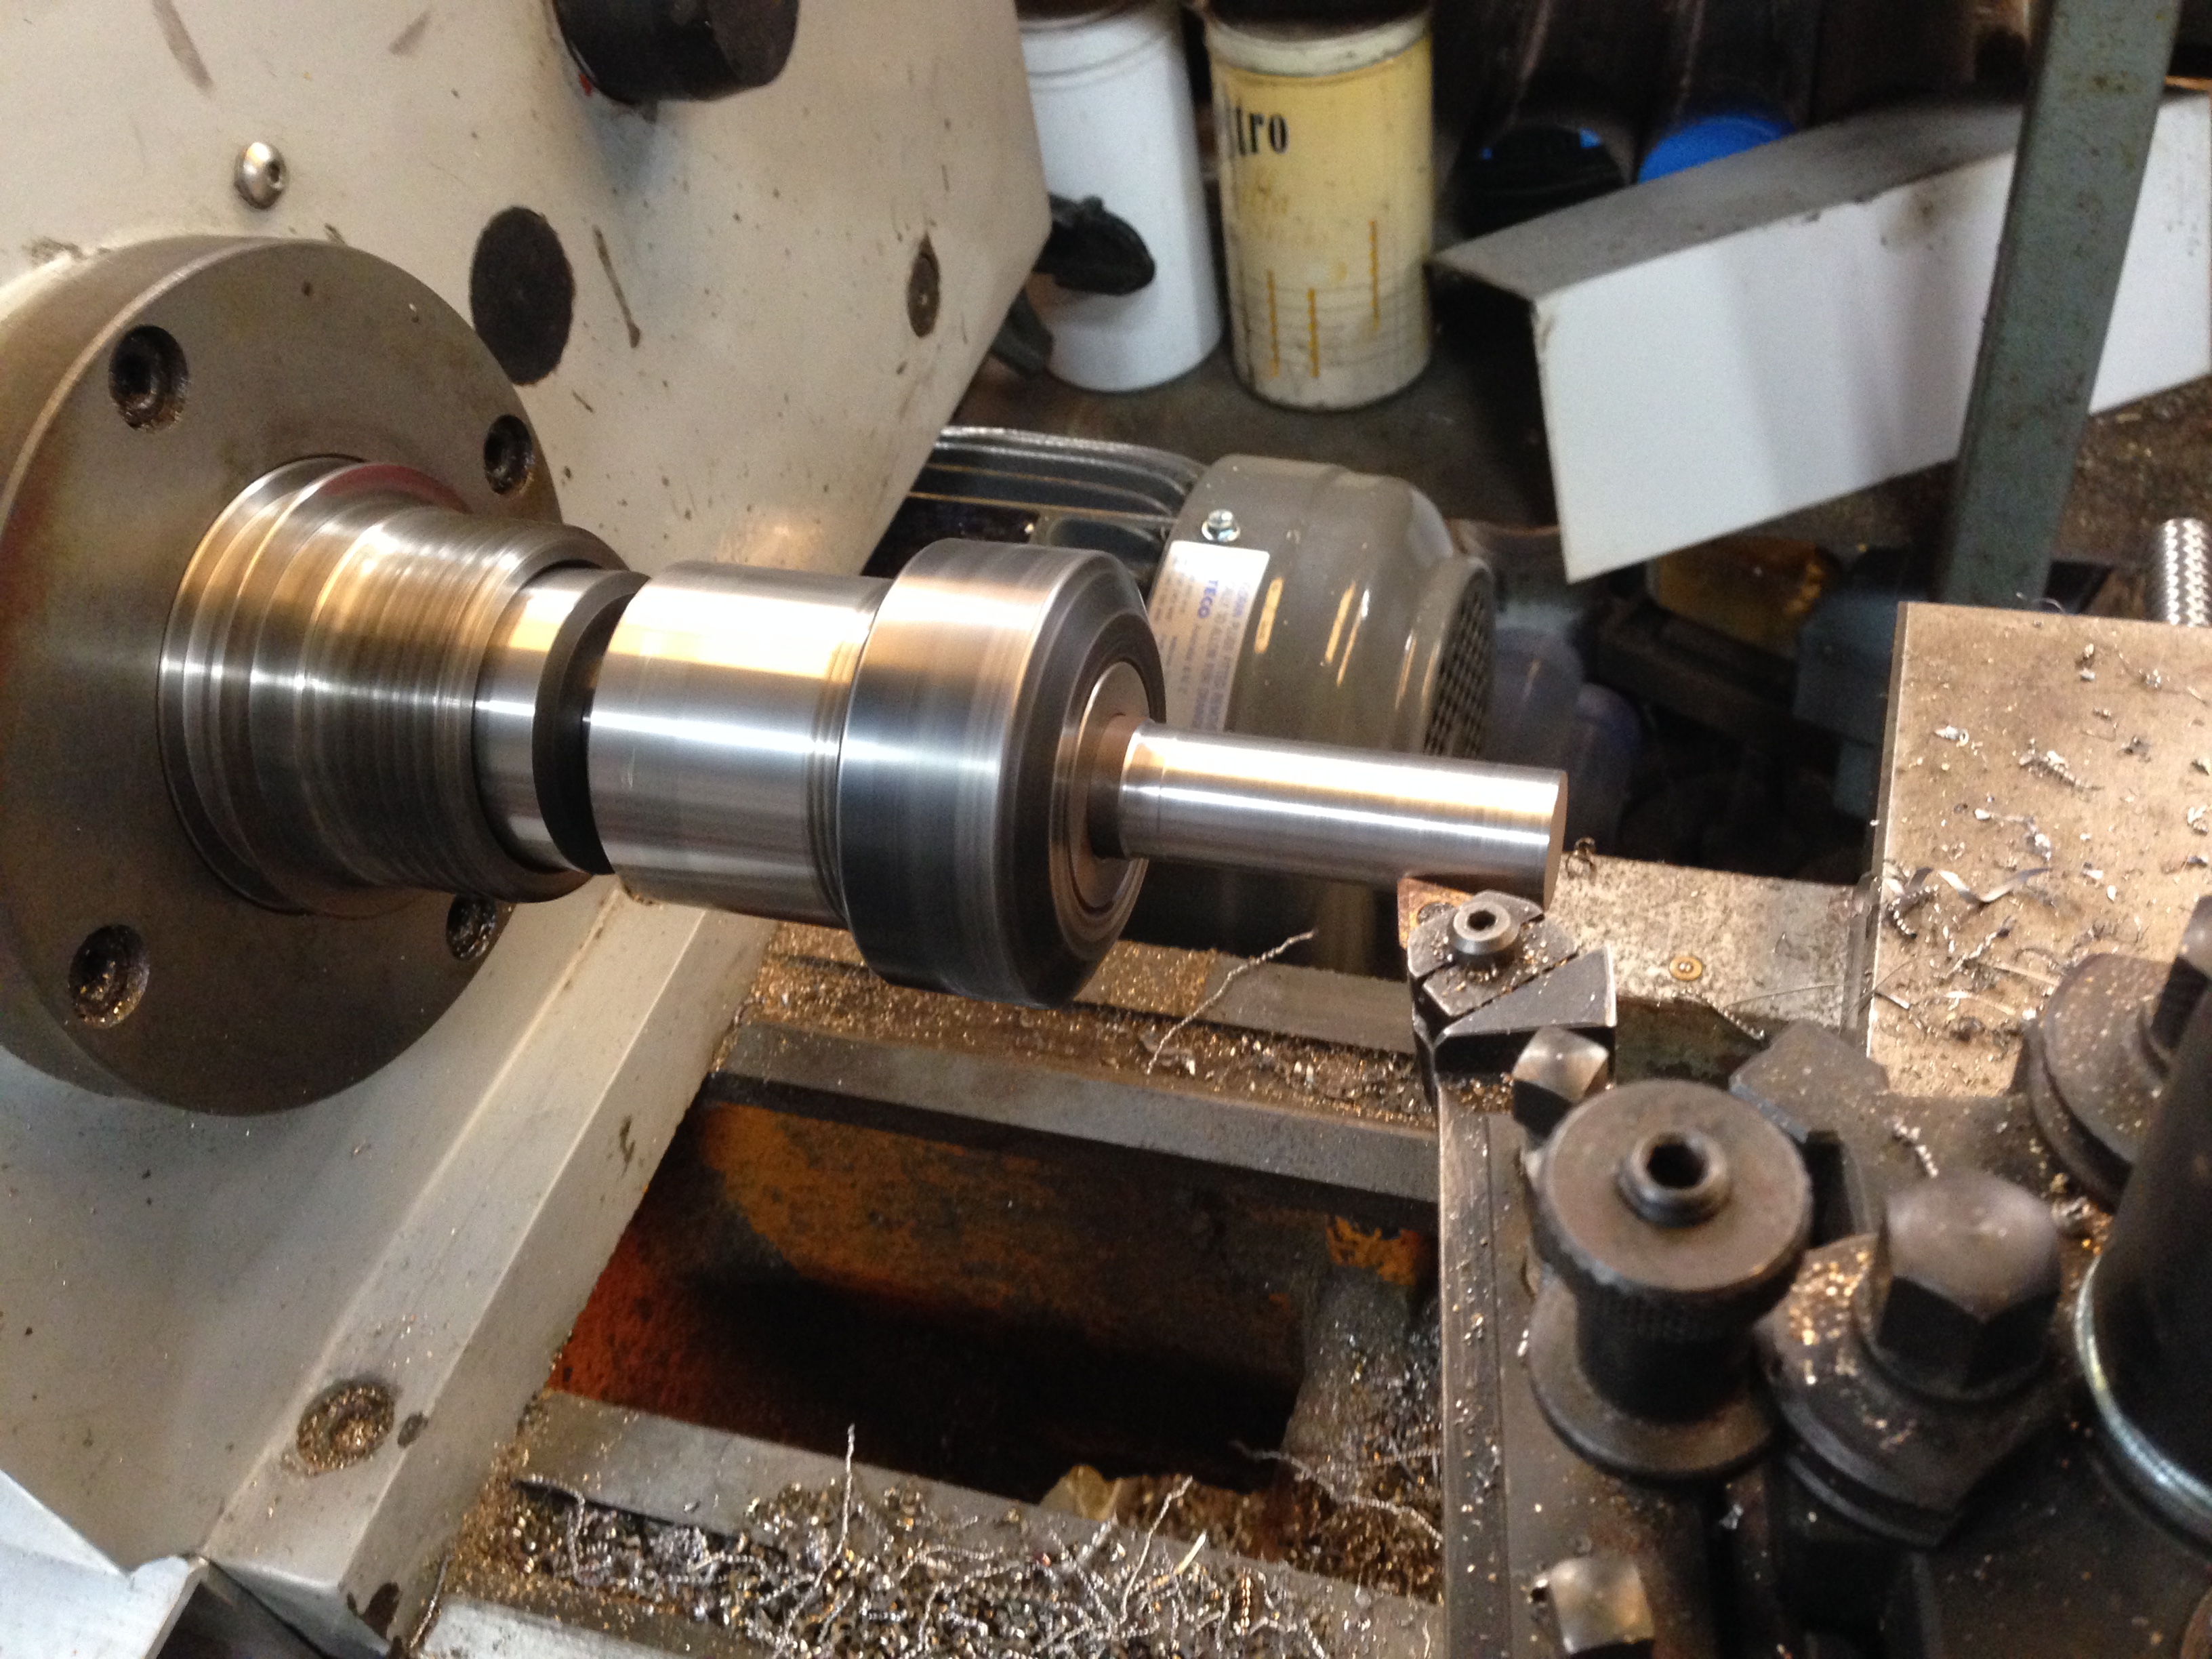
IMG_4295.JPG

I also installed an ER40 collet chuck.   I will be using this for all work with diameters under 26mm.

Seismic Wave Generator

To continue the posts about making the seismic wave generator.  See the previous post about water jet cutting the steel plates.

From what I am told, the generator is positioned, pinned to the ground, and hit on the ends with a sledge hammer.    Instruments pick up and measure the seismic waves in order to analyse what is beneath.

Sound is not required.  In fact sound is annoying and a disadvantage.

The operator stands on the generator while swinging the hammer.

So here is the finished item, ready to be delivered.  It weighs 20kg.


Striker - 1.jpg

The seismic generator, ready to be delivered.  The brass plate is to remind the user to wear safety glasses, safety boots and ear protection.   The holes in the impact plates are to permit aluminium plates to be attached if the situation absolutely requires no sparks.


Striker - 3

There are 10 ground pins.  Each pin is slightly tapered to make removal from asphalt or clay easier.   The pins are machined from 16mm set screws.  I imagine that 6 or 8 pins will be adequate to hold the generator in most surfaces.   The pins are removed for transport of course.

It will be interesting to hear how it performs.


1779 Naval Cannon Scale Model

It is almost 2 months ago that I started this model.

I thought that it would take 3 or 4 days!

Anyway, here it is.

It will look interesting on the mantelpiece.

cannon - 3.jpg

Note the hinge and square bolts and keys on the trunnion straps.

cannon - 4.jpg

A good view of the elevating apparatus, the quoin.

cannon - 6.jpg

A trunnion, trunnion band, trunnion bolts and key.

cannon - 7.jpg

Powder pan and touch hole.

cannon - 8.jpg

The underbelly

cannon - 2.jpg

It goes on display at the Geelong Wooden Boats Show next weekend.


A Collet Chuck for the Colchester Lathe

I recently bought a blank chuck backing plate on Ebay, hoping that it would fit my Colchester lathe.  It was $AUD110 plus postage, which, if suitable, would be an excellent price, but it was a gamble.  It was old new stock.

When it arrived I cleaned off the old, hard grease, and nervously presented the backing blank  to the lathe headstock.  It fitted perfectly!  The seller had another identical blank backing plate, so I bought that one too.  Components for the Colchester are not readily available, so I was very happy with this find.

I had a use in mind for both of the backing plates, and a few days ago I machined up the first one as per the following photos.


IMG_3330.jpg

The cast iron backing plate blank had a tough skin which a high speed steel cutter would not penetrate. So I use a carbide insert tool cutting 1mm deep to break through the skin. I finished the contact surface with a HSS tangential tool. (A diamond cutter from Eccentric Engineering)


IMG_3331.jpg

The C5 collet chuck.  I have had this chuck for a few years, purchased from CDCO Machinery (USA), but rarely used it because I was not satisfied with the accuracy.  I was very interested to see whether a very careful installation on the Colchester lathe might be more satisfactory than on the previous lathe (a Chinese lathe).  


IMG_3332

Checking the runout off the newly installed collet chuck. With a piece of 10mm diameter silver steel, the total measured runout was about 0.005mm. Good enough.  The backing plate is larger than required, but I will leave it as is in case I ever use it for another, larger chuck.   C5 collets will hold round stock 2-26mm diameter, and some common square and hexagonal sizes.   Very useful.

CNC Mill 11

CNC.  That is what started this post.  Today, I fired up the CNC mill, and made a simple fitting for my Bolton 7, which involved some accurate deep drilling in aluminium.  I LOVE CNC!!  Drilling 3mm diameter holes through 16mm material, automatically, centre drilling, then deep drilling  1mm peck at a time and automatically clearing the chips, with positional accuracy of  0.001mm.  Fantastic!  Cannot wait to get more into this.

IMG_2383 IMG_2384


An Improved Lathe Stand.


I was becoming a bit annoyed with my Asian HMC lathe.  It was noisy, and whatever I did with respect to feed rates, tool types, material etc, I could not seem ever to get a really good finish, and it did not seem particularly accurate.

I had spent a fair bit of time getting it level, and adjusting the tailstock offset, but the settings never seemed to hold for long.

The base was as supplied originally.  2 fairly solid sheet metal cupboards with handy storage compartments, and a rather flimsy piece of sheet metal joining the 2 cupboards.   Each cupboard had 4 adjusting bolts, ie 8 altogether, so levelling the lathe was tricky.  But the worst aspect was that it all seemed very flimsy.

The lathe on its original cupboard base

The lathe on its original cupboard base

So I decided to make a new base.

A visit to the local scrap metal yard yielded up a 3 meter length of 300 x 100 x 16mm channel.  Too heavy for 2 men to lift onto my vehicle roof bars, but easy with a fork lift.

Getting it off at the other end was tricky.  But I managed to do so without damaging my vehicle.

Cutting the channel with the drop band saw.

Cutting the channel with the drop band saw.

IMG_2299

I made the legs from some 100 x 50 x 3 or 4mm RHS, and welded it up.  It all seemed heavy and rigid.

I measured and drilled the mounting holes for the lathe bed.  The new base was at the same height as the original, so I was able to crow bar the lathe over onto the new base, hoping that it would not fall between the 2 bases.  It weighs several hundred kilograms, so a fall would have been messy.

Amazingly, the bolts dropped straight into the new mounting holes, after some manoevering with a podger bar.  Then I levelled up the base using bolts at the bottom of each leg, and a machinists level on the lathe ways.

The new base.  The channel is barely visible under the lathe bed and behind the legs.

The new base. The channel is barely visible under the lathe bed and behind the legs.

Levelling bolts at each corner

Levelling bolts at each corner


IMG_2380

Showing the channel welded to the legs, the cross piece, and the levelling bolts.


Then I did some test turning.

1. The lathe is appreciably quieter.

2. The work finish is definitely improved.  No unpredictable and odd grooves to mar the finish.

3. I have yet to measure the accuracy change.

4. Unexpected bonus.  There is a lot more storage space under the lathe than there was in the original pokey little cupboards.   Small items now live in the mobile chest of drawers unit next to the lathe, and big items such as the toolpost grinder in its box, are under the lathe.

CNC lathe tool holders.

I needed some extra toolholders for my Boxford CNC lathe, and the following photos show some of the steps in making them on a vertical mill with a horizontal attachment.

The toolpost holder is a Dickson, beautifully made, precise.  And it came with 6 tool holders.  6 should be adequate you think?  Not so.  You really need one holder for every tool that you might use, because with CNC, you want to do the CNC settings in the computer only once.  And the Dickson holders are expensive, so I made the extras.

The material for the tool holders is cast iron bar from a house wreckers yard.  The bar was 3 foot lengths of iron window counterweights from very old double hung windows.  Very cheap $5 each.  A bit porous in places, but enough good stuff to get useable 300mm lengths. Roughly cut to length in foreground, machined square behind, finished article on right.

The material for the tool holders is cast iron bar from a house wreckers yard. The bar was 3 foot lengths of iron window counterweights from very old double hung windows. Very cheap $5 each. A bit porous in places, but enough good stuff to get useable 300mm lengths.
Roughly cut to length in foreground, machined square behind, original holder bottom right.

The holders had been dimensioned and drawn up by my expert friend Stuart Tankard.

The holders had been dimensioned and drawn up by my expert friend Stuart Tankard.

This is the original horizontal machining set up.  I made each holder separately.

This is the original horizontal machining set up. I made each holder separately.

For the next batch, I got smarter, and milled 300mm lengths of the bar, and cut them up later.  You might also note that I painted the horizontal milling attachment, using Por 15 paint.  For the actual milling I also used copious lubricant fluid.

For the next batch, I got smarter, and milled 300mm lengths of the bar, and cut them up later. You might also note that I painted the horizontal milling attachment, using Por 15 paint. For the actual milling I also used copious lubricant fluid.

Using a drop bandsaw to cut off the milled blocks.  Less than 1mm clearance.

Using a drop bandsaw to cut off the milled blocks. Less than 1mm clearance.

I made about 30 altogether.  Some for centre drills, ER collets, various left right and centre insert bit cutters, and quite a few spares for the future. You say a cornucopia of toolholders.

I made about 30 altogether. Some for centre drills, ER collets, various left right and centre insert bit cutters, and quite a few spares for the future.
You might say a cornucopia of toolholders.

DSC_1664

The height setting knobs were turned on the Boxford 125 TCL CNC lathe, again designed and G coded by Stuart Tankard. The knurls were cut by Stuart on his 4 axis CNC mill.

DSC_1663 IMG_2356 IMG_2357 IMG_2358

LATHE RESTORATION

I have been busy with selling farm equipment in my spare time lately and have only been in the workshop to get stuff ready for sale.   New starter motor and starting solenoid on the mower, for example, took a lot of time to identify the problems, source spare parts and then fit them.  Another story.

So to find some material to post I decided to show some pics of a lathe restoration I did several years ago.  Actually, it was two lathes, both  Smart and Brown, almost identical except that one was single phase and the other was 3 phase.  They had been imported from UK by the seller, a second hand dealer, and sitting in his back yard, uncovered,  for 5 years.  There was quite a lot of extra stuff, such as 6 cross slides, a capstan tool changer, 2 complete sets of collets, several tail stocks, several 3 and 4 jaw chucks, and all of this was interchangeable between the 2 lathes.  No lead screws, but 100mm of travel on the cross slide longitudinally.  I think that these lathes are termed “2nd process” or something similar.  They date from the 1940’s-50’s.  The shape of the base, cupboard, and headstock really appealed to me, so I decided to try to salvage them.

Amazingly, after I cleaned up the slides and beds, they were in excellent condition.  Whatever they had been coated with was incredibly effective.  There was minimal surface rust and no pitting at all.

The following photos are mainly the single phase machine.  Both machines looked fantastic after repainting.  At some stage I will have to sell both machines, because I have totally run out of space in my workshop.  I just really like the design and appearance of these lathes, and although I do not use them often, they are lovely to look at.  My architect wife appreciates the designs and says that whoever designed them was as concerned about form as much as function, which is unusual in machine design.

IMG_0227

The two Smart and Brown lathes sitting on my ute, ready for unloading. One was made of cast iron, the other of cast aluminium.

IMG_0255

The capstan, after partial disassembly.

IMG_0256

The capstan was frozen solid with rust. I had to crack it to complete the disassembly, by putting it a 20 tonne press after pre-soaking with WD40.. With huge pressure, it eventually went “bang”, and then showed some movement. I was then able to take it apart. Nothing broken or bent.

IMG_0281

The collet closer on the three phase machine, after some cleaning and lubrication, and prior to disassembly.

The single phase S&B after restoration, painting, new tool post, attention to motor and wiring and switches.  A lovely, quiet, accurate machine.  Just no thread cutting.

The single phase S&B after restoration, painting, new tool post, attention to motor and wiring and switches. A lovely, quiet, accurate machine. Just no thread cutting.

Cast aluminium brand plate.

Cast aluminium brand plate.

I did install a quick change tool post.  No apologies.  Not historically accurate, but very useable.

I did install a quick change tool post. No apologies. Not historically accurate, but very useable.

A good selection of collets.

A good selection of collets.

New, modern belts for both lathes.

New, modern belts for both lathes.

The 1 morse taper tail stocks are a pleasure to use.  Smooth, no discernible play.  Modern lathe makers could take a lesson from these handles.

The 1 morse taper tail stocks are a pleasure to use. Smooth, no discernible play. Modern lathe makers could take a lesson from these handles.

The motors on both machines were checked by a motor rewind specialist.  No major problems with either motor.

The motors on both machines were checked by a motor rewind specialist. No major problems with either motor.

MILLING THE COLUMNS for THE BOLTON 9 MARINE ENGINE

90% setup time, 10% machining.

The columns are tapered on all faces, so are difficult to hold, and difficult to measure.

I did a CAD drawing, to measure the taper angles, and to calculate some extra dimensions.

Then, in order to hold the castings in the milling vice, I made some accurate wedges at the appropriate angles (3 and 12 degrees) in wood and aluminium.

I actually progressed a bit further than the photos show, even roughing out the condensing tank.

IMG_2319

IMG_2317

The aluminium wedges have a 12 degree taper. The top wedge is sitting on a 10 degree and a 2 degree precision taper, giving an accurate 12 degree slope for milling. I made 2 such wedges, each 100mm long.

IMG_2318

Unmachined casting on right. Partly machined on left. Quite difficult to set up, despite the setp up blocks at the appropriate angles.

Beam Engine Driving Wheel 2

The aluminium disk was drilled then reamed to 19.05mm (3/4")

The aluminium disk was drilled then reamed to 19.05mm (3/4″)

IMG_2207

Then a shaft was pressed into the disk. The shaft is the same as the shaft on the beam engine, in fact it is from the same stock. It was centre drilled at the ends in preparation for turning between centres, and shaping the driving wheel.   This should result in a wheel which runs true and does not wobble when installed onto the beam engine. 

TAPPING HOLES. BOLTON 9. (Triple Expansion Marine Steam Engine)

Today I drilled and tapped the holes for the bolts which secure the crankshaft main bearings.  I had accurately marked the bearing mounts  in the previous session (see previous photos), and calculated and recorded the DRO (digital read out) position for each hole.  So going back to that position for each step in the process was easy and quick.  The steps today were centre drilling, drilling the 3.3mm holes, and tapping the 4mm threads to a depth of 20mm.

Centre drilling is done with a centre drill bit in an accurate chuck in the milling machine.  Centre drill bits are inflexible and will not wander over the work like an ordinary twist drill bit,  The centre drilled hole is deep enough to create a chamfered edge to the hole.  All 12 holes are drilled with the centre bit, then all 12 drilled with the 3.3 mm bit, then all 12 are threaded.  The DRO positions the work within 0.005mm each time, and the repositioning is very fast, much faster than going to a position doing all 3 processes, changing the bit for each one, then moving to the next position.

The threading was done with a Tapmatic 30 tapping head in my milling machine.  See photo.  This takes about 10 minutes to set up, but the tapping process for the 12 holes then took about 5 minutes.  I use Rapid Tap lubricant for tapping, even in brass.  I guess that manually tapping the holes would have taken about the same time, but it was so satisfying to see the Tapmatic do its stuff.  I use the Tapmatic for any tapping job involving more than about 8-10 holes.  Fewer than that it is quicker to do them manually.  The Tapmatic has a adjustable clutch.  I have never broken a tap in the job using this machine.

Incidentally, I have decided to use nuts and bolts and screws and studs in preference to metric cap screws for this model.  The appearance wins out over practical expediency.  So why the metric threads for this job today?  The specified thread was 5/32″ which is 3.96mm, so I decided to go with the 4mm metric, for which I have the tools already.


Tapping the main bearing blocks using the Tapmatic and Tap Magic.

Tapping the main bearing blocks using the Tapmatic and Rapid Tap.

TRIPLE EXPANSION MARINE ENGINE 2

Reducing the width of the aluminium plate to 140mm, so it will fit into my milling vice

Reducing the width of the aluminium plate to 140mm, so it will fit into my milling vice.  The plate is clamped to an angle plate.

Squaring the ends.

Squaring the ends.

IMG_2153

The base plate bolted to the aluminium plate. Care was taken to fix the brass base centrally and parallel to the aluminium. The fixing bolts are 3mm cap screws, and the holes through the brass plate are 3mm, so even if the brass base is removed, it will go back on in exactly the same position.

IMG_2154

I finished the day by making a spur gear for my brother’s lathe.


The gear attached to the shaft using Loctite.  If the Loctite is inadequate, the gear can be pinned to the shaft.   In the post tomorrow, to Townsville QLD.

The gear attached to the shaft using Loctite. If the Loctite is inadequate, the gear can be pinned to the shaft. In the post tomorrow, to Townsville QLD.  The photo shows why metalworking is an unsuitable hobby for a gynaecologist.

TRIPLE EXPANSION STEAM ENGINE 1

The base casting.

The base casting.

The base of the base, machined flat

The base of the base, machined flat

The base, with 6 pillar mounting areas machined parallel & coplanar, and the crankshaft mounting blocks after an initial skimming.

The base, with 6 pillar mounting areas machined parallel & coplanar, and the crankshaft mounting blocks after an initial skimming.  Slots for big ends roughed out.  2 hour first machining session.  2998 hours to go?

After carefully examining the base casting, and scrutinising the plans to discover all of the dimensions of the base, I commenced machining on my King Rich mill (Bridgeport clone, NT40 with DRO, an excellent machine). Since the base dimensions are scattered over 3 pages of very complex plans, and I am still relatively unfamiliar with them, I am approaching the machining with great caution. At this stage I am aiming to create some flat and coplanar surfaces, with a margin of material remaining, so I can hold the base flat, without rocking, roughing out the shape, and leaving finishing to dimensions at a later date. I intend to attach the base to a rectangular piece of aluminium, so the aluminium can be clamped or held in a vice, rather than risking damaging the brass casting.

CASTINGS ARRIVE AT LAST!!

Today I received a 16.6kg package by courier. It was too heavy for the regular post.  It contained the castings for the model triple expansion steam engine, which I am hoping to build in the next year or so.  I am told that on average this model takes 3000 hours to complete.  That is a scary thought.  Almost unbelievable.  But when I calculate how many hours went into the much simpler single cylinder beam engine (maybe 600-800), I guess that it is not an unrealistic estimate.  Just as well that I am close to retirement age.

The castings were made in NSW Australia, and supplied by Kelly Mayberry at EJ Winter.

All carefully wrapped

All carefully wrapped

The castings are all brass, gunmetal, or bronze

The castings are all brass or gunmetal.  There must be at least 100 of them.

Looks like the condensor chamber, as part of the engine frame.

Looks like the condensor chamber, as part of the engine frame.

The base.

The base.

A large chunk of brass

A large chunk of brass, the intermediate and low pressure cylinders.

The castings appear to be free of holes or defects

The castings appear to be free of holes or defects

CNC Mill 4 (with some pics)

Now that I have a couple of days cleaning off the carelessly applied paint, I am prepared to show some photos.
The trouble with a 17 year old machine, even if it has done little work, is that repairs are required before it can be used.
1. New hand wheel
2. Z axis acting strangely. ? encoder faulty, or broken wires.
3. Pneumatic drawbar not working ? needs replacing.
4. Auto lubrication system not functioning. ? relay faulty, other problem.
5. Operator needs considerable training.

The only available space in my workshop was in front of the door

The only available space in my workshop was in front of the door

Showing the table, with the tool rests removed, the hand wheels including the broken X axis hand wheel, the turret and the electrical box

The broken X axis hand wheel.  replacement from China for $a20, including postage....

The broken X axis hand wheel. replacement from China for $a20, including postage….

Showing the X axis ball screw, the hand wheel gearing, and the coated way (? Teflon)

Showing the X axis ball screw, the hand wheel gearing, and the coated way (? Teflon)

The control box for the pneumatic power drawbar (not working), and the automatic lubrication pump and reservoir (also not working).

The control box for the pneumatic power drawbar (not working), and the automatic lubrication pump and reservoir (also not working).

The CNC input control panel.  I am still learning how to use this.

The CNC input control panel. I am still learning how to use this.

CNC MILL 3

Pneumatic draw bar. The draw bar was not functioning at all. One of the valves was completely corroded, so I rebuilt it, making a new rim from brass and attaching it with Locktite. The draw bar now functions, but it leaks air badly. A gasket needs replacing, and I will renew that. But if it is still unusable, I will buy a new air draw bar.

I turned on the mill for the first time today.
It booted up, and self tested OK. The servo motors and spindle work fine, and smoothly. The axes move up to 4000mm per minute. The spindle runs quietly up to 4000rpm. (not immediately. I ran it for 10 minutes at a low speed as per the instructions). There seems to be some limits to the travel on the X and Z axes, not related to the hard limits. There must be some soft limits set incorrectly.

All of the ways were dry. There is an automatic oiler, with plenty of oil in the reservoir. I used an oil can to lube all of the ways and the ball screws, because I am not sure if the auto oiler is functioning. It is meant to operate on startup, and then every 30 minutes. Another item to check.

This mill is an Extron, with 1000mm travel on the X axis, and approx 500mm on the Y and Z axes. It is big (for me) heavy and smooth. I expected that it would need some attention because it has not been used in years. So far the revealed problems have been with the peripheral items and cosmetics, and not the major components or the electronics. So far so good. I will post some pics soon.

Burrell Traction Engine

I bought these Burrell Traction Engine castings and parts off ebay recently, because they were cheap, and my triple expansion engine castings still have not arrived!
The traction engine is 1.5″ scale, and the finished model will be about 500mm long.
The complex copper sheet part in the middle of the back row has been partly riveted and soldered. The sheet steel parts on the right hand side have had some of the fittings bolted to it. I am guessing that 95% of the build is yet to happen.
There were no plans, but Kelly Mayberry at EJ Winter has a 1.5″ Burrell in his catalogue , so I have purchased those plans hoping that they will suit. Kelly tells me that the Burrell is a fairly difficult build, so that is a challenge.
There are hundreds of rivets in this engine, so riveting will be a new skill to acquire.
22 July 2014. The plans have arrived, 9 sheets of them. Like all plans, the initial browse showed a daunting mass of detail. Some of the sheets have imperial measurements, so first task is to convert those to metric. The boiler particulars were upgraded to modern approved standards a few years ago, so they at lest are already metric.
The next task is to get the plans laminated, so they remain readable in the dirty workshop environment.
Then to starting the fun bit… the machining…..
There are many such models, working, on U Tube, and worth a look.

johnsmachines

Castings for Burrell steam traction engine. Castings for Burrell steam traction engine.

IMG_1958IMG_1959IMG_1960IMG_1961IMG_1962

View original post

Burrell Traction Engine

Castings for Burrell steam traction engine.

Castings for Burrell steam traction engine.

IMG_1958 IMG_1959 IMG_1960 IMG_1961 IMG_1962

TOOLREST FOR GRINDER

This contraption is a toolrest for a benchgrinder. it was an early project when I started metalworking-machining, and was made mainly on a milling machine, and lathe.
The tool to be sharpened on the grinder (lathe cutter, chisel, screwdriver, saw blade etc) rests on the top platform. The top platform can be adjusted to any angle in 3 dimensions, using the brass handles. The 2 brass knobs are to present the work to the grinding wheel, and are graduated in thousanths of an inch. Sounds complicated and it is.
Designed by Harold Hall, with plans and instructions in his book “Milling, A complete course”.
The wine glass is for scale only. Although the level went down during the photography session. Must have evaporated.
I have nickel plated several components of this tool ,because of surface rust.