machines which I have made, am making, or intend to make, and some other stuff. If you find this site interesting, please leave a comment. I read every comment and respond to most. n.b. There is a list of my first 800 posts in my post of 17 June 2021, titled "800 Posts"
PART A. The GunPort Covers. See the photos. They were attached yesterday, after the previous post’s pics were taken.
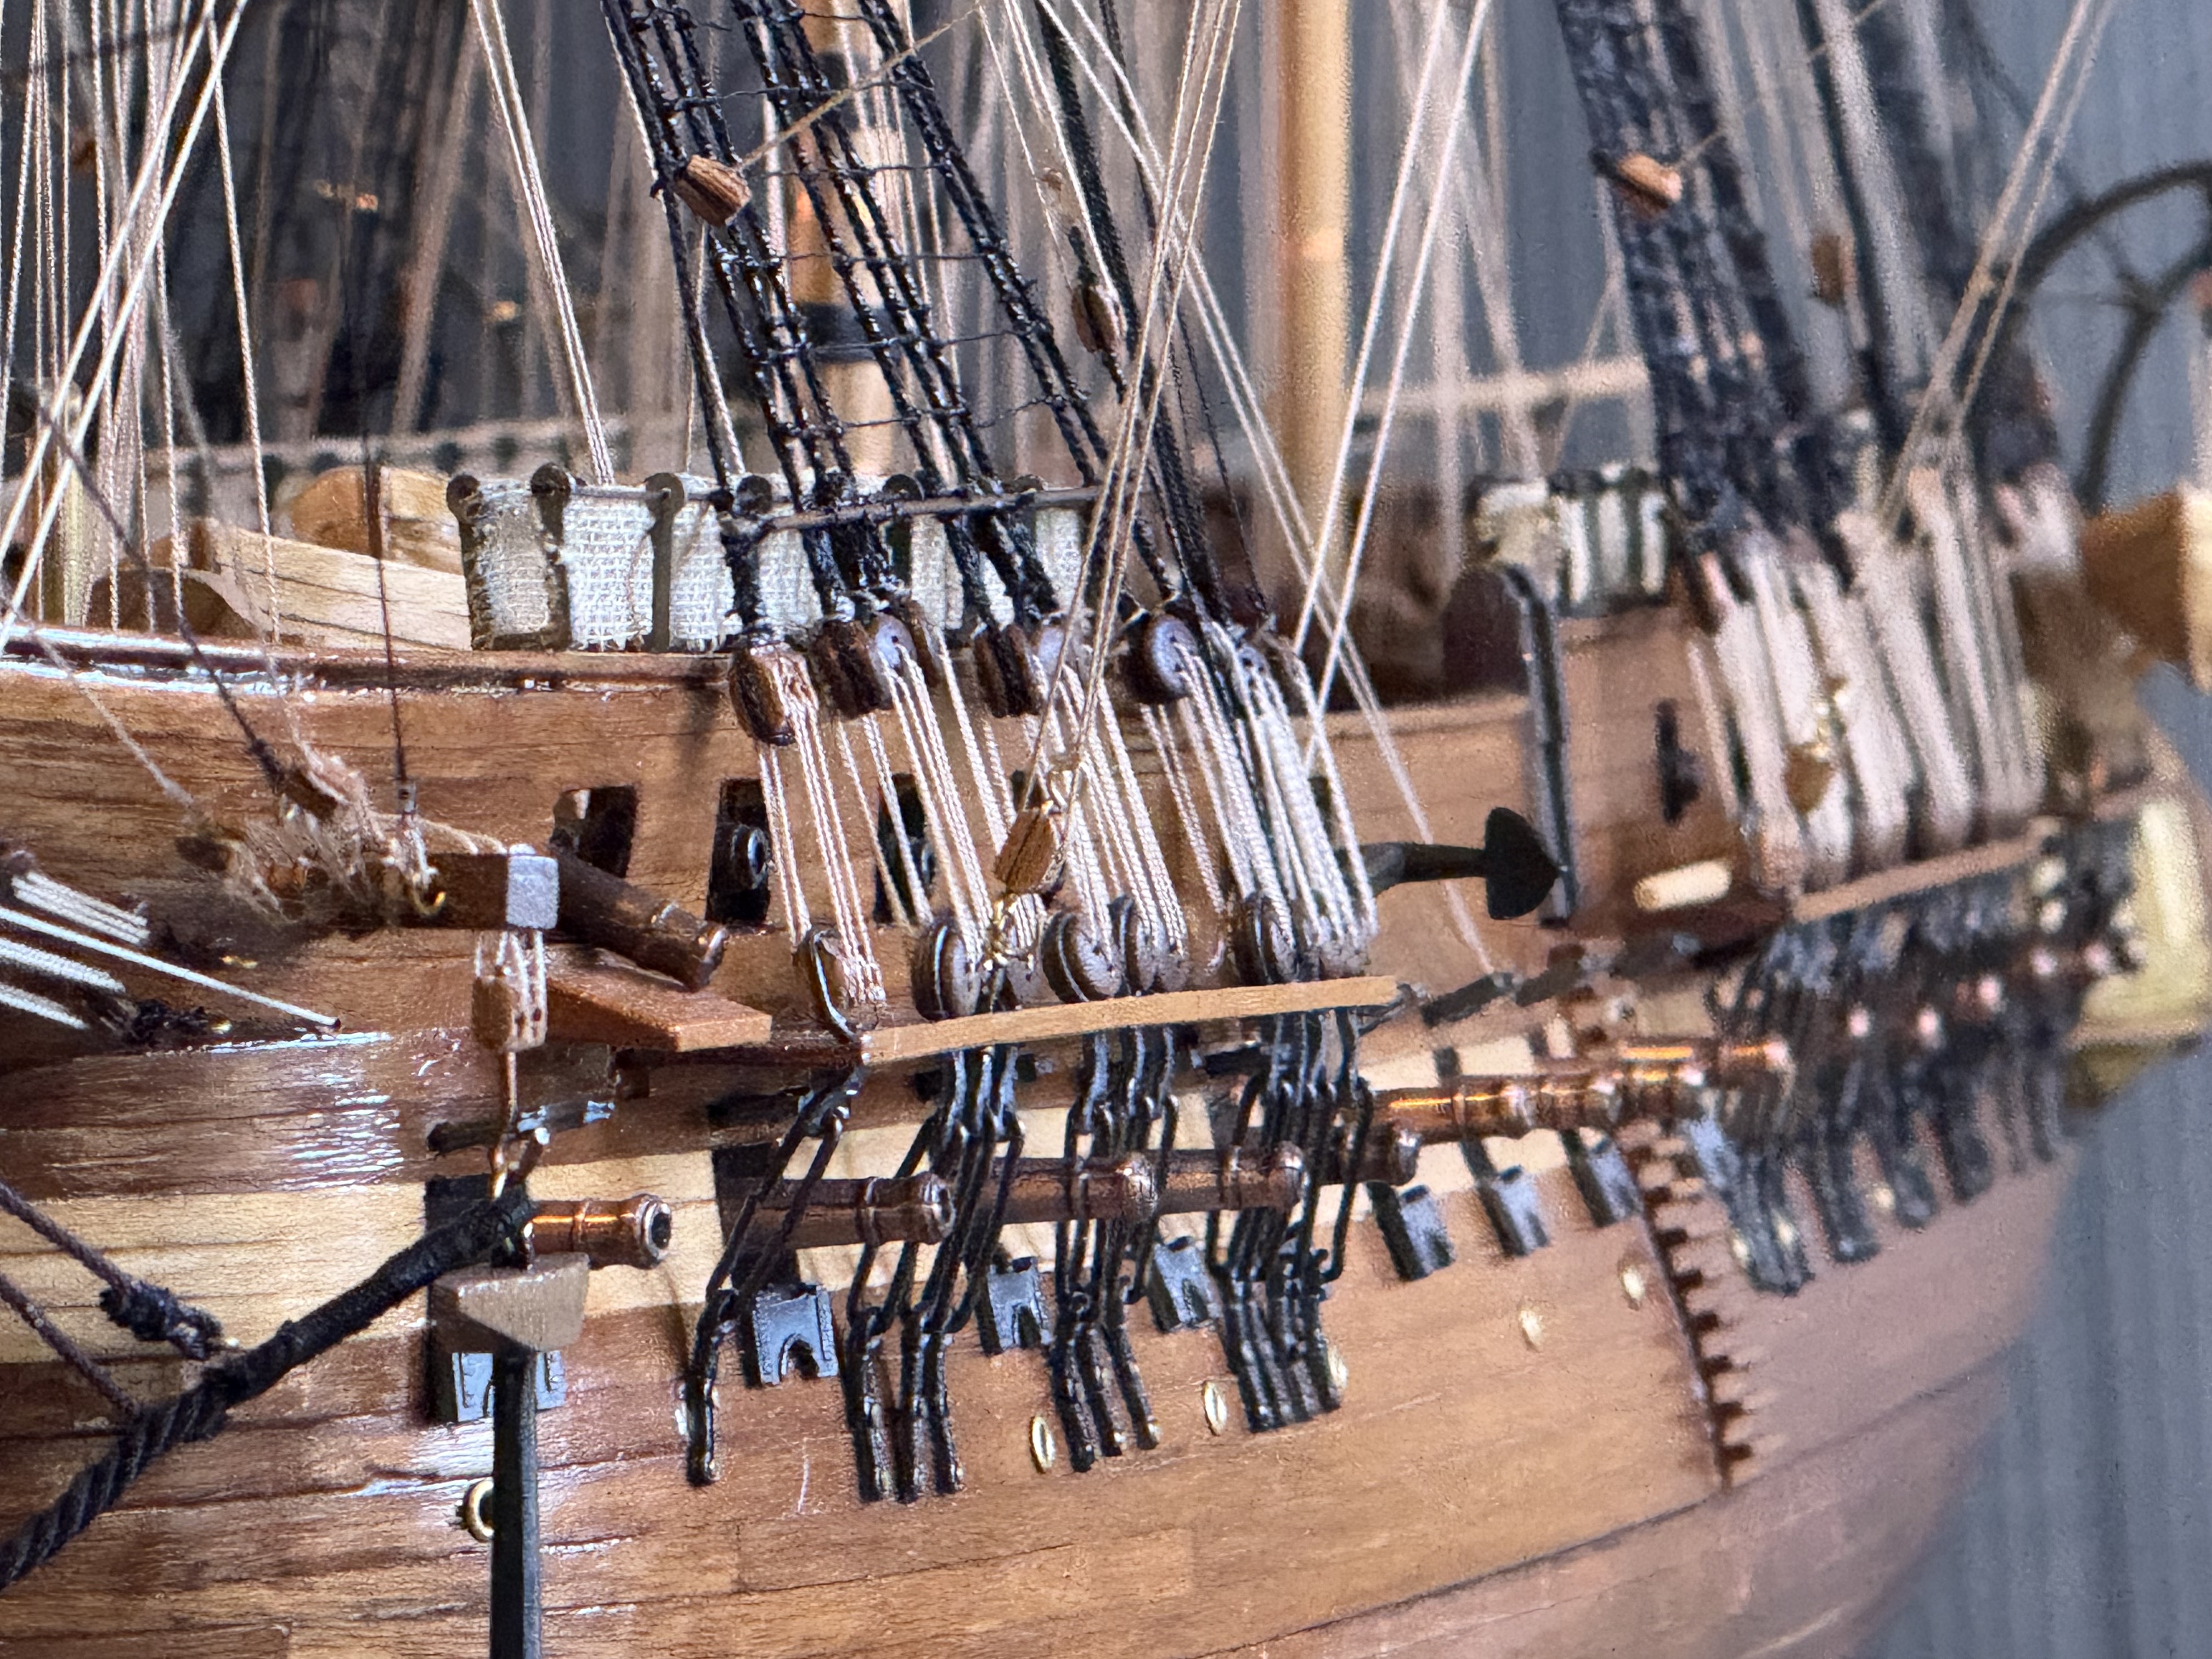
Magnified photos show warts and all. Like crooked gunport covers, gappy bulwark rail, bent channels. and a long gun which is aiming very low.!
The photo setup… black background, natural light, some telephoto. Gunport covers are in place. Looks OK from this distance?The gunport covers supplied by Mamoli are soft metal. The originals were thick painted wood. I imagine that they had separate round covers to block the central hole in rough weather. I quite like the soft grey colour, so will not paint them. But the wooden anchor bar needs some metal bands painted on.The plans for the barge davits had only single ropes, and the ropes for the blocks which attached to the boat were tied to shroud deadeyes. I could find no authoratative reference regarding these details. But I did note that Constitution currently has davits which are hinged, and when the pins are removed the davits are bent, moving the boat away from the hull and towards the water. I thought the boat crew could assist with the lowering using the tackle which is hooked to the boat, so I ended the ropes onto the boat. Rope coils will be added.Rope coils will be added to the belaying pins also. I ran out of the Mamoli supplied belaying pins and purchased 40 new ones which are the same length, but thinner and shinier. The shiny ones will tarnish eventually.
I have mulled regarding the carronade ropes. My intention is to install breech ropes, just winding them around the carronade knobs. The carronades are mounted on carriages with recoil slides built in. So the breech ropes can be fairly short. Installing gun positioning blocks and tackle will be overly fiddly, difficult at the scale, and look too crowded on the model so they will be left out.
PART B. The Case.
I have vacillated about this. Already the model has accumulated more dust than I like, and I know from experience that the longer the dust remains the harder it is to clean off. So a transparent cover is required.
Glass is heavy and dangerous if it breaks. Dangerous to personnel and the model.
Polycarbonate is very strong, but expensive, and apparently scratches easily if incorrectly cleaned.
Acrylic is less expensive (roughly half the cost of polycarbonate), less tough than polycarbonate (not bullet proof, but this is Oz not USA), and slightly less transparent. But on balance seems the best option.
The design has been given considerable thought and research. I drew up plans using acrylic, fluted corner columns, wooden base and framed acrylic. Then the problem was solved from a different source.
SWMBO said…”it needs to be simple, and not compete with the ship. So just a plain glass box.” So that was that. Except that it will be acrylic not glass. My thought is that the walls and roof will be 4.5mm acrylic, glued together, and lifted on and off the base in one piece. The base will be thick black plywood with rubber feet. Sitting on top of the plywood will be some 10mm black gloss acrylic. I have used black acrylic layered with black painted plywood on another model (cannon), and it looks good. If I decide to add some LED’s and batteries, the thick plywood base could house the batteries and wires.
Just to show the black acrylic layered on top of painted plywood. I quite like the appearance but maybe customwood would give a smoother appearance than ply. Or maybe I should use 2 layers of black acrylic and hang the expense. The build of the 1866 Armstrong 80pr rifled muzzle loader was posted 5 years ago on johnsmachines.com.
Next decision, will I make it myself, of get it made professionally? Not yet decided. I like to have control of the process, and supervise the quality control, and it would be less expensive. Also I could buy sheets of acrylic, enough to do the 3 or 4 ship models in my possession and planned. (I have 2 model ships which I bought recently, so I can give one to each daughter eventually. And I intend to assemble the model of Pharaoh Khufu’s ship.
A frigate (/ˈfrɪɡət/) is a type of warship. In different eras, the roles and capabilities of ships classified as frigates have varied.
The name frigate in the 17th to early 18th centuries was given to any full-rigged ship built for speed and manoeuvrability, intended to be used in scouting, escort and patrol roles. The term was applied loosely to ships varying greatly in design. In the second quarter of the 18th century, the ‘true frigate’ was developed in France. This type of vessel was characterised by possessing only one armed deck, with an unarmed deck below it used for berthing the crew.
Late in the 19th century (British and French prototypes were constructed in 1858), armoured frigates were developed as powerful ironclad warships, the term frigate was used because of their single gun deck. Later developments in ironclad ships rendered the frigate designation obsolete and the term fell out of favour. During the Second World War the name ‘frigate’ was reintroduced to describe a seagoing escort ship intermediate in size between a corvette and a destroyer. After World War II, a wide variety of ships have been classified as frigates. Often there has been little consistency in usage. While some navies have regarded frigates as principally large ocean-going anti-submarine warfare (ASW) combatants, others have used the term to describe ships that are otherwise recognisable as corvettes, destroyers, and even nuclear-powered guided-missile cruisers. Some European navies use the term “frigate” for both their destroyers and frigates.[1] The rank “frigate captain” derives from the name of this type of ship.
USS Constitution, 1797, was classed as a “heavy frigate”. HMS Warrior, 1851, was twice as long and 5-6 times heavier than Constitution, was also technically a frigate.
Speed, manoeuverability, and a single gun deck seem to be the defining characteristics in the early 19th century, so that is what I am going with.
The Mamoli Constitution has a gun deck with 30 long guns. 24 pounders (24lb being the weight of the round shot). But it also has a spar deck above, with 22 carronades and 2 long guns. So how many gun decks does that add up to? Just wondering.
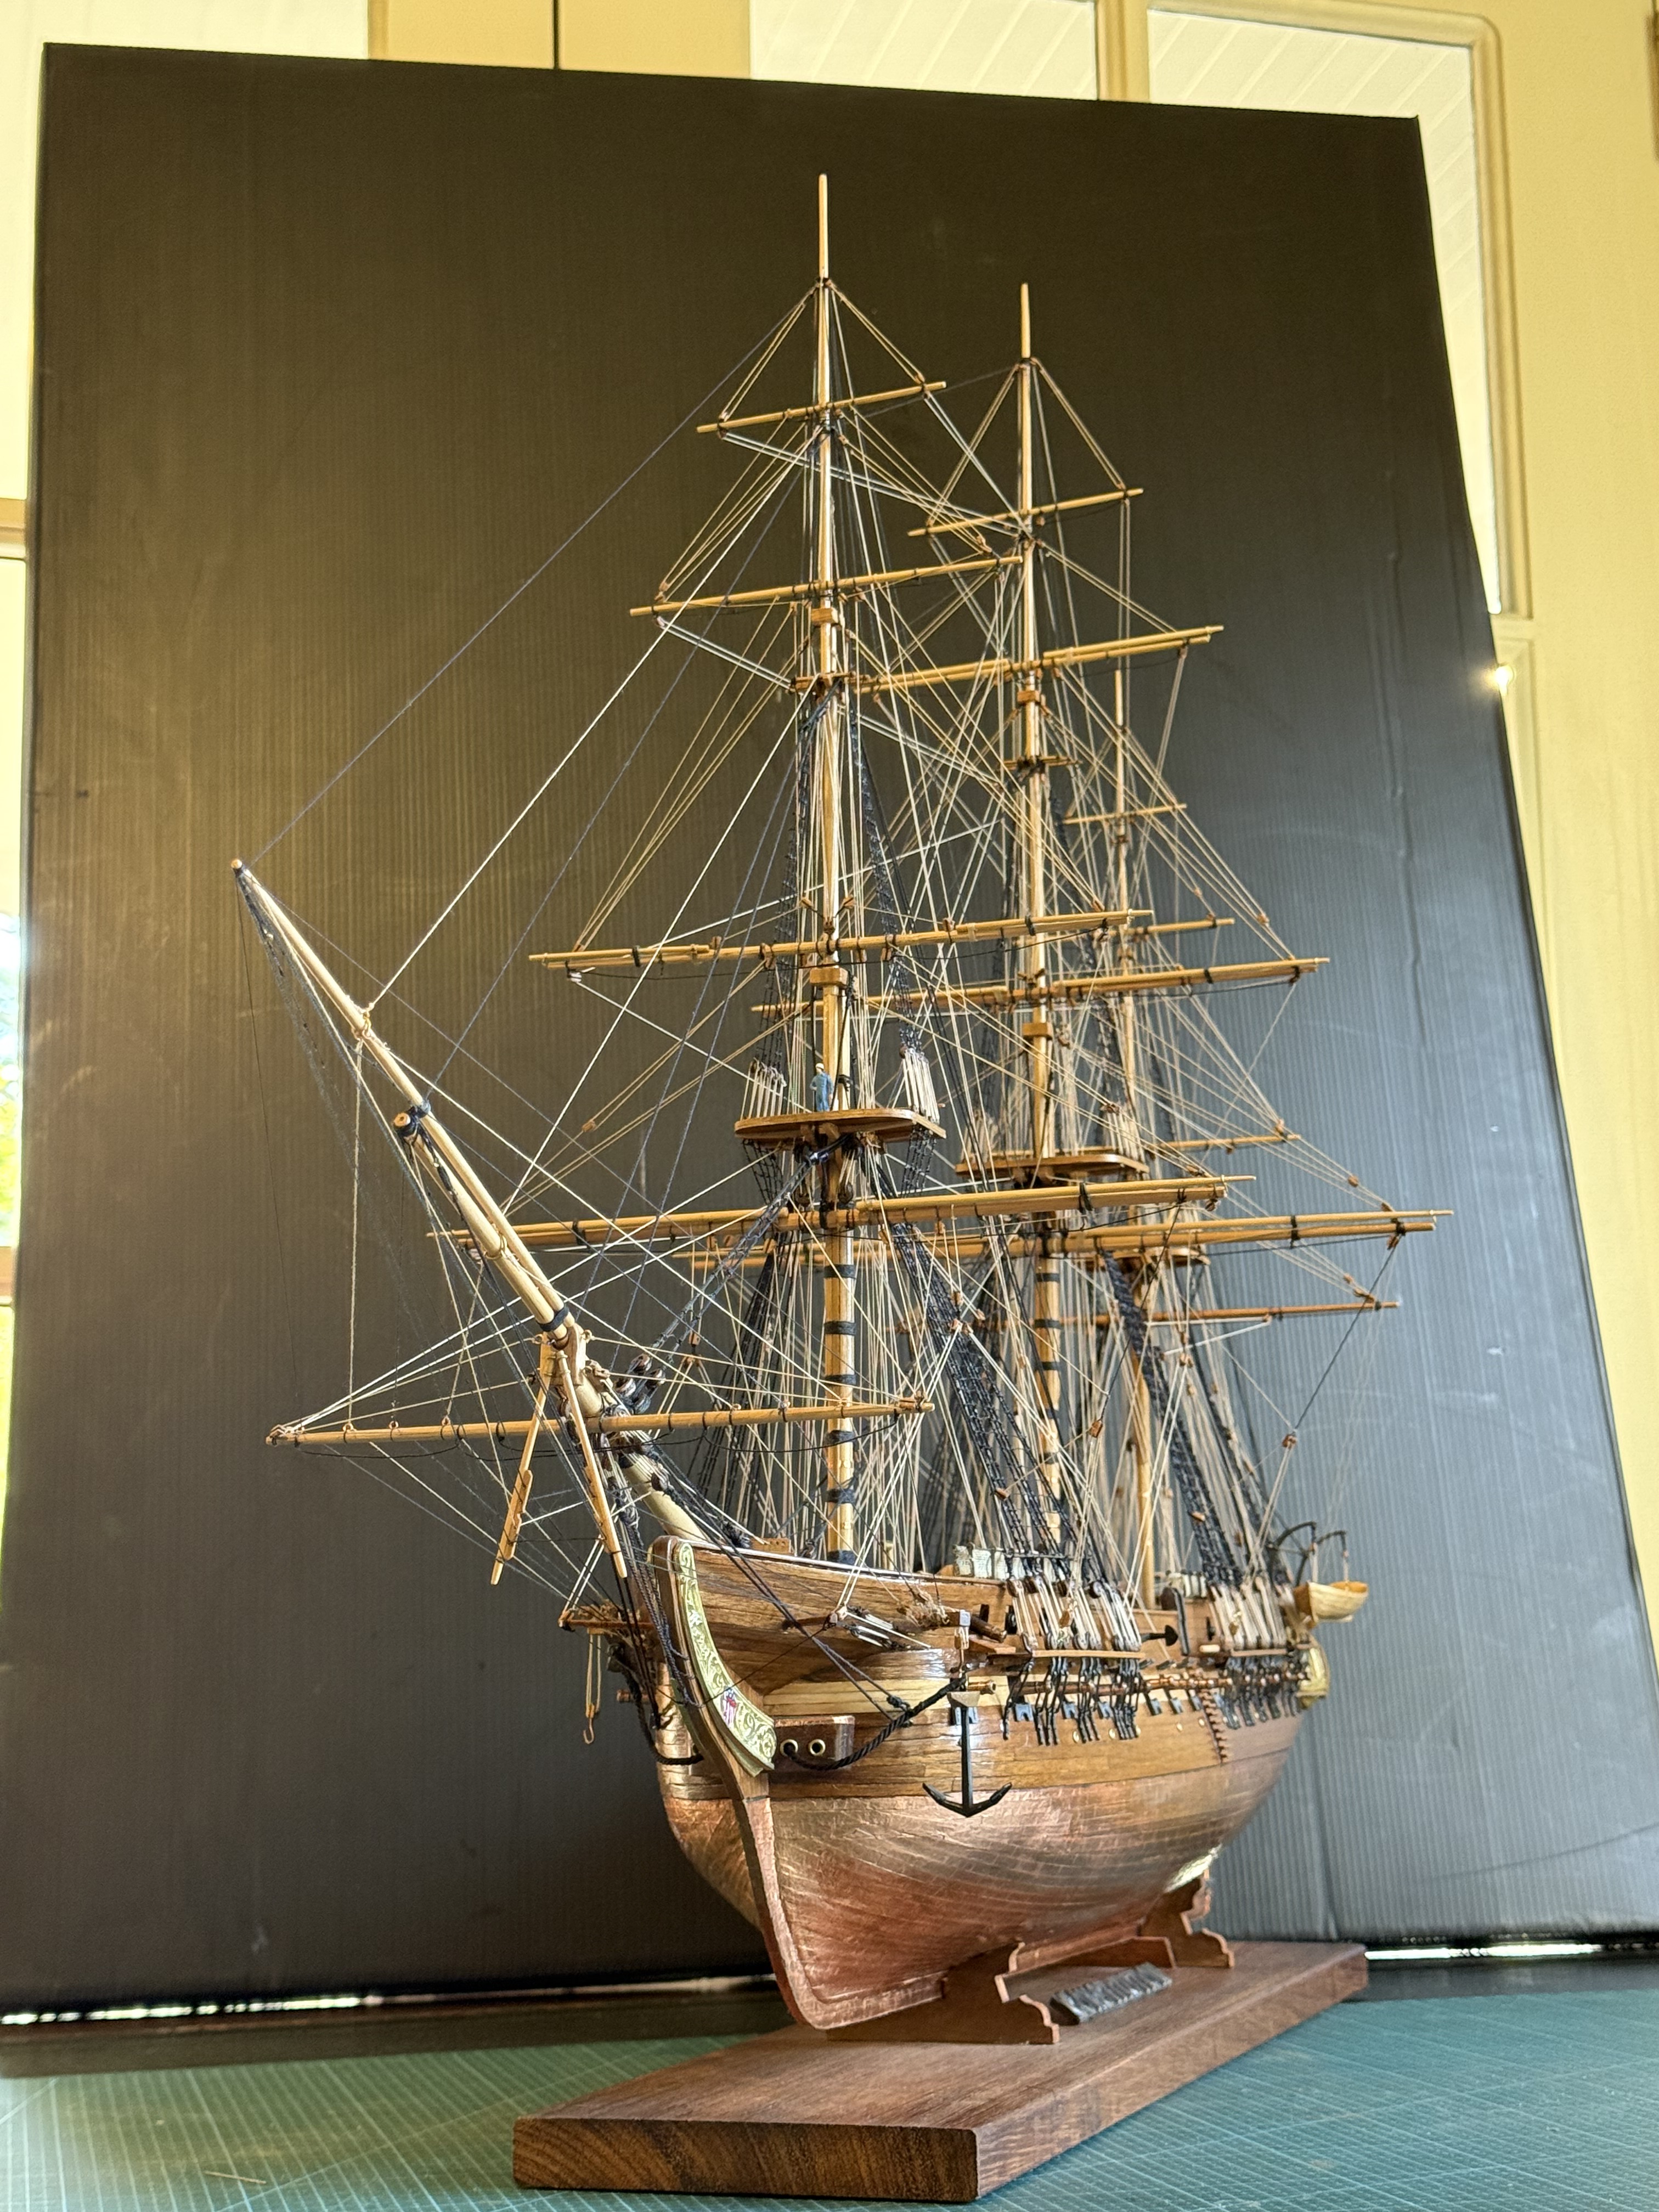
Anyway, I am now commencing the masts and rigging.
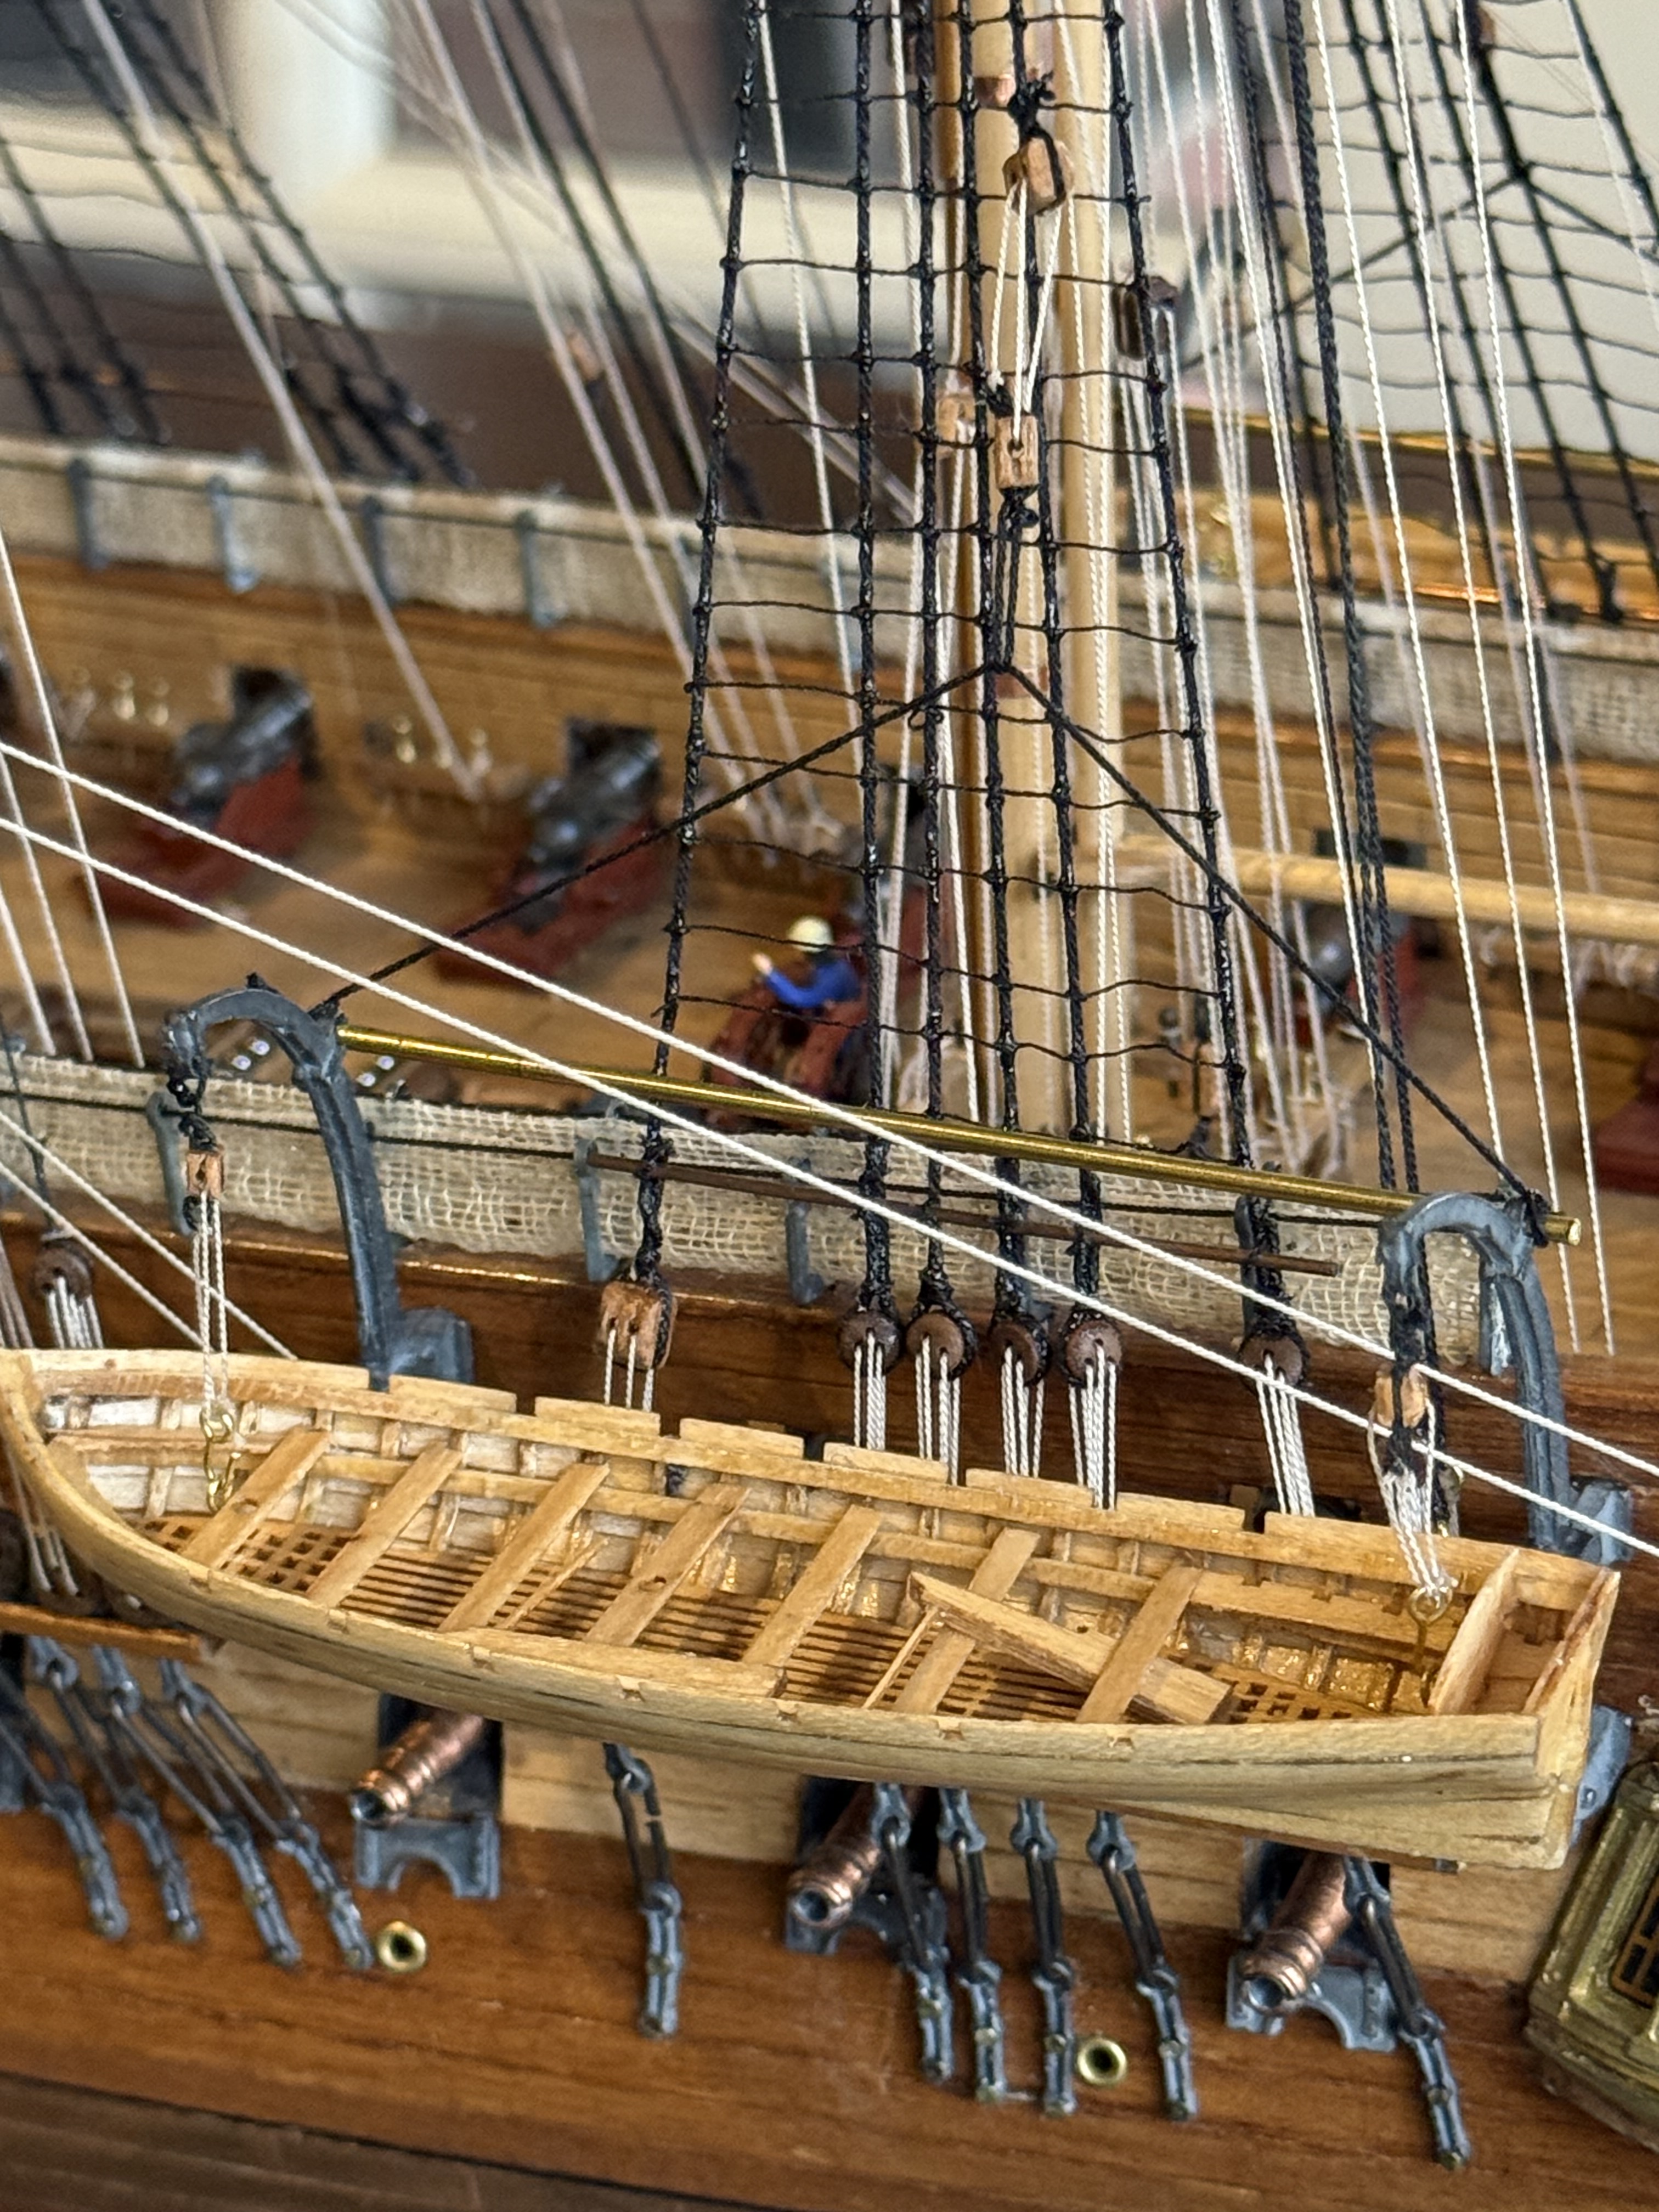
This is the barrel of one of the 24pr long guns. To the right are some of the deadeyes to which are attached fixed rigging to support a mast. (just sitting there at this time). Bear with me… I will get to the point of this post eventually. The muzzle of that barrel protrudes 10-11mm (depending on the barrel elevation.)
This is a 1:10 model of a 24pr long gun which I made years ago. In the full size 24pr’s about 1/3 of the 10′ length would protrude beyond the carriage. The sides of Constitution were said to be 21″ thick. So, if my arithmetic is correct, 1/3 of 120″, (40″) minus 21″ equals 19″ of barrel protruding beyond the hull sides. At 1:93 scale that equals less than 1/4″ or more precisely 5.2mm. These are the 24pr long guns supplied by Mamoli. I have cut off casting sprue, and then sanded them in the lathe. I also drilled the bore to a more visually appealing length. They were black in the packet, (intentional or just aged?) and sanding revealed the copper or brass plating over the soft base casting metal. Since the gun deck is not visible, there are no carriages for the gun deck guns.
But, from the pictures and calculations above, they protrude too far outside the hull!
So, I intend to shorten them, probably by about 4-5mm.
I have not yet decided whether to leave them with the brass colour or paint them black. Decorative vs. authenticity again.
And on the decorative vs. authenticity again, here is the model’s transom, with the bling added….
Hmm. Not sure about this. The photo flash makes the transom planks appear lighter than they really are, but even so, black and white would probably have looked better here than the gold and natural wood.
The kit came with only 4 stars, and I dropped one. Despite exhaustive searches, I never found it. So I searched the net and found a supplier with stars the correct size and number of points, and I purchased a packet. They are intended to be stuck to small girls’ fingernails, and were very glittery, so I applied some ordinary gold paint to get a more sedate appearance. I will straighten the name plate later. Annoying me.
And another thing. those gun port hatches with covers open into the captain’s quarters. Not sure about Constitution, but many captain’s rooms were cleared of furniture and partition walls when preparing for a battle, to extend the gun deck, but would the windows have been permanently covered with gun port lids? Maybe I should have ignored the Mamoli plans in this regard and glued the gun port lids to the upper 3 openings on the spar deck, and made windows for the lower ones. Anyone have information about this?
Finally, in preparing to commence the rigging I have checked the Mamoli supplied ropes. They are OK, but I am intending to make my own with a rope making machine. There are plenty of rope machine designs available, and I do have the equipment and expertise to make one. There should be something to post soon. Meanwhile SWMBO directed me to a shop which I have never before entered. It is as big as a large supermarket, and full of goods and materials for users of fabrics, embroidery, knitting. Even ship modellers. I think that I was the only XY human in the entire shop. “Spotlight”. I was directed to the “yarns” section. No long stories. Just a lot of spools of threads of different materials, colours, weights. I purchased some cotton in 800m lengths, black and brown. Then spent time examining various tools for embroidery and crocheting which should be useful in manipulating the “ropes” around the Constitution rigging. More on that later.
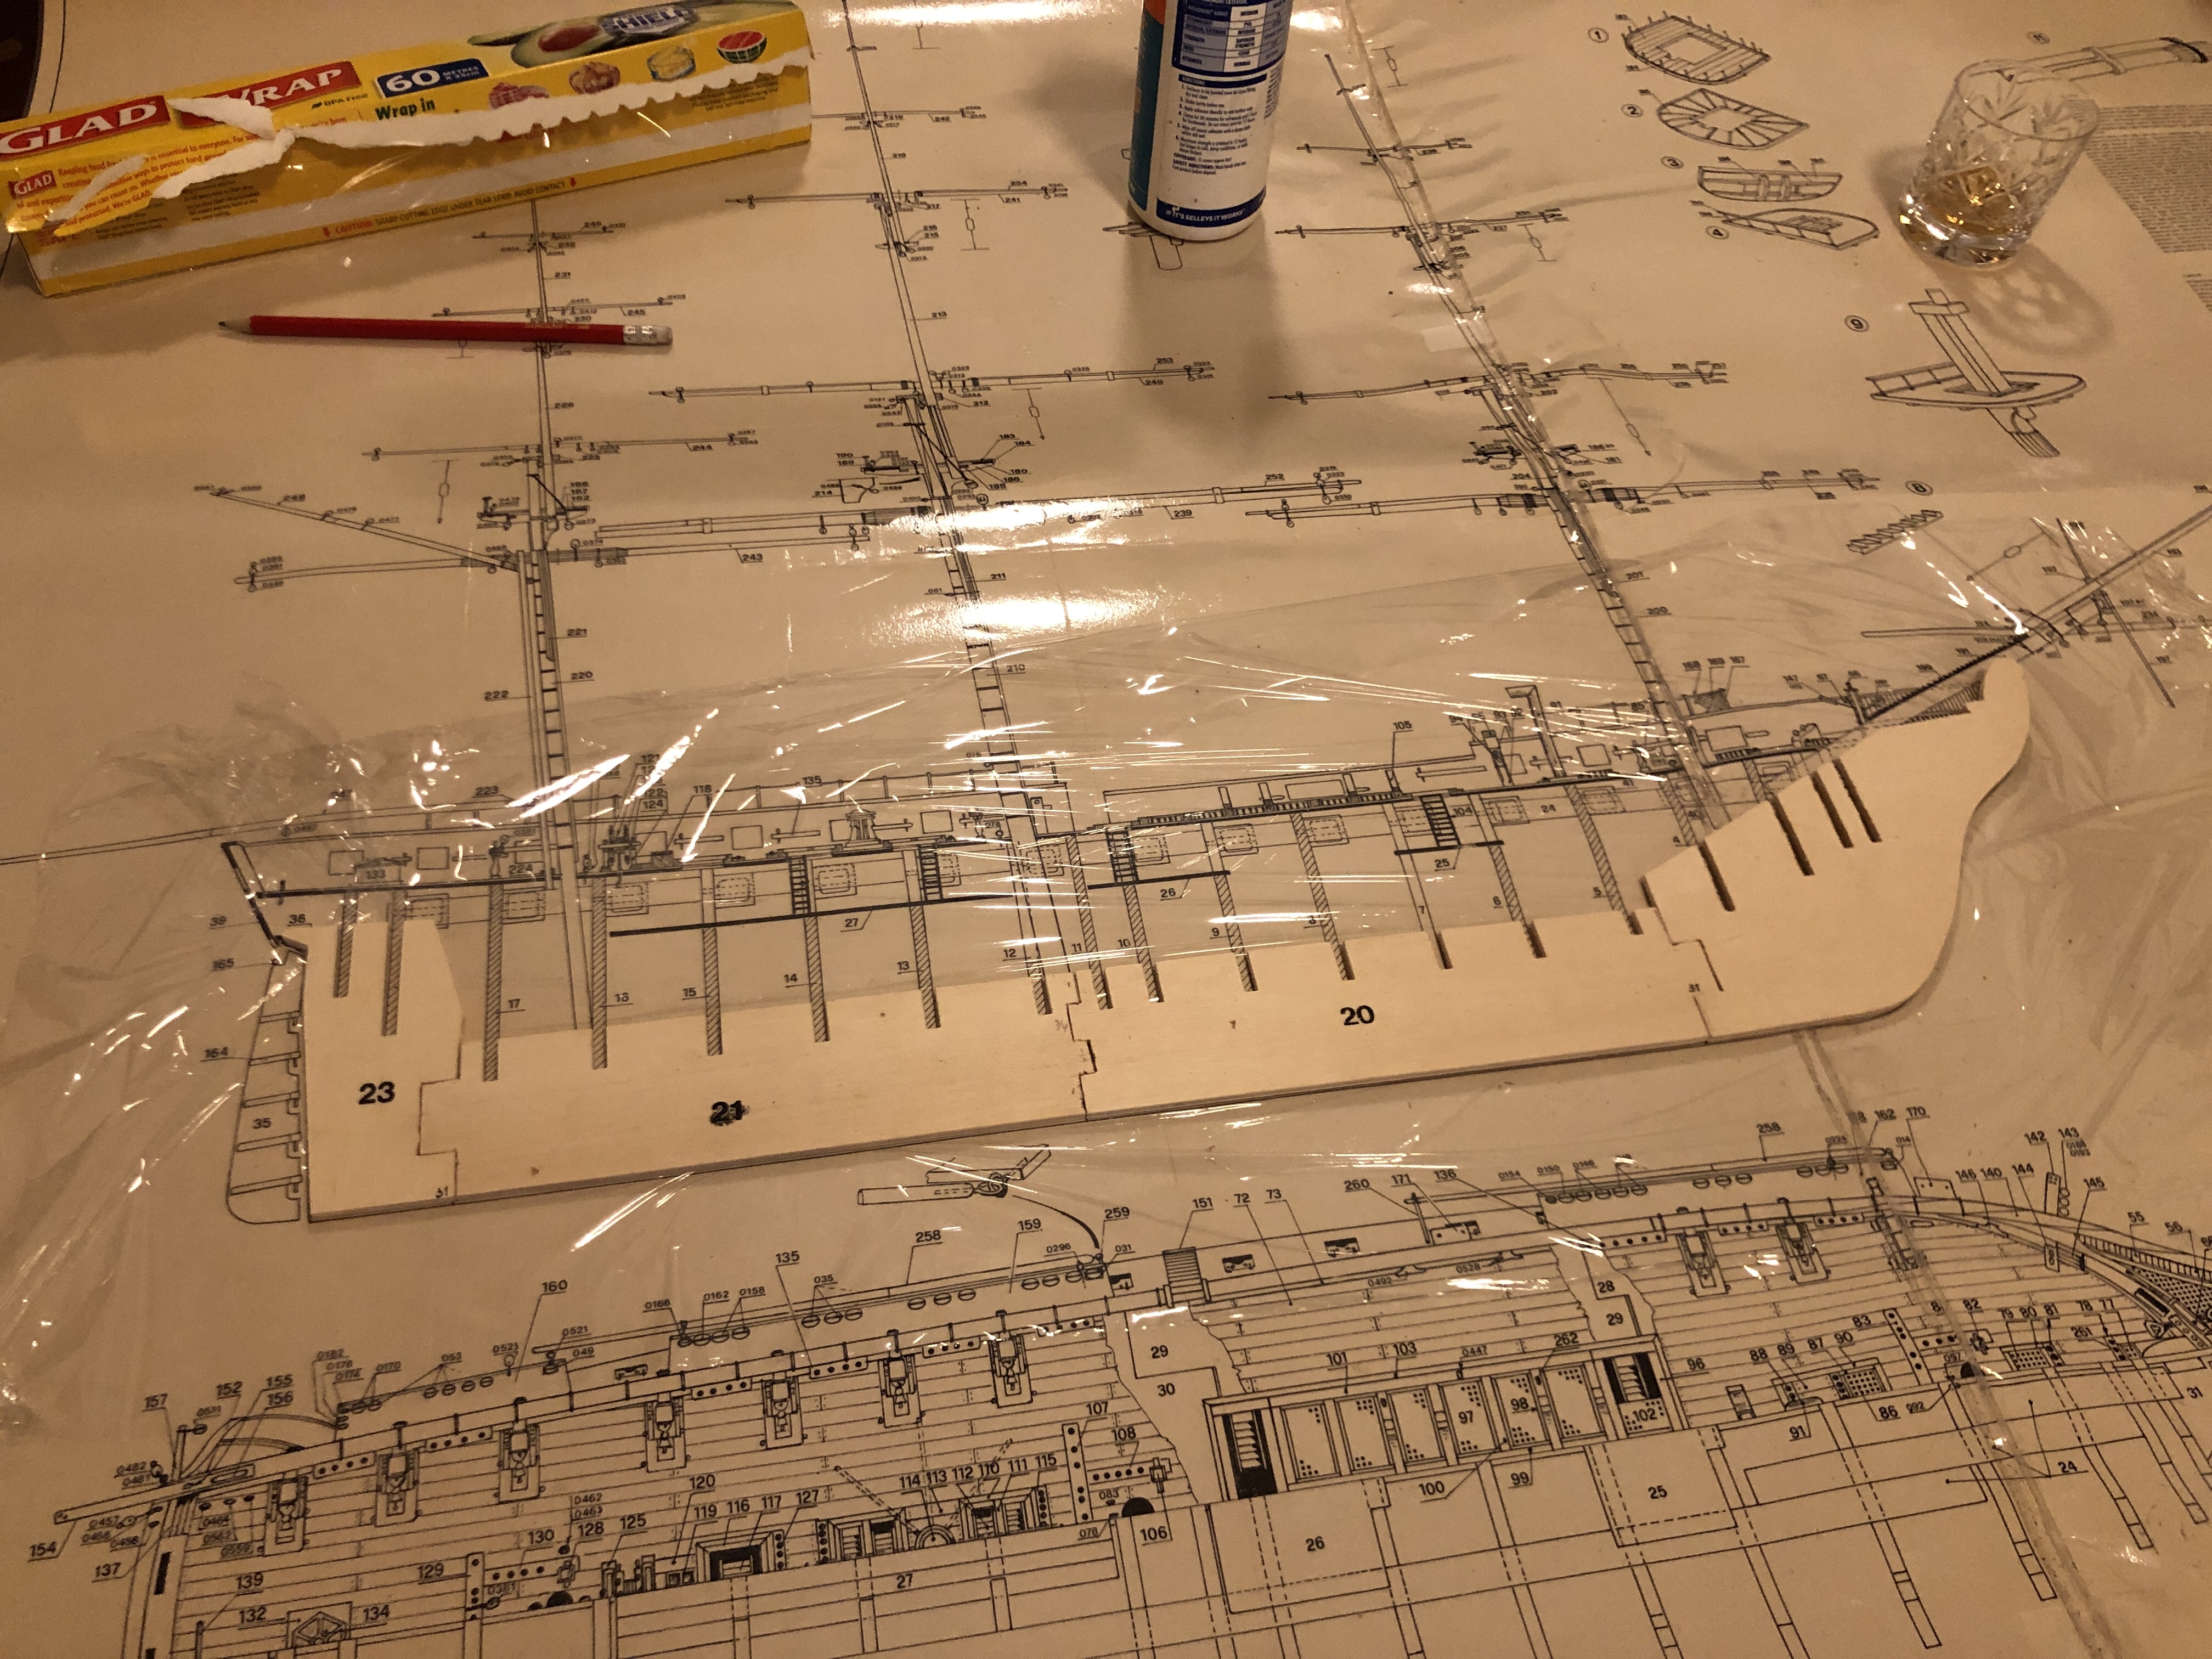
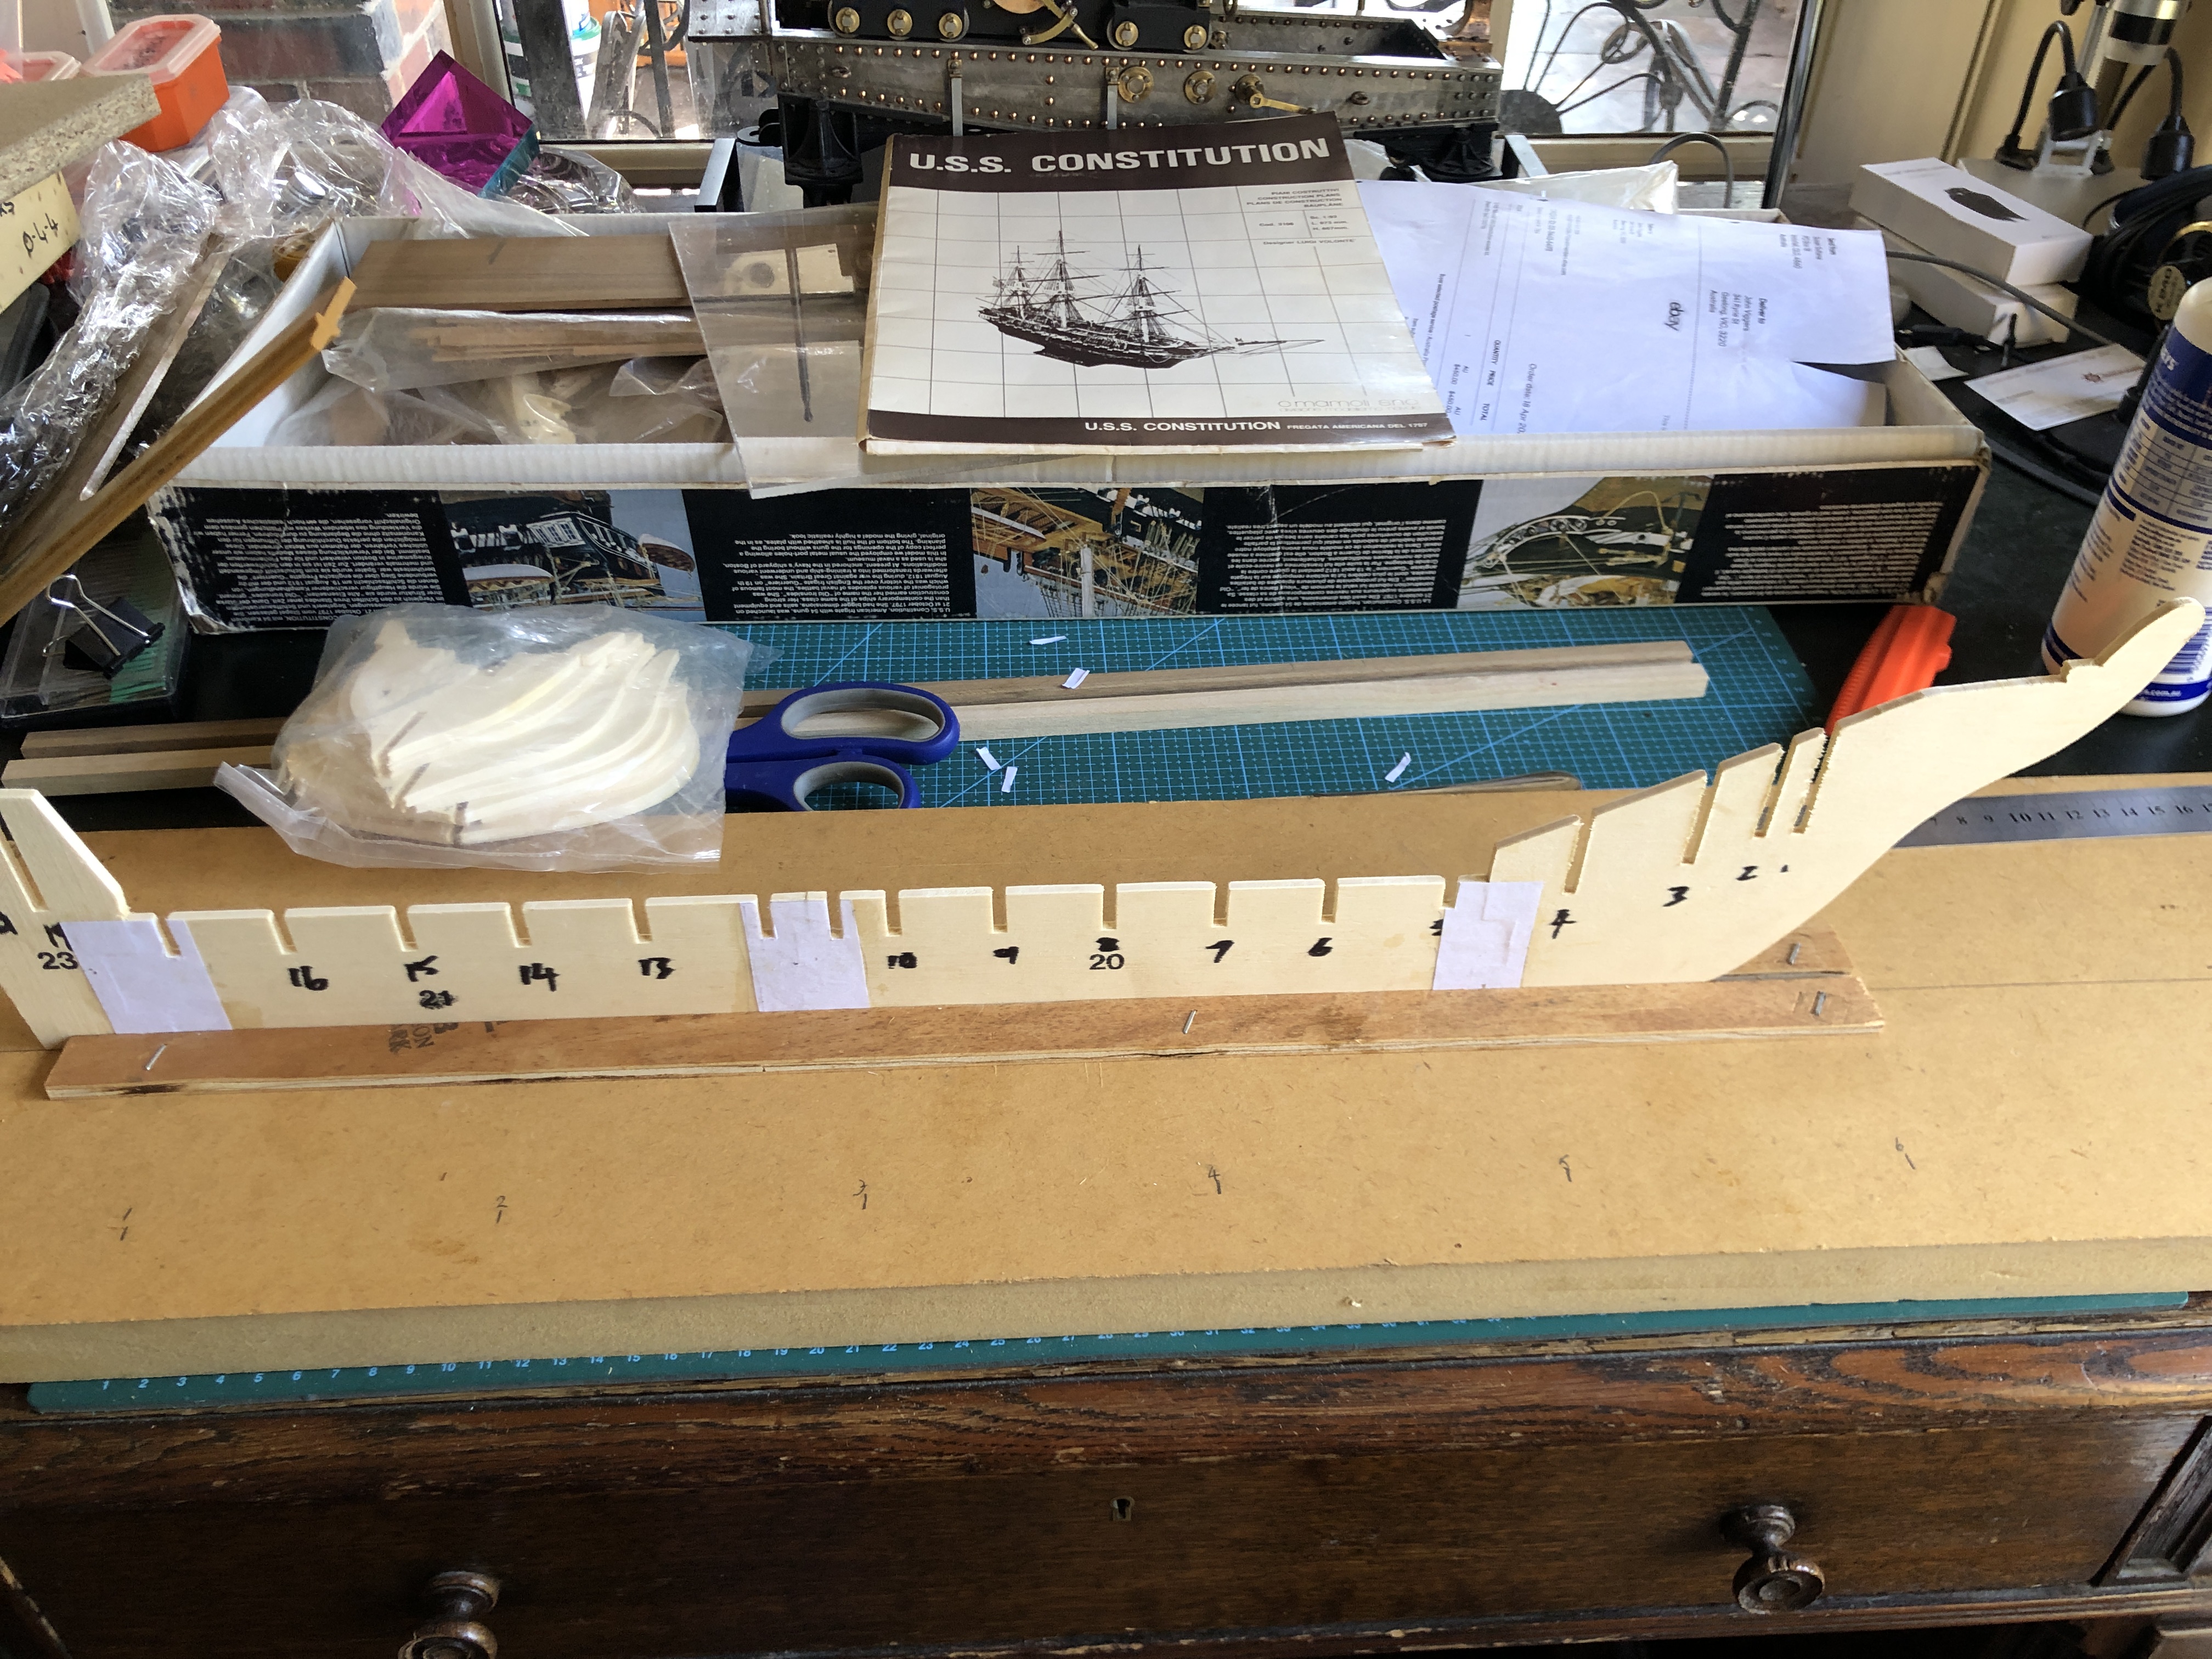
Construction starts with the hull, specifically the keel. The model keel comes in 3 pieces of 4mm plywood which are glued together. The instructions specify that the slots for the bulkheads should be positioned on top of the plans. Since the provided cut pieces are not absolutely accurate, some trimming with a sharp knife was required. I used to own some scalpels, and boxes of spare blades, but unable to locate them so I purchased an “Exacto” knife and a packet of spare No 11 (pointy, straight blade) blades. To avoid getting glue on the laminated plan I covered the plan with GladWrap.
The 3 numbered pieces of pre-cut plywood, trimmed by me to size, ready for glue. I used PVA white glue which did not adhere to the GladWrap. The keel will not be visible in the finished model, but it is the backbone of the ship, so needs to be strongly joined.The instructions say that the pieces should be nailed to the baseboard, but I decided that was not necessary, and just weighed them down with a board and books, and left the glue to cure overnight.The instructions suggest gluing some strips of paper over the joins, and since the glued keel was a bit bendy laterally I complied, and to my surprise the paper reinforcement did indeed stiffen the keel considerably. Live and learn. The strips holding the keel vertically were stapled to the baseboard. I numbered the slots to match the bulkheads. The original Constitution did not have bulkheads like the model, of course, just heavy frames and about 4 times as many. But the bulkheads will not be visible in the model, so I proceeded to use them. If I do one day make another wooden ship model, I will use frames, not bulkheads.
The next step specified gluing the bulkheads to the keel, but reading ahead I noted that the top deck was in 2 layers, and held to the bulkheads in neatly fitting slots. Also, the depth of the slots in both the keel and the bulkheads was quite variable and not in a straight line. And the bulkheads needed to be at 90 degrees to the keel, and vertical to the baseboard. And the plans were not dimensioned.
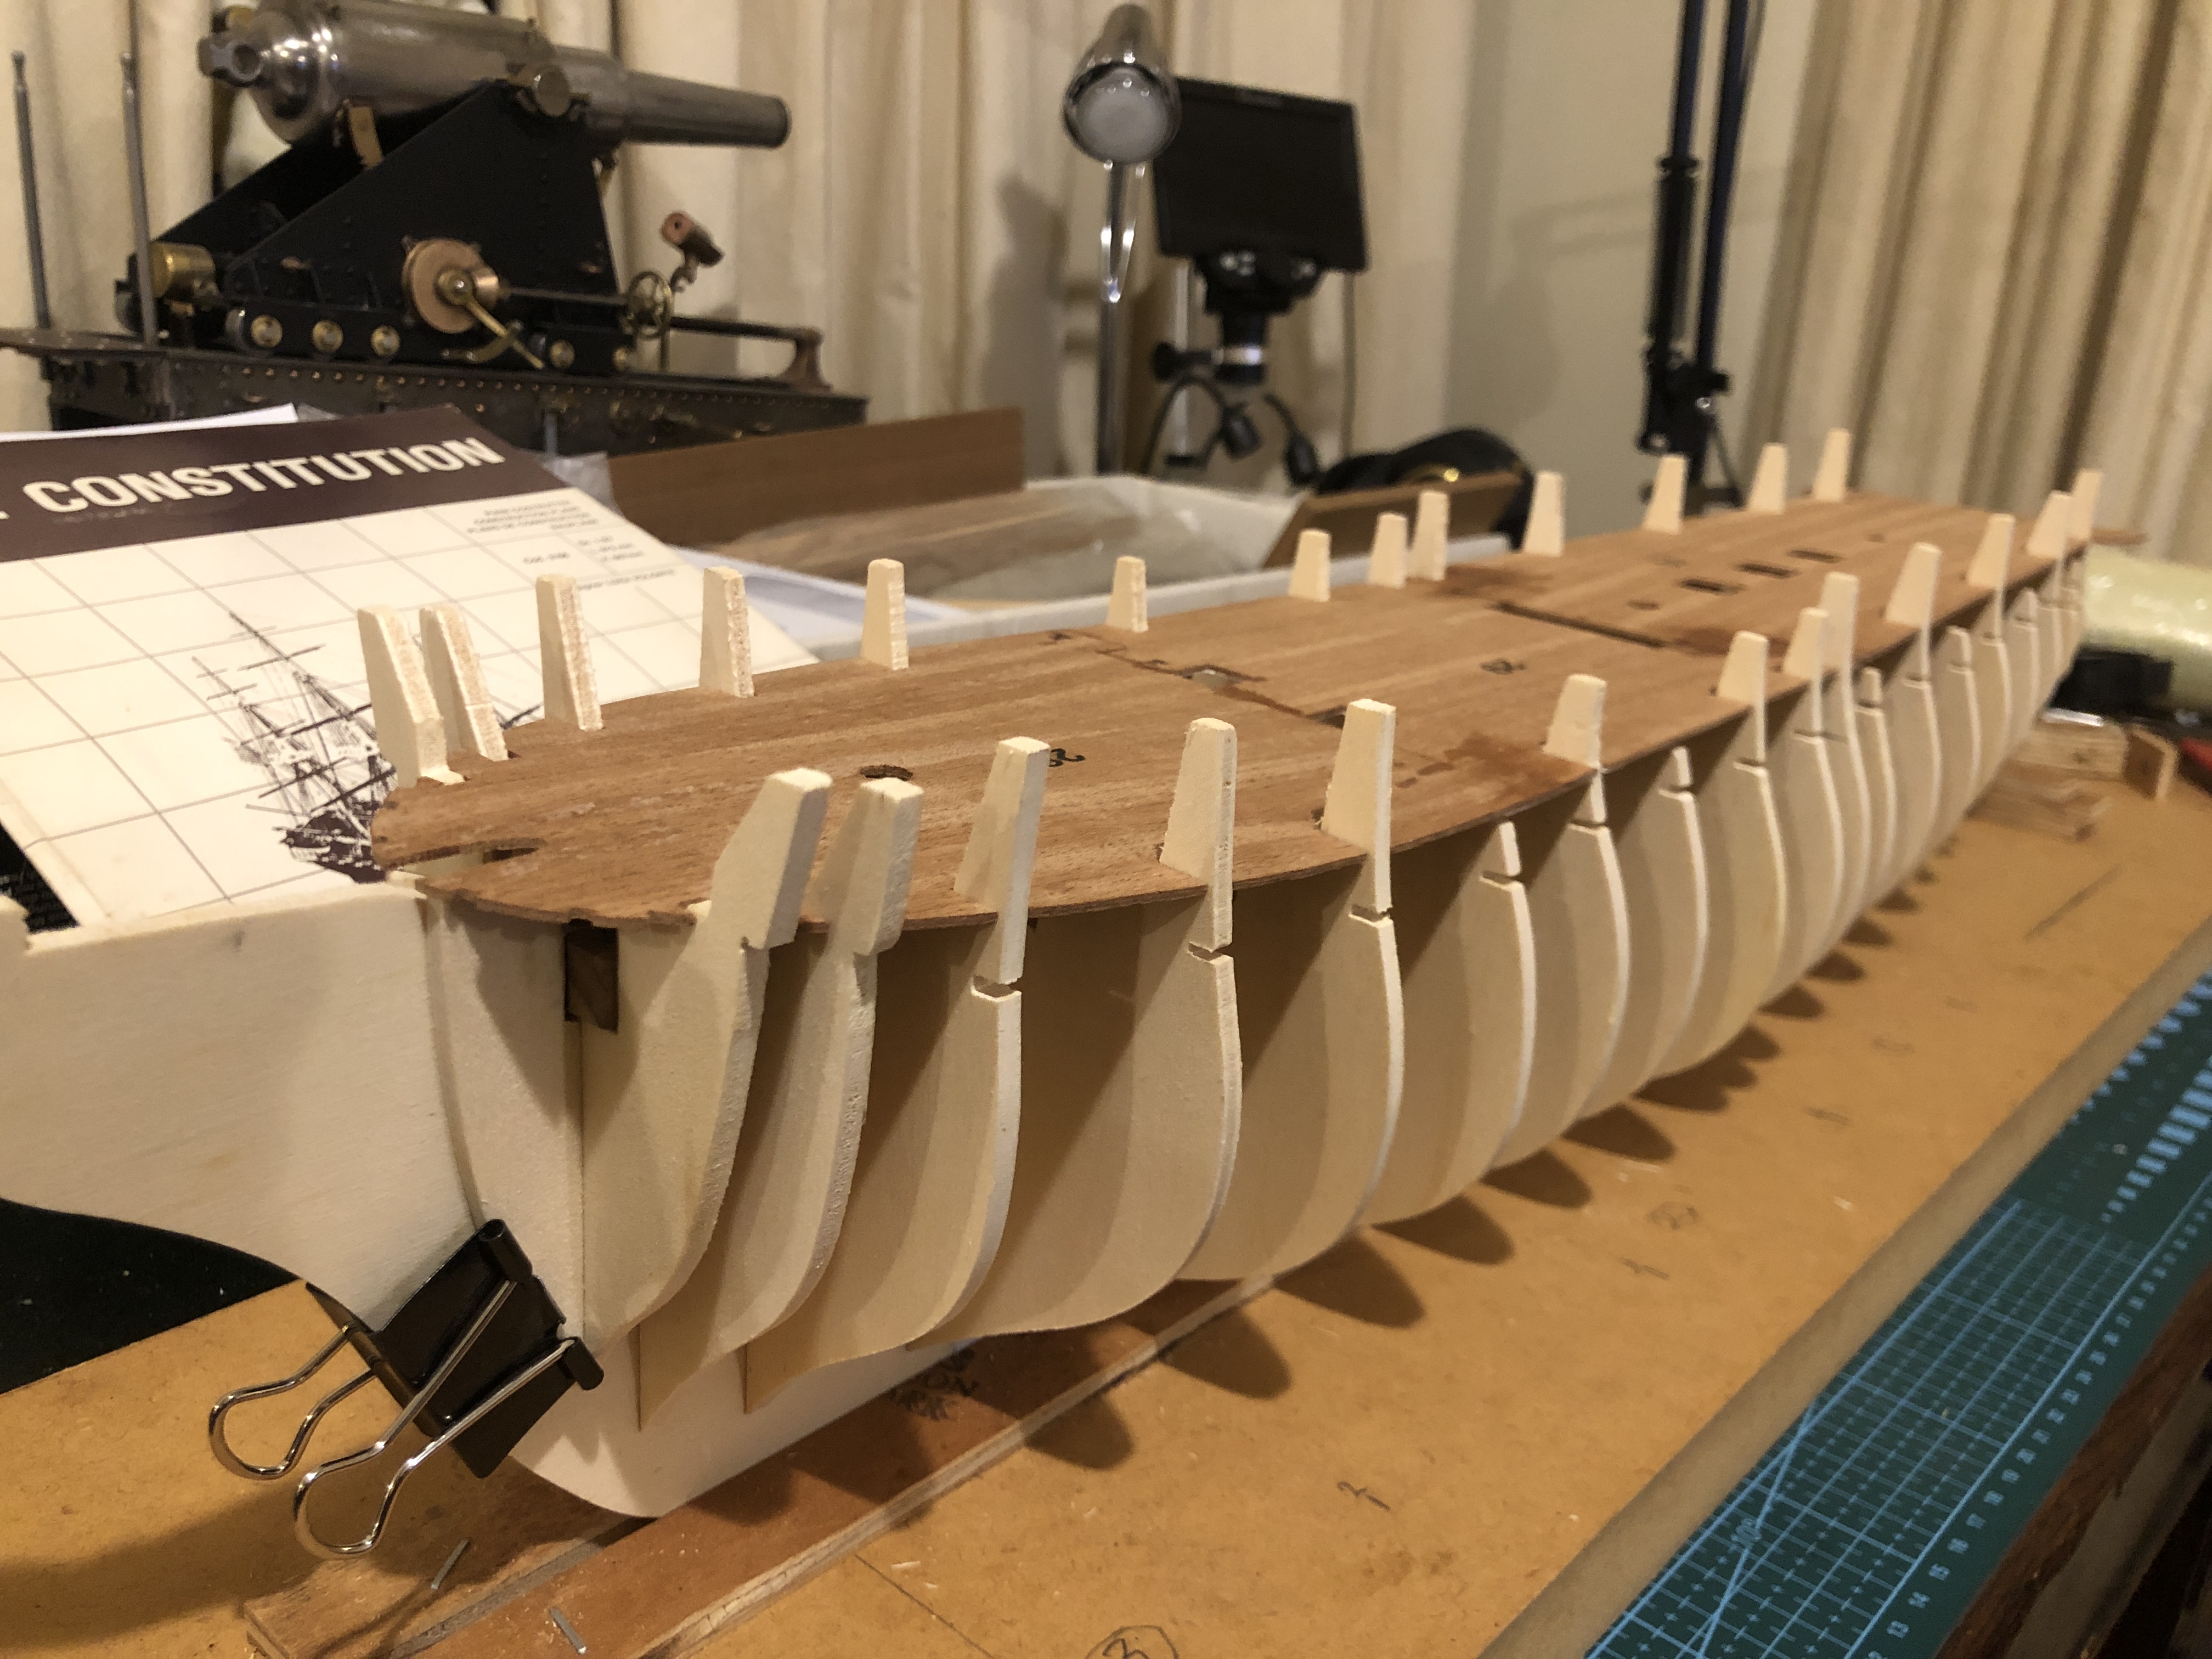
So I used a different order of assembly. I do hope that this variation does not return to bite me on the bum. I glued the 3 deck panels together, after doing a dry run assembly of the keel, bulkheads and deck pieces, and reinforced the joins with paper strips….
The deck panels glued together, again after measuring and trimming, making sure that the overall shape was symmetrical, and fitted the keel with bulkheads not glued yet. Then glued on paper. Some penetrations were covered with the paper strips, and cut out after the glue dried.Then made sure that the glued up deck panel fitted the bulkheads. Some enlargement of the undersized deck panel slots was required, but it is starting to take shape, No? The deck panel will not be visible after it is covered with planks later.
So that is where we are up to, after 2 days of about 6 hours/day. So far it has been very enjoyable.
I have been waiting for an inspiring next modelling project, preferably one that I can mainly manage at home, rather than my workshop which is about a 20″ drive away.
In the past month I have committed to two projects. One for the workshop (9pr field cannon of Napoleonic vintage), and the other I spotted on Ebay, placed a bid, and won it.
It is a wooden kit for a 1:93 scale model of USS Constitution. A Mamoli kit, about 30-35 years old. Sold by a QLD vendor (austin31614) with a starting price less than half new price. Constitution was an American heavy frigate, with a spectacular history, launched 1797, for the purpose of tackling Corsair pirates in the Mediterranean. And later heavily involved in the British-US war of 1812. More about the history in later posts.
I was a bit concerned about the kit because of its age, but the intact plastic packages within the carton was somewhat reassuring. I was very impressed by the seller (austin31614) who fully answered my questions and provided extra photographs.
To my delight, my opening bid won the auction. The vendor, was probably the best Ebay seller I have ever dealt with. They responded quickly to my request for more information with many photographs and descriptions. There was further amiable correspondence after the win, and an invitation to notify them if there were problems with the kit. This was reassuring because of the age of the kit.
The kit arrived about 5 days ago. 2 packages, weighing about 5kg. They looked undamaged. Our modelling engineering club president suggested a video of the unboxing, and we decided to do the unboxing at the next GSMEE meeting. I know that kids love unboxing videos, and I admit to watching them myself occasionally. But would our GSMEE membership be at all interested? After all, most of us are grandfathers, and possibly a few great grandfathers. But as model engineers I suspect that we just love toys, so we decided to give the unboxing a go.
We have a prospective new member. He gave the first talk. Retired now, but a long working career as a pathologist, with special expertise in gynaecological pathology, and forensic pathology. He talked about shotgun cartridges, with a display from a local industry, Winchester, now closed I think. And a very interesting case involving a shotgun murder suicide.
Then my turn. What an act to follow. So I just did a brief introduction, and opened the cylinder with the plans. They were yellow with age, laminated, and in good condition. I noted that there were 2 large sheets which had been sticky taped together to make an A1 size, along with a number of A2 sheets. The sticky taping had not been done very neatly, but more about that later. Handed the sheets around the table for the perusal by the 16 members present.
Then I attacked the rectangular box. The superb, multilayered packaging took a while to remove. The box was also a bit discoloured with age, but not as bad as I expected.
Found a ship modelling book. Nice. A good read for later. A long intact package of strips of wood for planking, mast components and spars.
Several intact packages of bulkheads, decks, the keel. All looked intact and good.
Packages of twine in different thicknesses, blocks of different sizes, wooden tiles to substitute for copper sheathing (I expect to replace those with copper foil), quite nice castings for anchors, name plate, and other fittings. Castings of carronades which I will probably use, and of long gun barrel mouths which I will probably replace with long guns of my own manufacture. Brass Pins. Chain links. And lots of other small parts.
All in all, the components were better than I expected.
Near the end of the meeting, with a few members remaining.Winchester shotgun display at rear. Me, Rudi and Brendan discussing the plans. Brendan has been over the original Constitution in Boston USA. Rudi has some experience in model ship building, and is a qualified boat surveyor and sailboat owner. Me, I have not tackled a wooden model of this complexity before.
There was quite a lot of conversation about the kit, the project, and the plans. An offer to lend me some modelling tools, and another to top up the brass pins.
A successful trial of an unboxing, I think. Despite the average age probably north of 70.
Since this is my first wooden model ship since a was a teenager, I will probably make it as intended, rather than introducing suggested modifications, but I am already considering a future project of scratch model ship build along traditional lines, with built up frames, layered planking etc.
This evening, after the unboxing, I could not wait any longer. I had read several books about model shipbuilding, and watched numerous YouTube videos, and read the fairly detailed instructions accompanying the Mamoli USS Constitution kit.
I found the keel components and glued them together, with PVA glue. Actually, I set up a flat baseboard on the dining room table, placed the full size keel plan on the baseboard, and tried to fit the 4 plywood components together. And realised that the 30-35 year old kit was not accurately cut out. It was clear that the bulkheads needed to be positioned on the keel at precise positions. Not only did the keel components not fit together, but the bulkhead slots were up to 1mm out of position. This was not a laser cut kit. Silly me. It was probably CNC cut, with relatively primitive cutting tools by todays modern CNC standards. So I spent some time with an Exacto knife adjusting the keel components. Not difficult. Mainly concerned to not cut my fingers. And ended up with a straight keel, and slots very close to their intended positions.
The glue can set overnight. The plan was protected with Glad Wrap, which was also placed against the keel pieces, preventing them from being glued to the base or compression piece, weighed down with some heavy books from my library.
The keel pieces positioned over the GladWrap protected plan, ready for gluing. I had removed the old sticky tape joining the plan halves, and carefully retaped the join. The plywood and solid wood parts needed trimming up to 0.5-1mm to match the drawings. Glued and weighted.The castings appear to be quite good quality.
I intend to continue with further posts about progress on this model.