johnsmachines

machines which I have made, am making, or intend to make, and some other stuff. If you find this site interesting, please leave a comment. I read every comment and respond to most. n.b. There is a list of my first 800 posts in my post of 17 June 2021, titled "800 Posts"

Tag: Turkish cannon

Fort Nelson. The Ottoman Bombard revisited.

Just to refresh your memory, if you are a long term reader of johnsmachines.com, this is the model of the Ottoman Bombard which I made several years ago …

bombard - 19bombard - 20bombard - 21

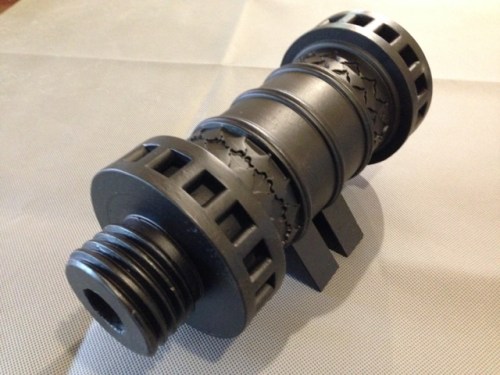
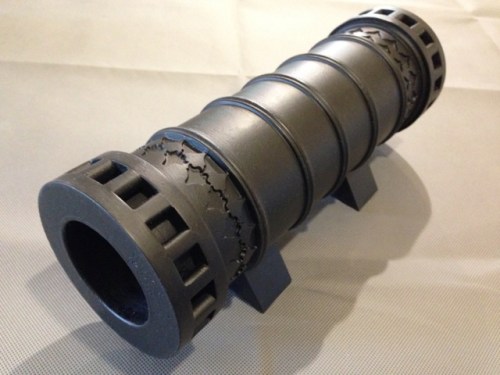
…but it is not finished.  I could not find a picture or drawing of the touch hole anywhere.  Requests to the museum drew no response.

Plus, I had some questions about how the square holes were made.  These were designed for levers to be inserted so the cannon segments could be screwed together.  But were the round pegs cast with the barrel and breech, or were they somehow added later?

Also, I wanted to take a close look at the huge V threads to see if I could work out how they made them.

And frankly, I just wanted to touch it.

It is currently on display at The Fort Nelson Royal Armories Museum near Portsmouth UK.  And I visited it today.  I allowed an hour to inspect the bombard and have a quick look around the rest.  4 hours later I staggered out.  This museum is another fantastic place to visit.  I will do a more complete report in another post. For the moment I will deal with the bombard.

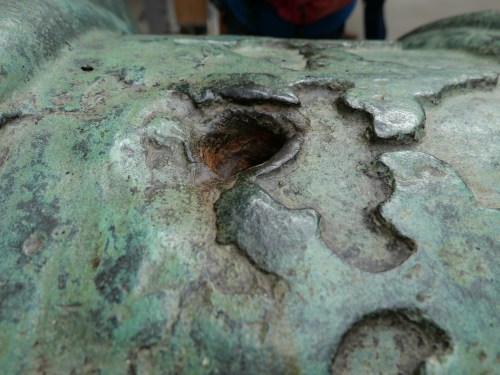
Firstly the touch hole.  Save these photos.  They do not appear anywhere else!

P1021867

P1021882

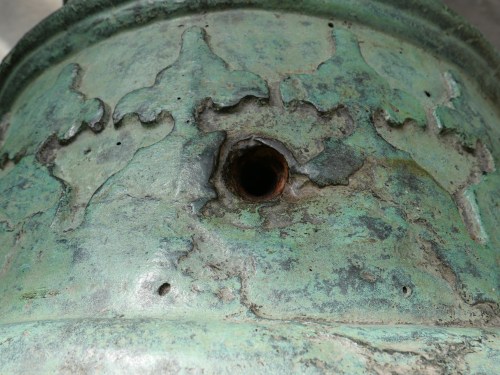
Not much design finesse there!  The wide opening becomes narrower about 25mm in (just visible).

P1021881

Next, the bombard as it was today..and I touched it!

P1021906.JPG

It is 17′ (5.2m) long, weighs 16.8 tons (17000kg).  It was made in 1465 by Munir Ali, as a copy of the bombards made by Orban, a Christian (Hungarian? German?) for Mehmet 2, the conqueror, who took Constantinople in 1453 on 29 May, (today in Oz).  Orban’s biggest bombard, named Basilica reportedly was 27′ (8.2m) long!

P1021880.JPG

That’s my hand underneath the “pins”.  Actually levering braces, cast integrally with the breech and barrel.  You can see dents, probably made by the levers.  In doing this I realised that the “pins” are not cylindrical, they are half a cylinder (split lengthwise).  The half cylinders allowed clay or something similar to be placed around the mold, under the half cylinders, and for the gaps between the half cylinders to be filled with clay pieces, to be broken out after the cannon casting.

And the huge threads…

P1021902.JPG

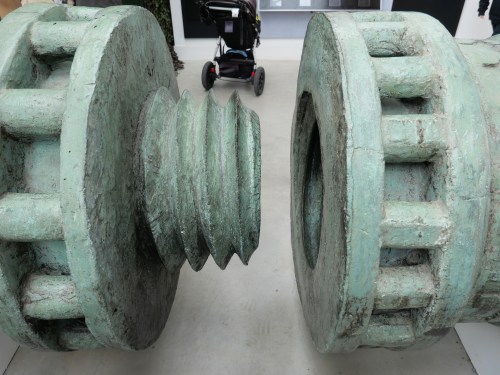
Well, I am no closer to understanding how these were made.  They are rough and irregular.  I would guess that they were carved in wood, then a clay mold made from the wooden model and baked, then the clay shape used in the final casting, and broken out afterwards.  Any other ideas?

I really enjoyed this visit.  If I have any WordPress storage remaining I will post some photos of some of theother artillery pieces later.

When I finally run out of space, I am afraid that will be the end of my posts.  Thankyou all for following.  It has been great fun posting, and answering comments.

Just in case this is the last post, I have to post these pics of the WW1 British rail gun.  It is truly awesome.

P1021962P1021963P1021964P1021965

P1021967

Cannon caliber 18″.  The Yamato (Japanese WW2 battleship) had 9 guns of this caliber.

P1021961

The breech OD  is at least 5′- 6′


Turkish Bombard – the barrel mouth

IMG_4572.JPG

Except for a name plate I have finshed the bombard.  The floral design at 12, 4 and 8 is not as clear as I wished, and the Arabic script at 2, 6 and 10 is even worse.  But it is cut in wood, and it is a first effort at such work, and it is not easily seen in a model only 106mm 4.2″ diameter, so I am reasonably satisfied.

Also, this was always a prototype, in wood, and I have not totally dismissed the idea of making it in cast iron or brass.  In metal I am sure that the detail work would be a lot finer.

Modelling A Turkish Bombard- The Pins

b281d1ba4455df20d7b832411bb00443

There are 16 pins at each end of each section of the cannon.

These were certainly used as leverage points, for very strong men with large levers to rotate the 8-9  tonne segments against each other to engage and tighten the screw.

I cannot see how the pins would have been cast with the breech and barrel.  For my model I decided to make separate pins and fit them into the gap between the big rings, then insert a grub screw through both rings and the pin.  The holes are then filled.

I wonder if a similar method was used in 1464.  I would love to have a close look at the original cannon to figure this out.  From the photographs, I can see no evidence of later insertion of pins, but neither can I see how it would have been done any other way.

IMG_4373.JPG

Drilling the holes for the grub screws

IMG_4395.JPG

In order to continue with red gum, I made my own pins.  This is the setup.  The blank is held approximately centre in a 4 jaw….

IMG_4396.JPG

…and the pins are turned, centre drilled, drilled, cut to length,  and tapped M4.  64 altogether.

IMG_4421.JPG

The M4 x 25mm grubscrew is screwed into the pin.  The wood join is super glued.  Also, I am attempting to patch the worst of the thread tearouts.

IMG_4423.JPG

Using a battery screwdriver to insert the grub screws.  The pins protrude above the ring surface for a reason..


IMG_4424.JPG

Sanding the pins flush with the rings.  Check the photo of the original 1464 model.  There is also some wood filler in other splits.  Not surprising after holding up a house for 70 years.

The holes are now filled with wood filler, and will be sanded flush.  They should be invisible after painting.

Next the painting, the stands, and some cannon balls.  How to reproduce that aged copper colour…


Bombard Model-3 turning the barrel

Another session or two, and this project is complete.

Now how do I make a cannon ball 62-63 mm diameter?  In wood will be ok?  Does not have to be granite.  I could make a mould and cast it in aluminium or lead, but stone would be authentic…..   thinking.

ps.  Re cannon balls.  I will cast them, in cement!   Now, how to make a mould.

Bombard Model -2. Big Thread

The breech and the barrel are joined with a very large thread.  On my 1:10 scale model it is 60mm diameter, and has a pitch of 6 mm.  These dimensions are measured off Internet photos of the original bombard, so they might not be faithfully accurate to the original bombard.  If anyone has accurate plans of the bombard I would be very interested to hear from them.

I experimented with various spindle speeds, feed rates, depth of cut, and finally decided that red gum wood is not the ideal material to be cutting a thread with sharp points.  However, at 200rpm, and taking 50 cuts to reach the full depth, and using a very sharp tool, the end result was OK.  I will fill the tearouts.

In order to make a functional join in the wooden cannon, I truncated the apex of the thread.  In the gunmetal version I will attempt a more faithful to the original, sharp look.

For some reason, the wood held together better during the internal thread cutting than the external.


The male thread was cut on my newly CNC converted lathe,  between centres, but the fixed steady on that lathe was just too small to hold the barrel, so the internal thread was cut on my bigger Chinese lathe.

Next I will bore the barrel to 63mm, then turn the exterior of the barrel.