machines which I have made, am making, or intend to make, and some other stuff. If you find this site interesting, please leave a comment. I read every comment and respond to most. n.b. There is a list of my first 800 posts in my post of 17 June 2021, titled "800 Posts"
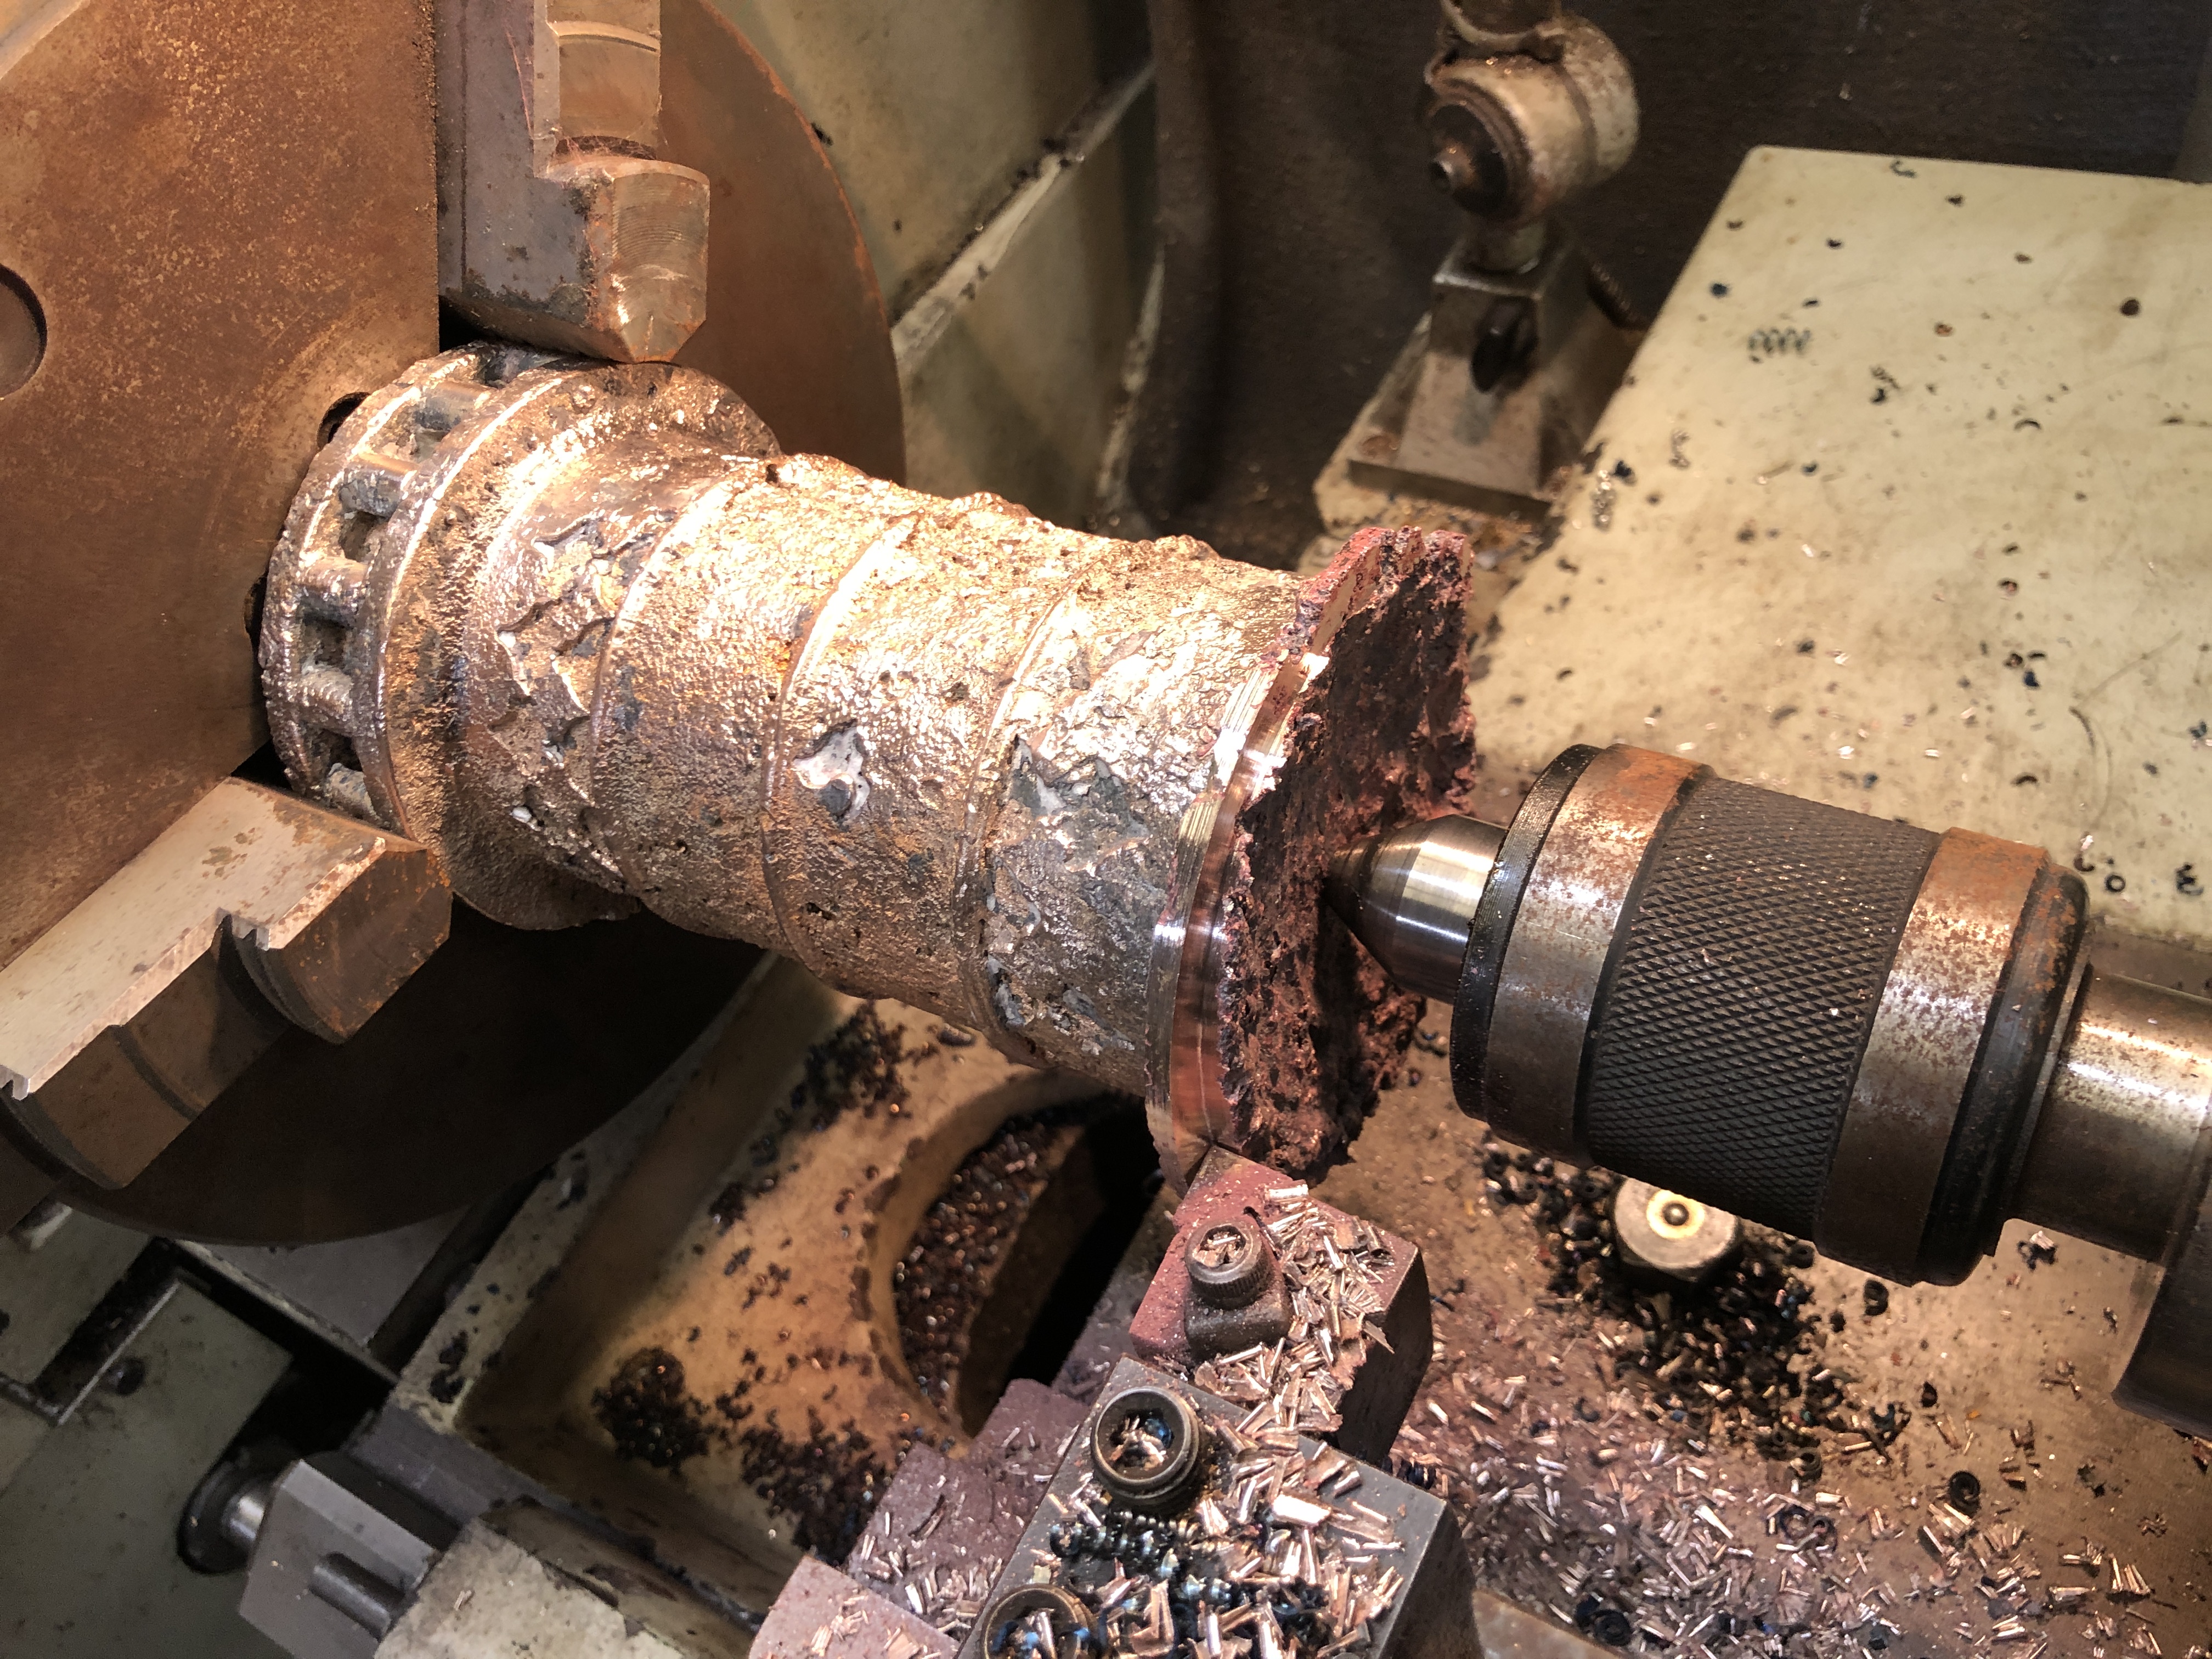
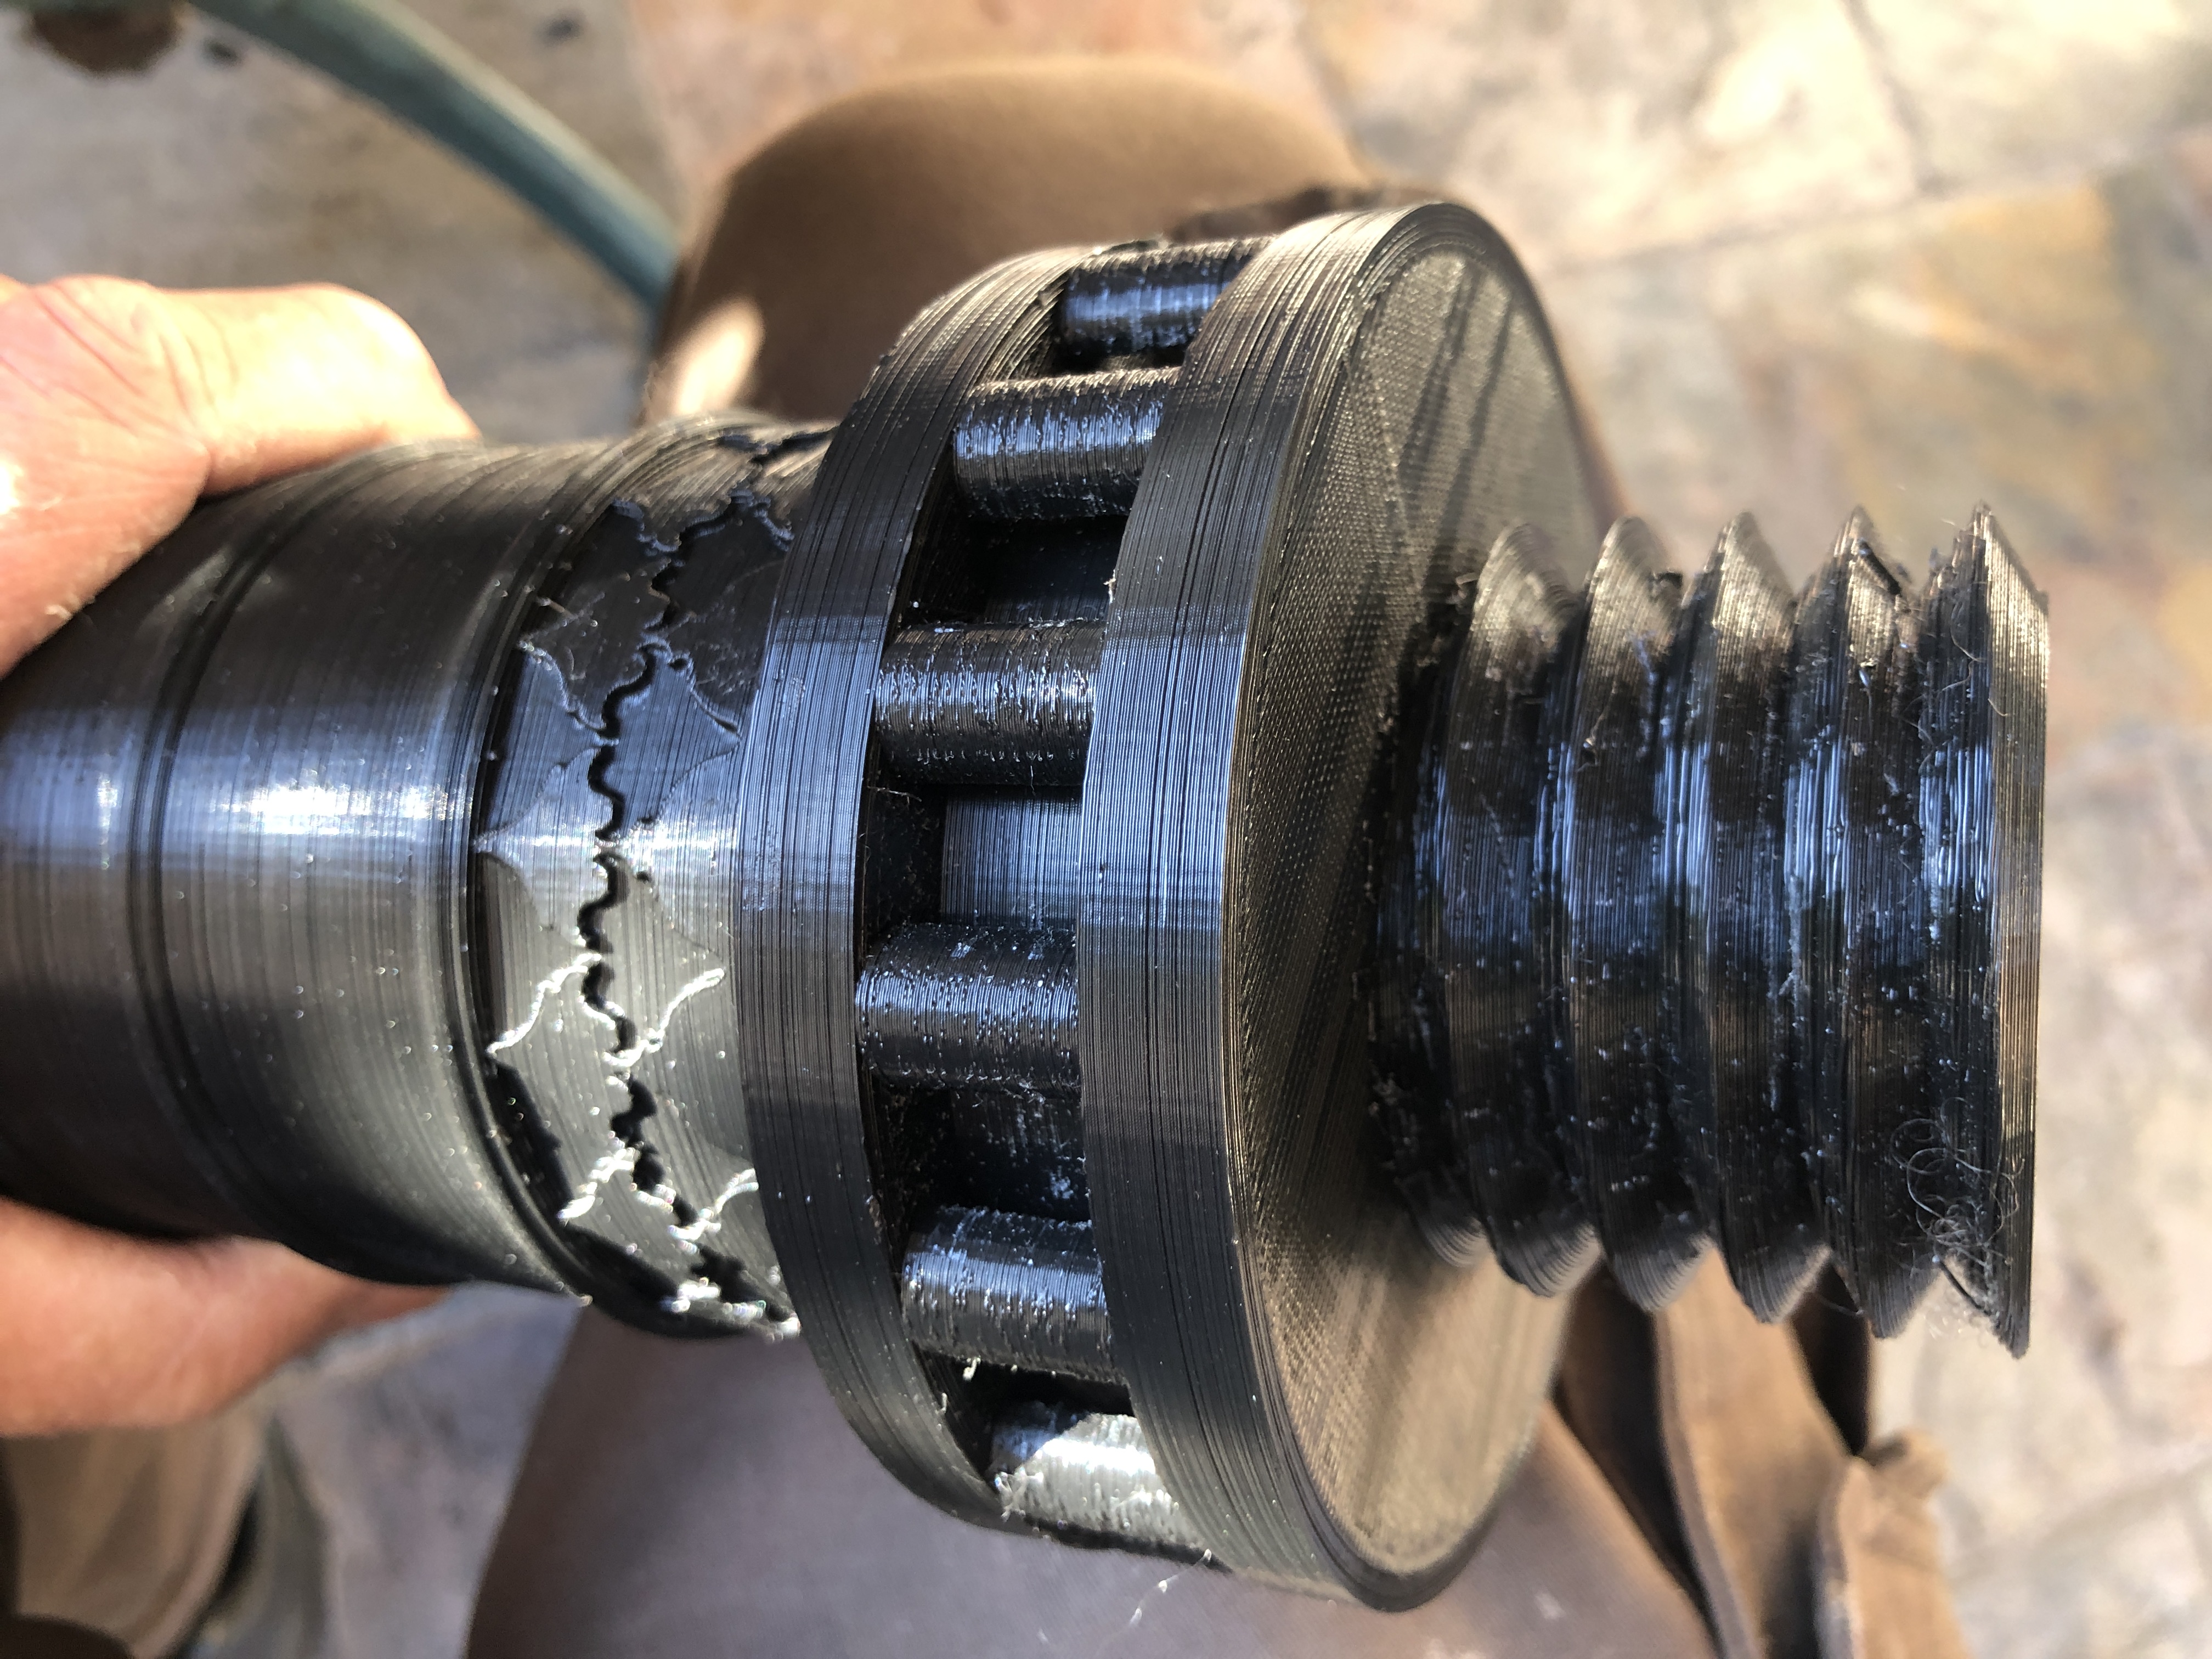
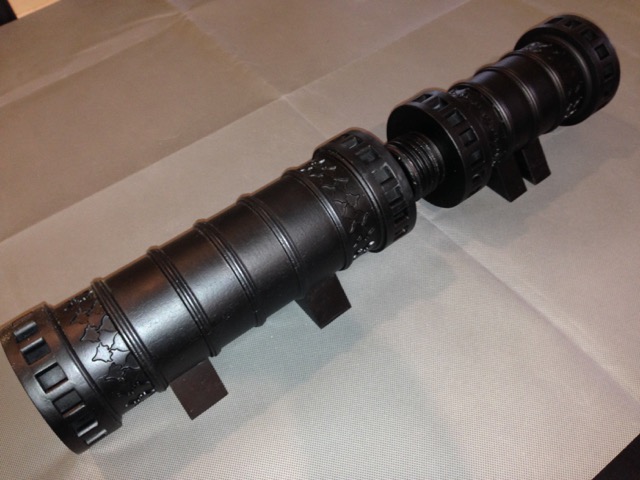
This is what the casting looked like after I had removed most of the investment, and turned a flat surface on the top of the casting.
I was surprised that the levering pins, and the big thread came out much better than the simpler flat surfaces. That might be because I had concentrated on those areas with the painted on investment slurry. And also because that end was at the bottom of the pour. That end got the first, most liquid melt, and the pressure of the melt above.
Turning the ragged end where the bronze was short.It IS sort of interesting, no?
Having decided that my casting equipment is inadequate for this this size and weight object, I do not intend to have another attempt at making a 1:10 bronze Ottoman bombard. Plus, even this sad 3/4 complete component is VERY heavy. I would not enjoy carrying the full size 1:10 model.
The only question remains, what will I do with the above failure? It could join my gallery of failed parts (like the crankshaft of the triple expansion engine, which had a single incorrect dimension). It is useful to occasionally survey this gallery. It does motivate me to measure twice, cut once. Or it could become a very heavy and expensive door stop. Or I could drill out the bore and use it as a specimen flower vase. Or I could cut it up, and use the bronze in future projects. Maybe I will just sit on the decision for a while, unless any readers have any persuasive suggestions.
I am reminded of one of my late father’s aphorisms. “He (or she) who never made a mistake, has never made anything”.
This project was put aside when I broke some ribs unloading the melting furnace which I had borrowed. Each of the 2 halves of the bombard weighed about 8 tonnes in the original, and in my model will weigh about 8 kg each.
These 8 kg parts will be the biggest which I have attempted to cast.
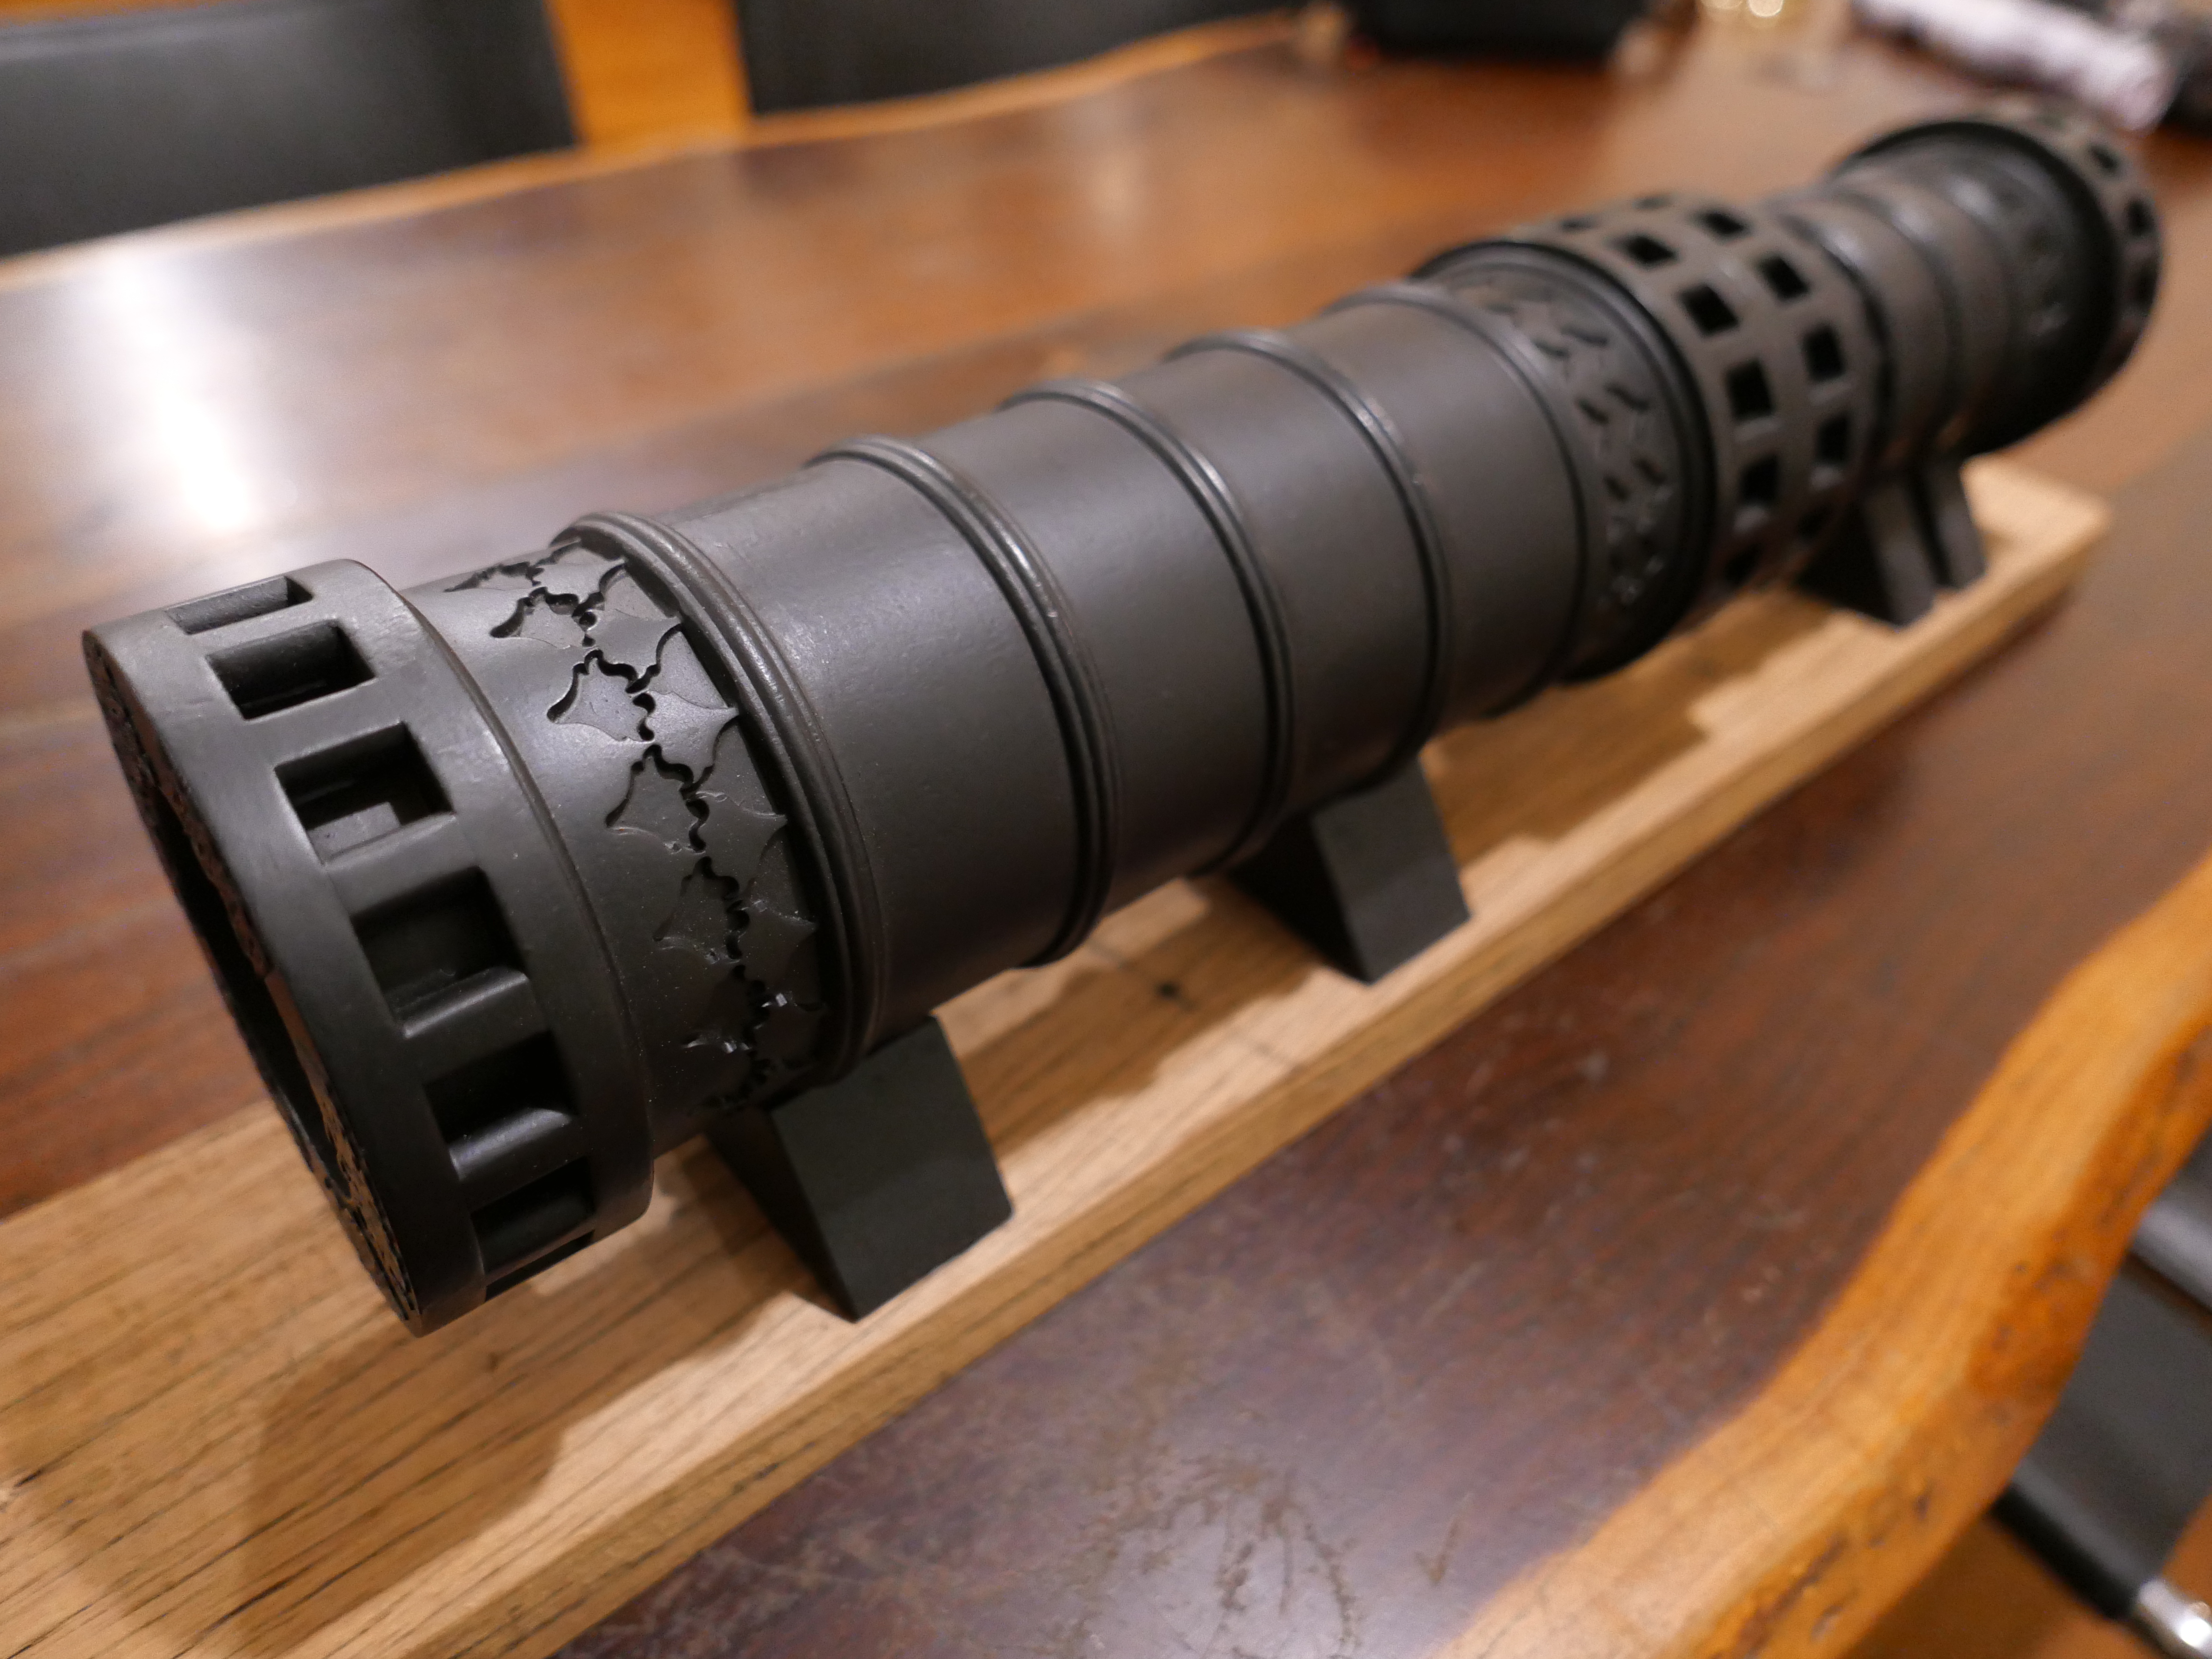
I am using the lost PLA method, having 3D printed the parts in PLA.
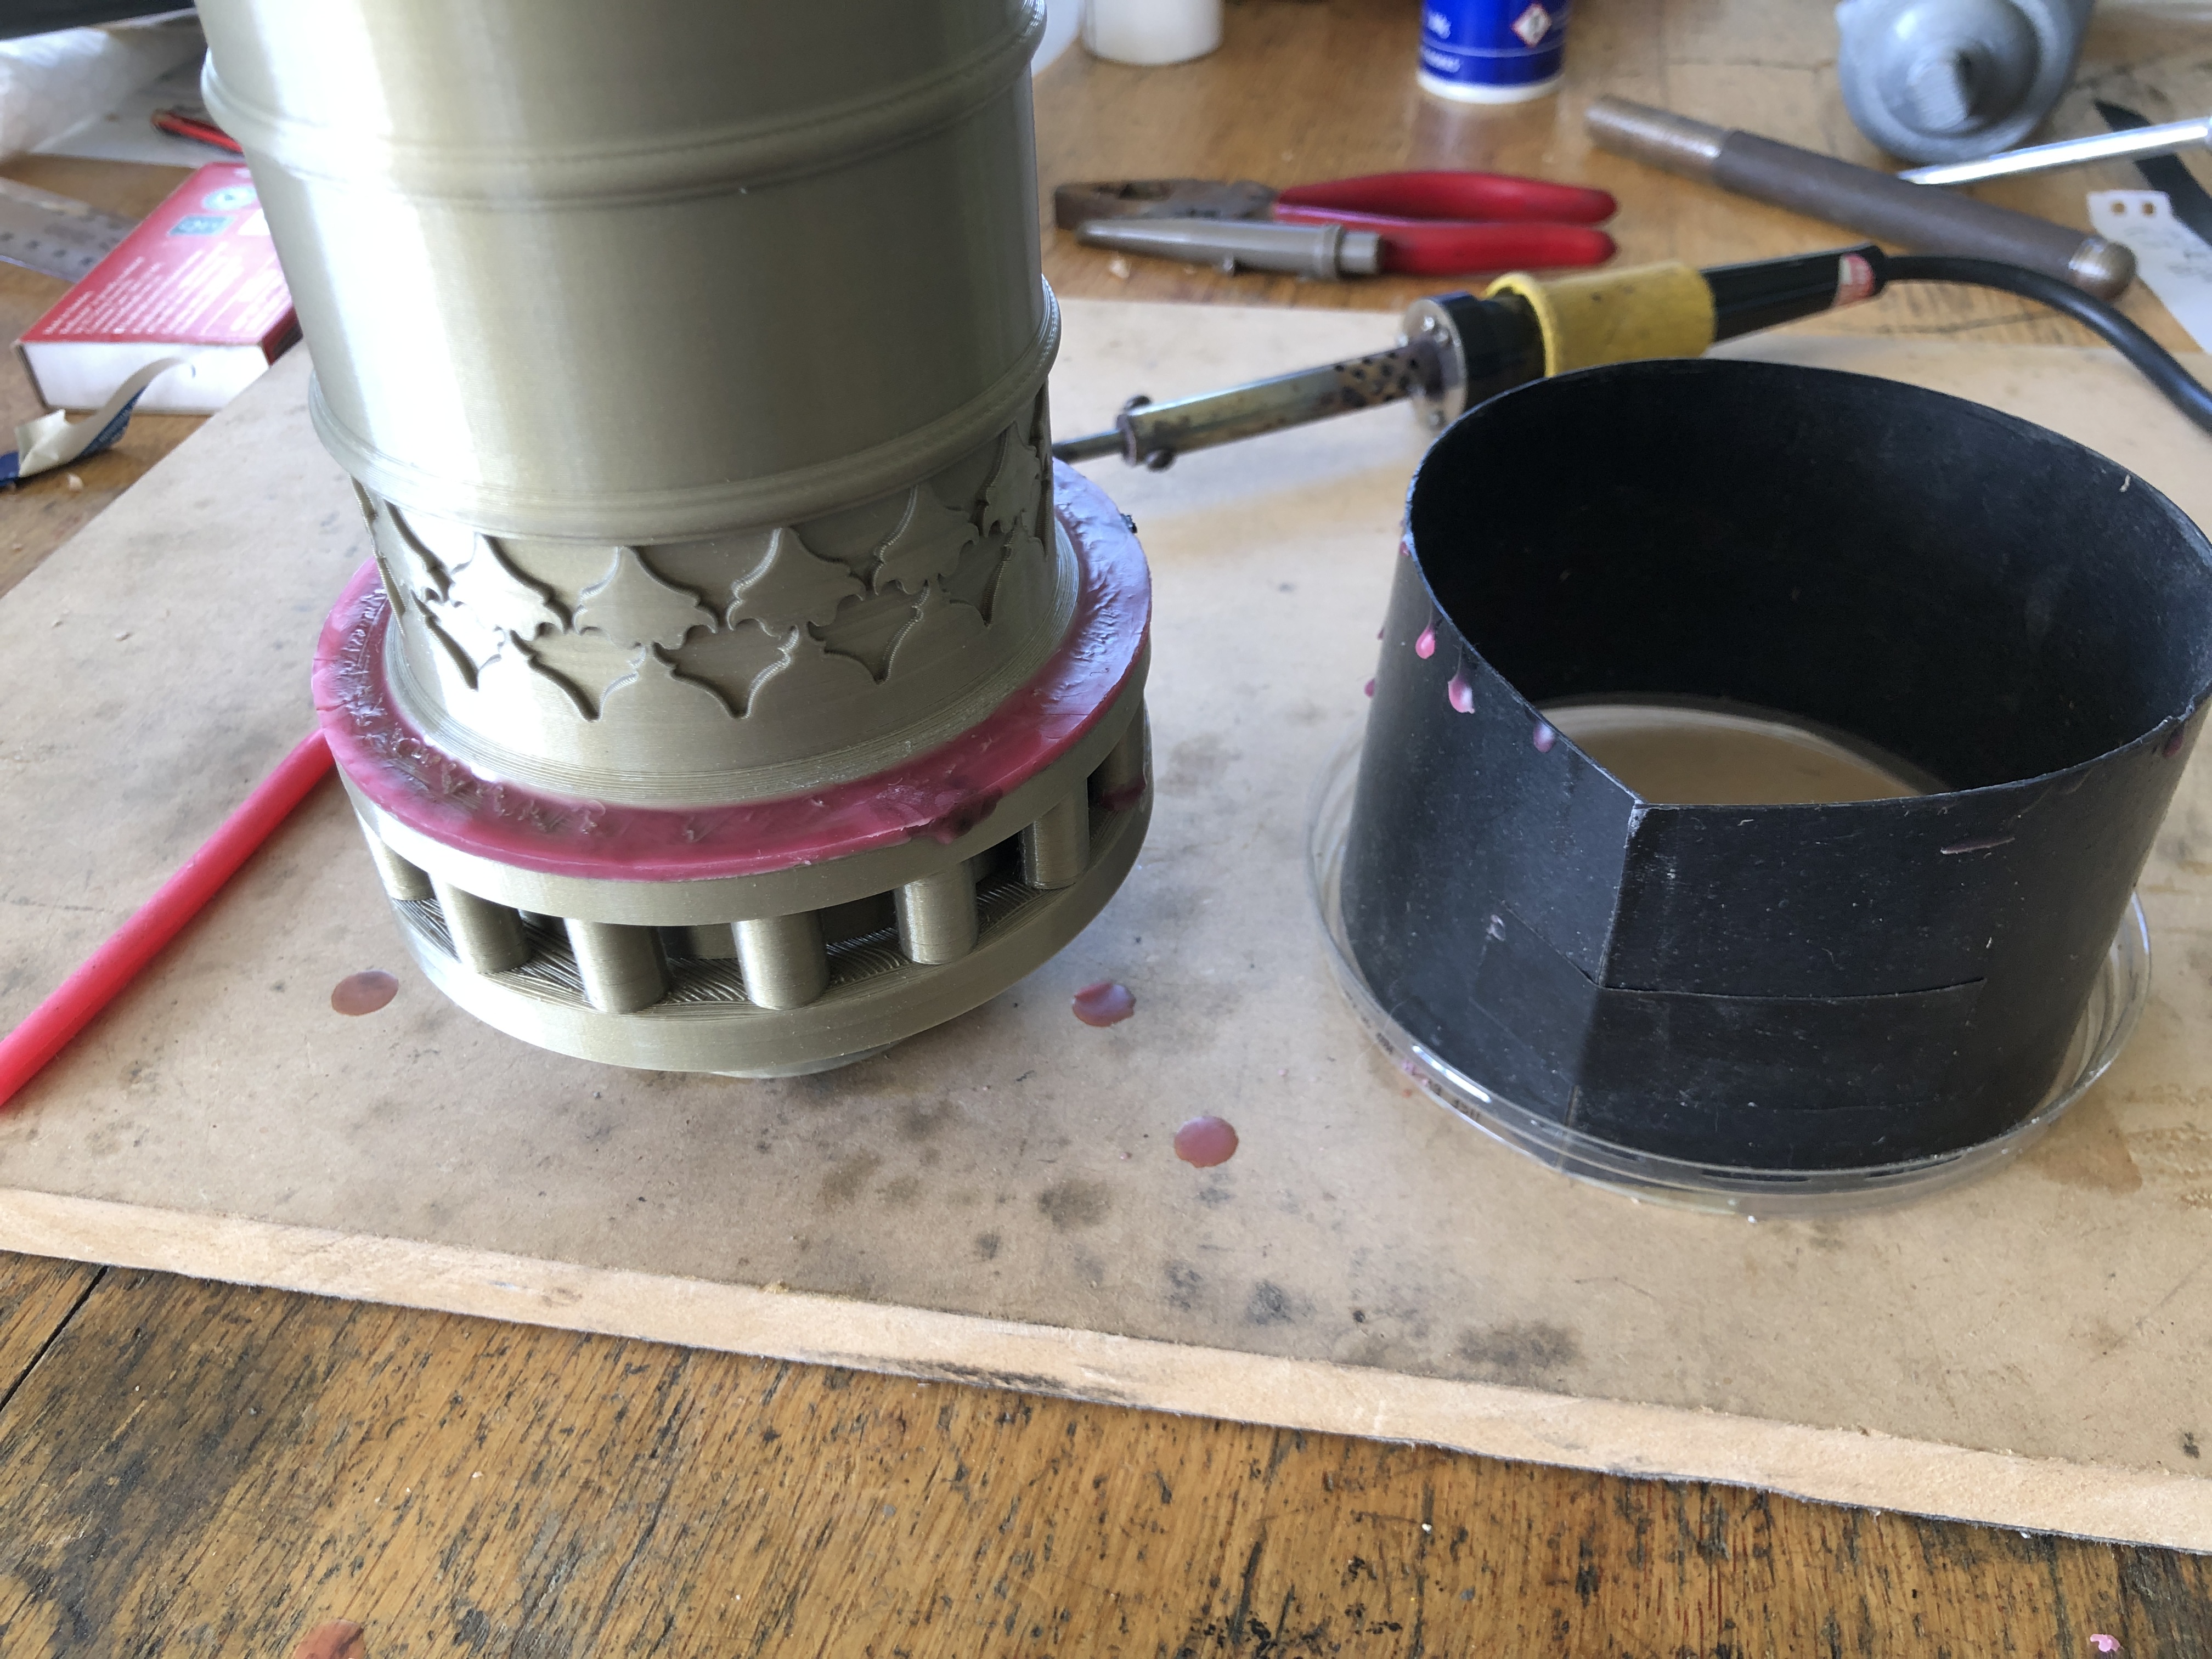
Today I attached the PLA breech to a PLA pouring funnel (also 3D printed), and poured the investment medium around the part in a 5″ steel cylinder.
First I repaired the PLA part, where it was a bit ragged. Poured some melted wax where there was a deficiency due to unsupported overhang during the 3D printing process. I deliberately overfilled the area with wax. The bronze in that area will require some turning to get the eventual correct thickness. Melted the wax with a soldering iron.Glued the breech to the 3D printed funnel, also using melted wax. All of the PLA will melt and burn out during the “burnout” process in the potters oven. That is a lot of PLA to burn out, so the windows will be open.
In order to minimise the possibility of air bubbles sticking to surfaces and corners, I painted the entire model with investment, before positioning it in the casting cylinder, and filling it with investment slurry. It will set overnight, and I will commence the burnout in the morning.
Fingers crossed for the pour late tomorrow afternoon.
It is now the next evening. I am despondent.
I woke early, and when I arrived at the workshop at 7:30am turned on the potters oven, and placed the cylinder containing the PLA model and investment medium inside. (Problem #1.) The cylinder was too big to sit vertically or horizontally, so I placed it diagonally. It was awkward, and I was concerned that the bore piece, being supported only at one end, might break free. It did. (Problem #2.) Started the burnout cycle at 250ºc, slowly increasing to 750ºc over 8 hours.
While that was happening I set up the melting furnace, gas cylinders (3 of them), tongs, bucket of water, face masks, gloves, aluminised apron, etc outside. It was going to be a warm day. Unfortunately it was also windy. Not ideal.
The furnace (centre), gas cylinders rear, dry sand tray front. Bronze ingots weigh 12kg. I had predicted that the casting would weigh 10kg.
Stuart arrived, and he checked his furnace. We lit it to pre warm the furnace and crucible. (Problem #3.) The crucible fitted in the furnace, with little space to spare. Just enough for the crucible with its tongs to fit. Stuart commented that it looked very big. It was, I answered “a 14kg crucible”. When the 12kg of bronze eventually melted it only half filled the crucible. It was not the size which I had ordered. It was too big, and restricted the gas flame, reducing its effectiveness. The melting phase required 3 hours! Much too long. (Problem #4.) (PPS. note added 23 Dec. I checked the dimensions of the crucible. It is a 30kg crucible!!! No wonder it was too big for the furnace! I had ordered and paid for a 14kg crucible. No wonder it was too big for the furnace. I should have checked before using it.)
The crucible has to sit on the furnace floor, reducing the heat exchange surface area, and narrow space on the sides restricting the flame volume.
Then it appeared that the flame was not as fierce as Stuart expected. The gas was piped from 2 cylinders, and one was not icing up as expected. It was close to full. Why was the gas not coming through? Could there be a ball valve somewhere in the system? Later we discovered that the pipe from that cylinder worked in only one direction because there was indeed a hidden one way valve. There was no direction arrow. (Problem #5.)
So, when we did get to the pour, and discovered the central core broken free (#1),
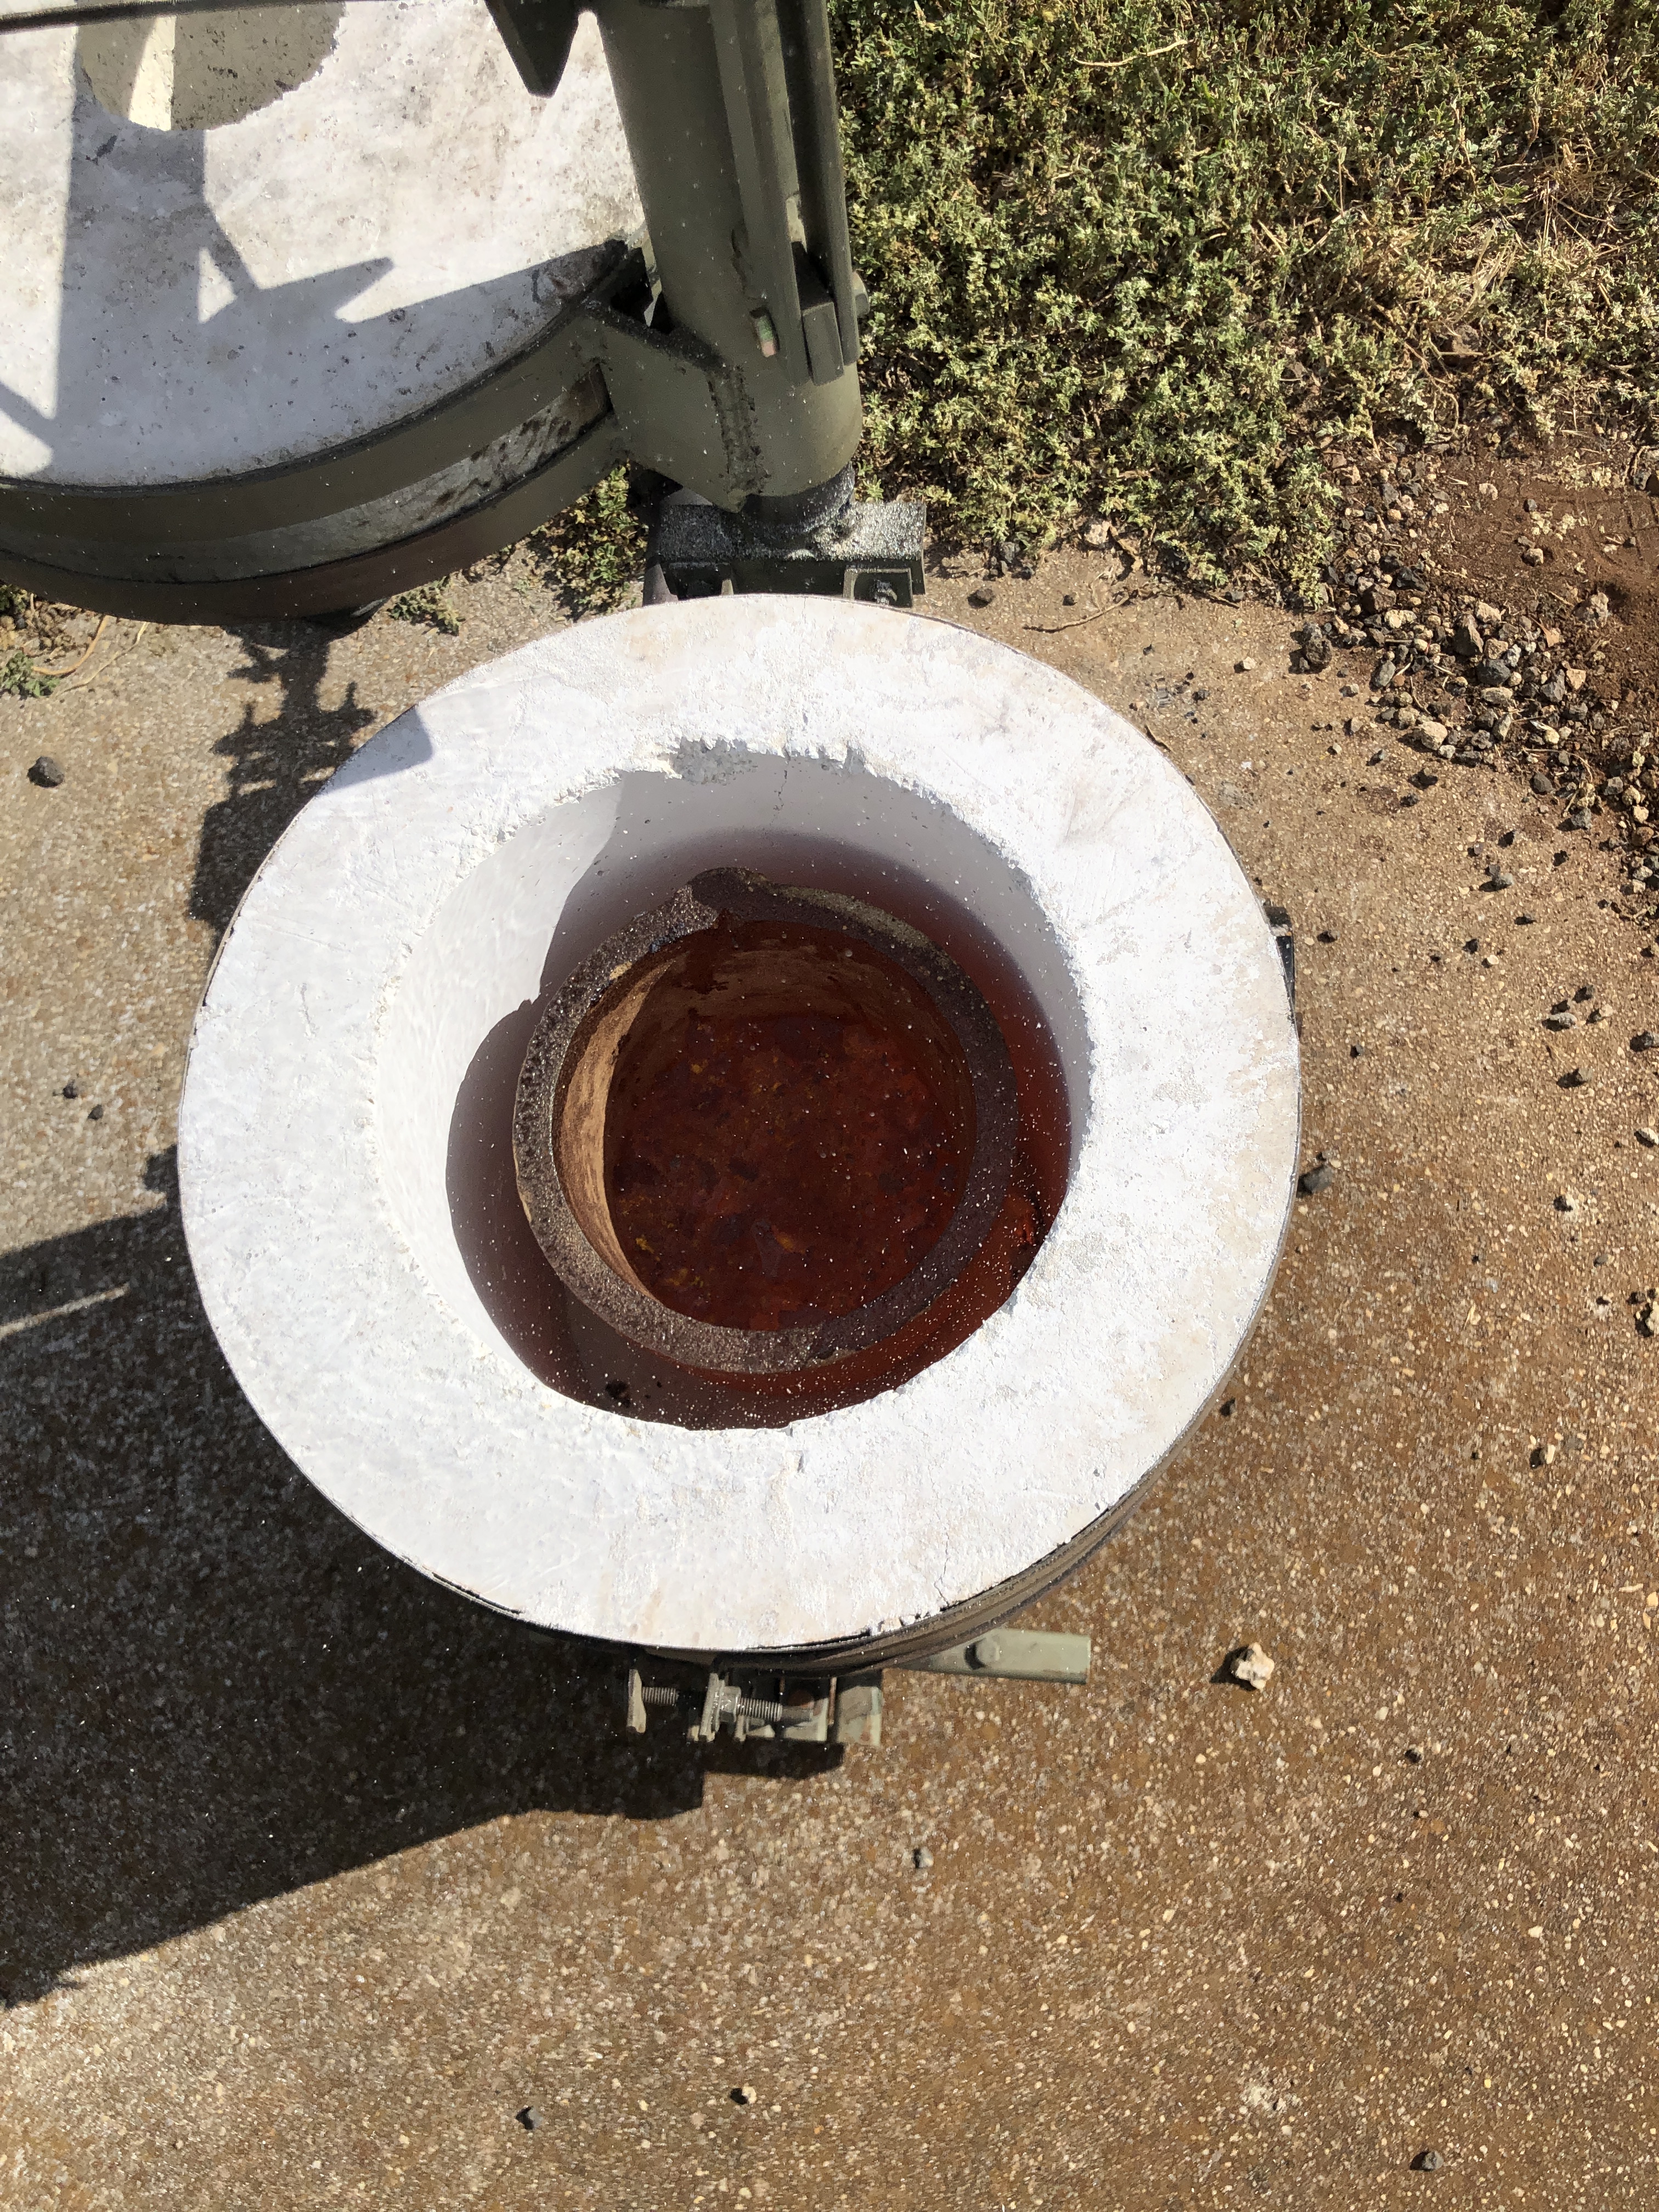
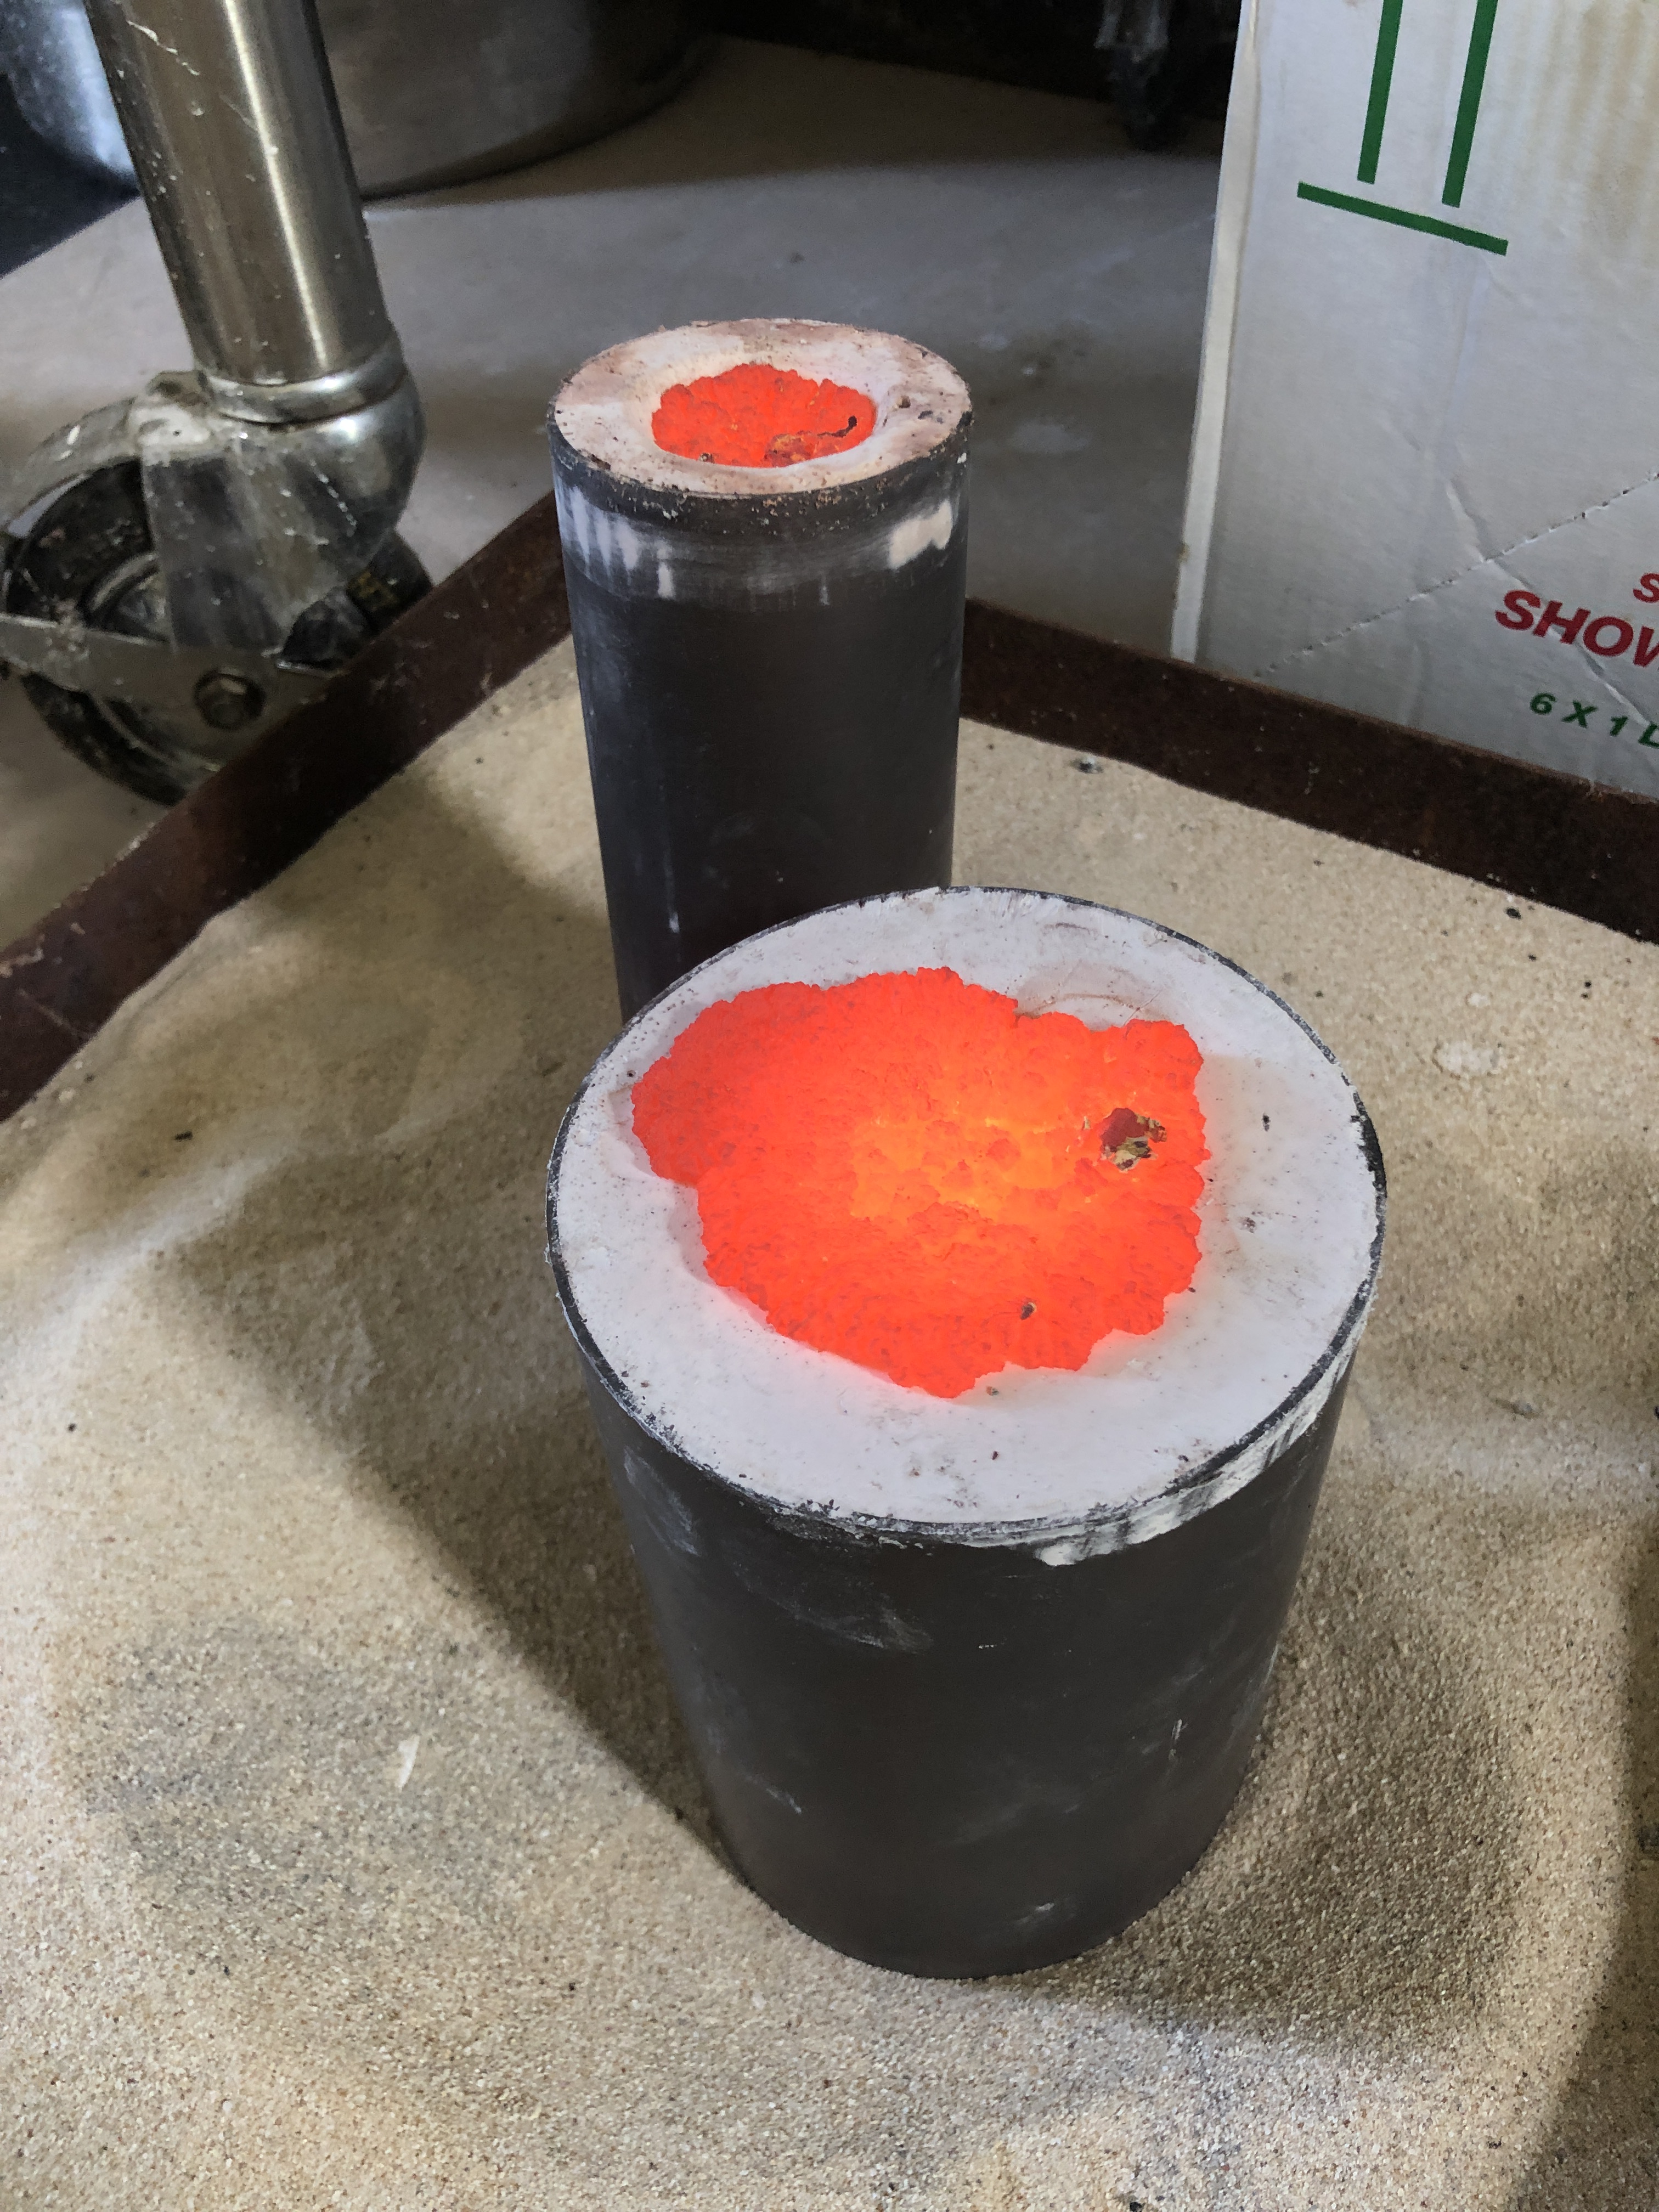
I inverted the now red hot cylinder to shake the core free. I calculated that the bore would fill with bronze and need drilling later. But would there be enough molten bronze to fill the cavity? I had allowed 1.5-2kg extra bronze to cope with unexpected contingencies but this would be cutting things fine.
So, we did the pour. There was a LOT of slag, possibly due to the slow melt. The molten bronze seemed to pour OK, and it filled the mold and the central bore. But it stopped about 3 cm from the top. Bummer!. Not enough bronze. Oh well. A learning experience.
I have washed and scraped off most of the investment. Oh Dear. A total failure. But, the threads were OK, so not a total failure. The worst area was the middle section which I had not painted with investment slurry prior to the the investment pour. I think that the PLA must not have been water tight, leading to the moth eaten appearance.
And worst of all….
It is only half the weight of the cannon, and it is just too bloody heavy!
I could fix the mistakes, reprint the part, and recast it.
But, you know what? I am not going to. The biggest issue is that even if I am able to fix all of the problems, and get a good result, it will be too heavy to move around. It will be too heavy to use even as a door stop. Hmm. Maybe I will clean up the failure and use it as a heavy door stop. Either that, or cut it up and reuse the bronze in the next casting projects, which will be much smaller!
This will be another failed, abandoned project to add to the list. (Chess pieces, etc). Oh well. Live and learn.
(it does cause me to appreciate the Ottoman cannon makers of 1465 who cast these parts with wood fires, where each component weighed over 8 tonnes!)
I guess that title should read “2 Person Tongs” but I doubt that SWMBO will be volunteering.
I am still planning to pour a model bronze Ottoman bombard.
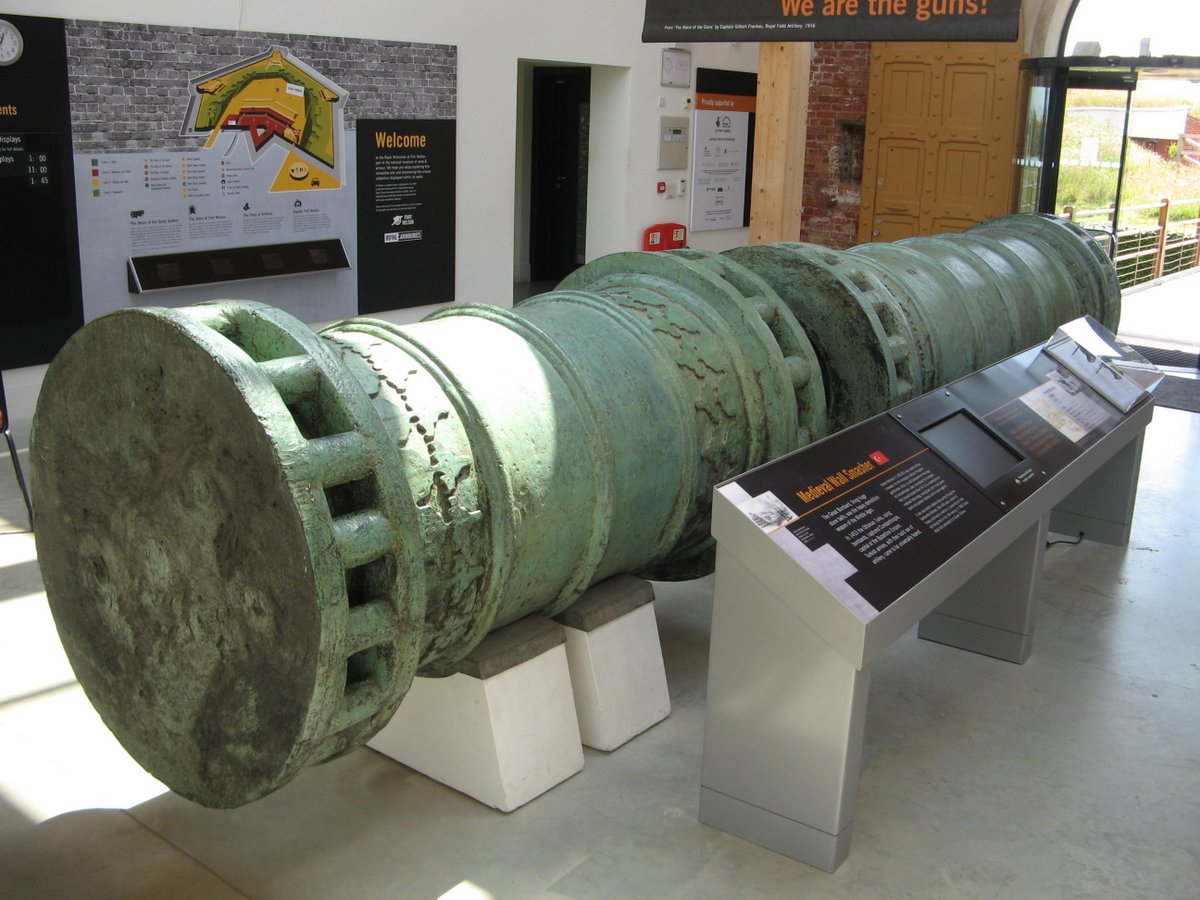
Wooden version. 520mm long, 107 diameter. I visited the 5.2 meter original near Portsmouth UK after I made this model, and I have refined the design of the new model.
The plastic model has been 3D printed, the flasks for the investment powder mould are ready, and I have the potter’s oven ready to dry, burnout, bake, and heat the moulds.
I have borrowed a melting furnace from Stuart Tankard, which is large enough to fit the crucible. The crucible has 14kg capacity. The crucible itself weighs 4kg. Unloading the furnace from my Toyota Landcruiser cost me a couple of broken ribs, which set back the project a few weeks.
Then I wondered about tongs to insert the crucible into the furnace, and, more importantly, how to lift the crucible full of molten bronze out of the furnace and pour the bronze into the moulds. The weight to lift and pour I estimate to be: bronze 10kg, crucible 4kg, plus tongs say 4kg = 18kg. The crucible with its bronze load will be at approx. 1100ºc / 2000ºf so some distance will be required for the gloved hands from the red-hot load.
3kg graphite crucible with tongs on the left, then ~5kg, and 2 x ~6kg. My new 14kg crucible at rear.
I have several pairs of tongs for smaller crucibles, but nothing approaching a 14kg crucible. So I asked Stuart T for his thoughts on the matter. He recalled seeing a video by an MSMEE member and suggested that I check it out.
John M’s tongs looked like they had been designed by an engineer, which was actually the case. I contacted him (by email because Melbourne is in Covid lockdown), and he generously offered to send photos, a video and a drawing.
I copied his design, with a few modifications based on the materials which I had on hand, and also to enable a 2 man lift and pour. In retrospect, I could have fabricated a one man pouring apparatus, using a swivel on a frame, but to be honest I would prefer someone else present for safety reasons.
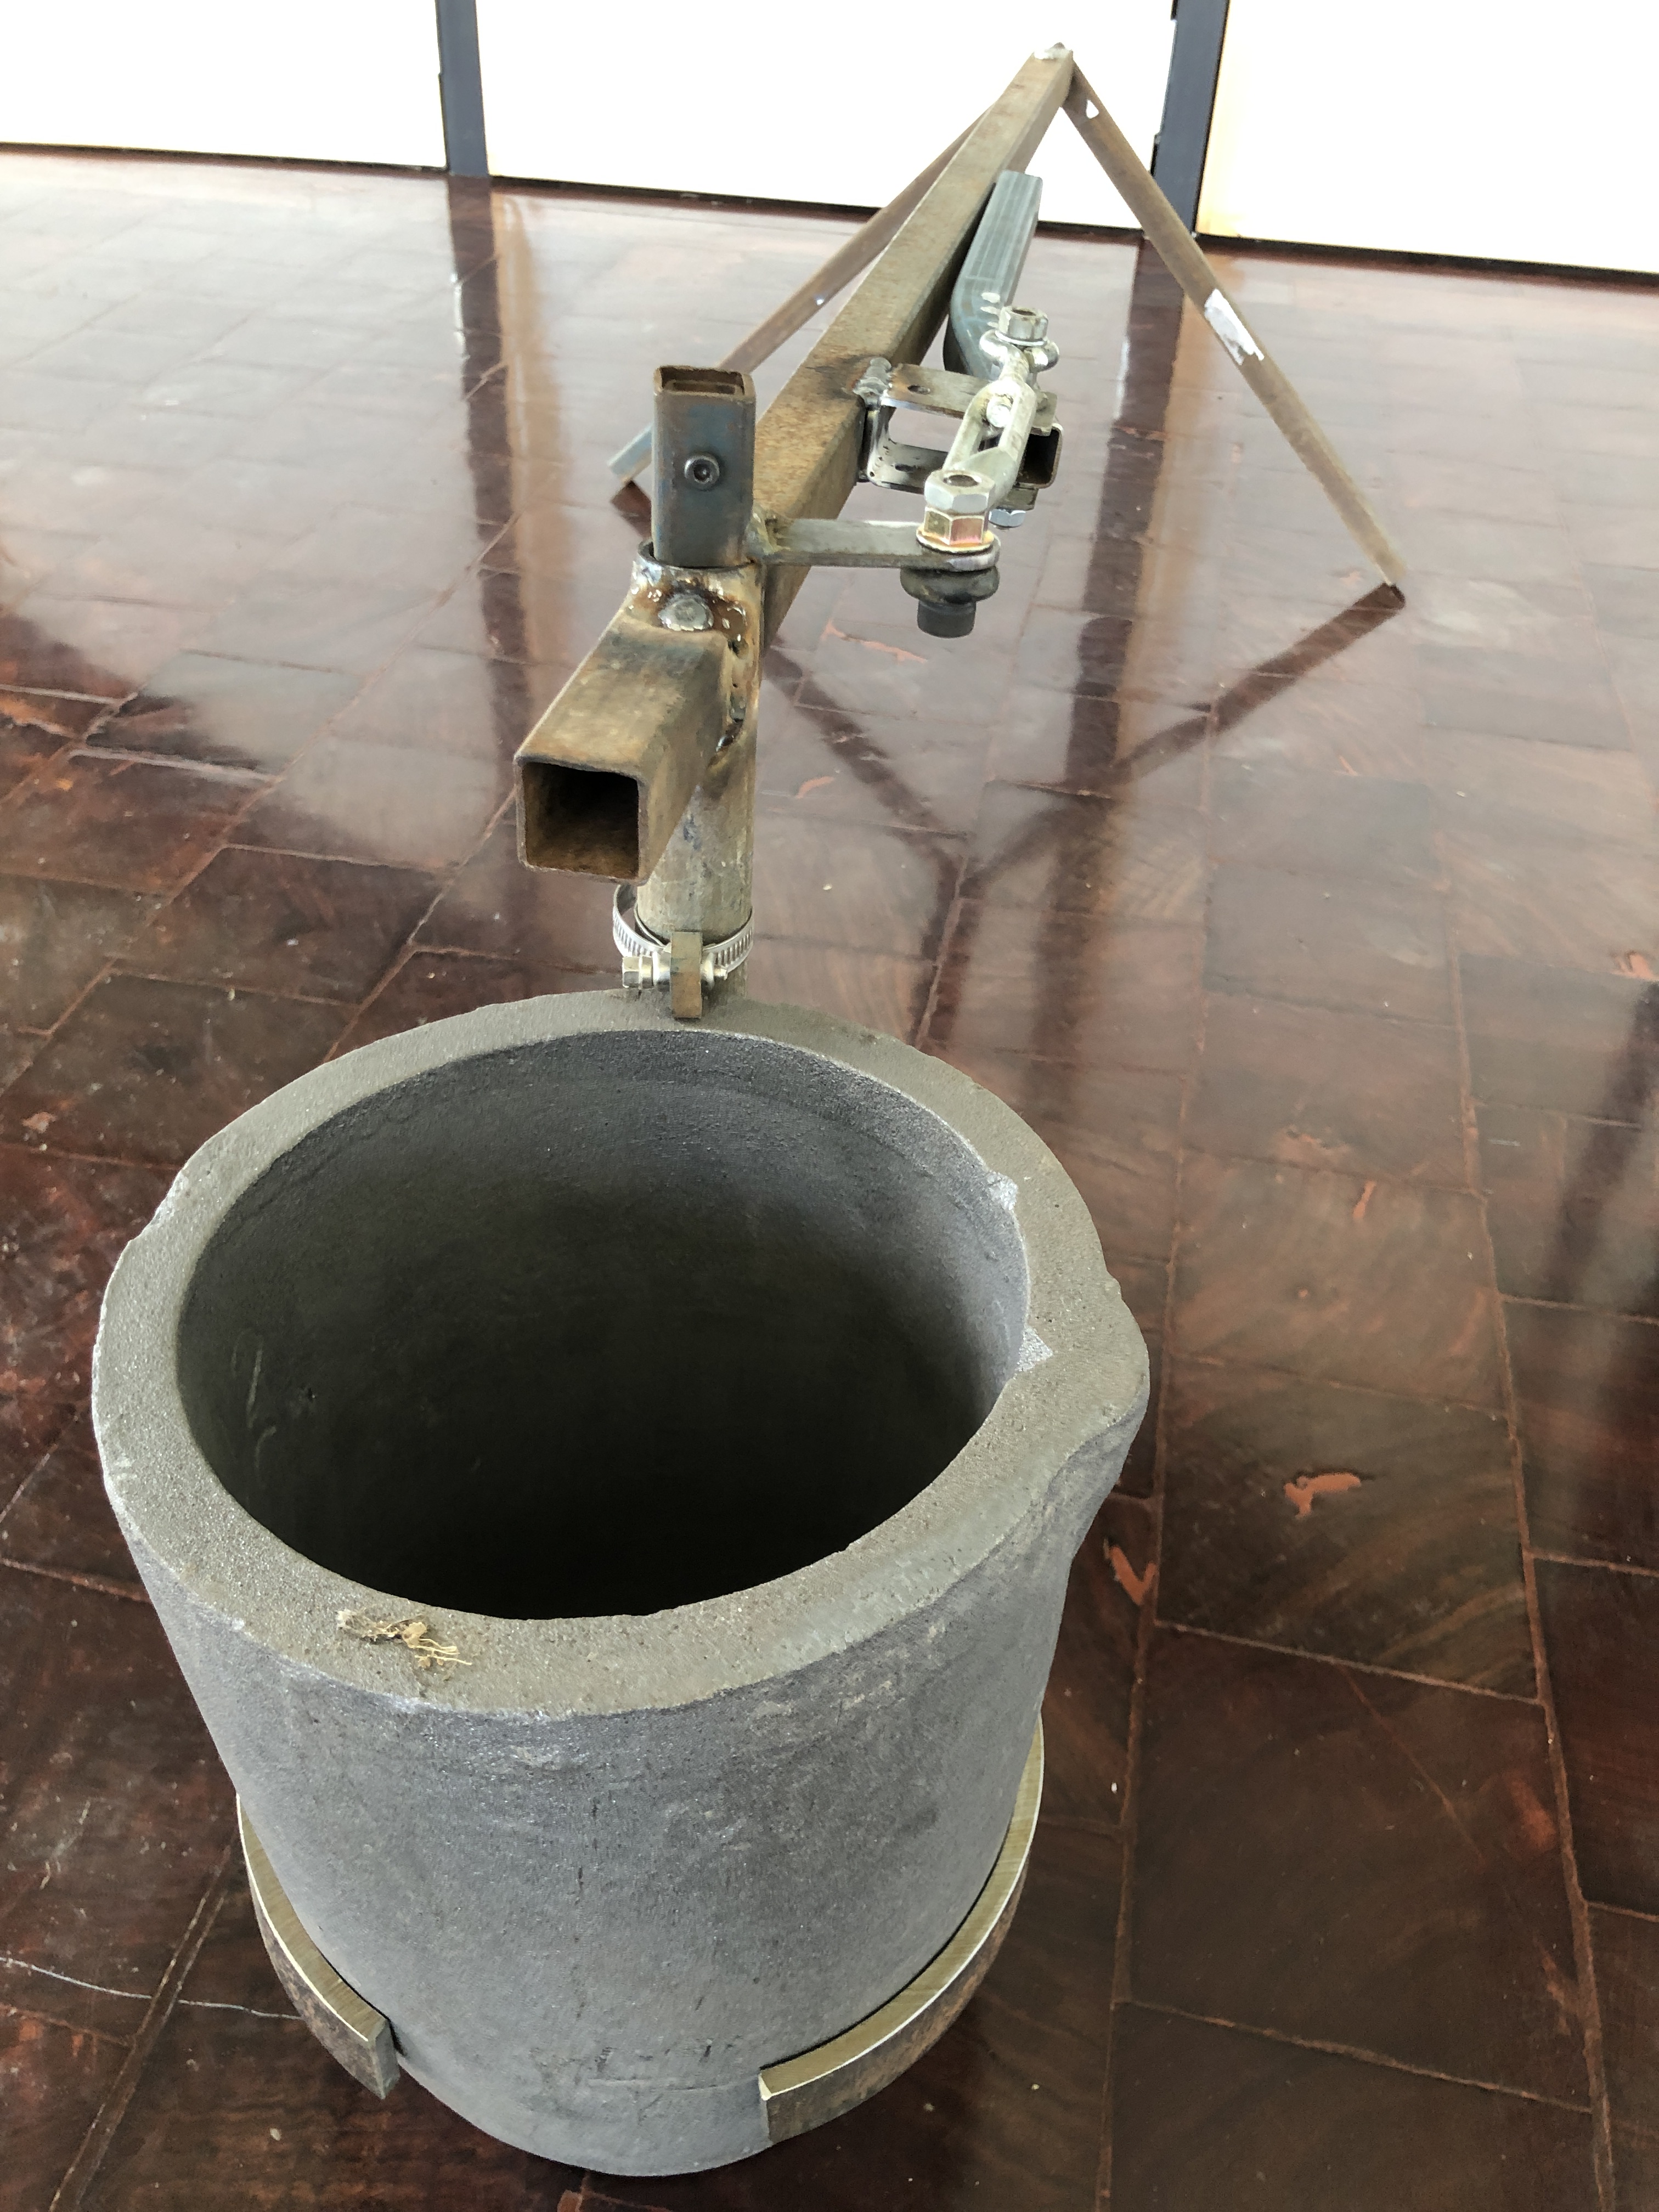
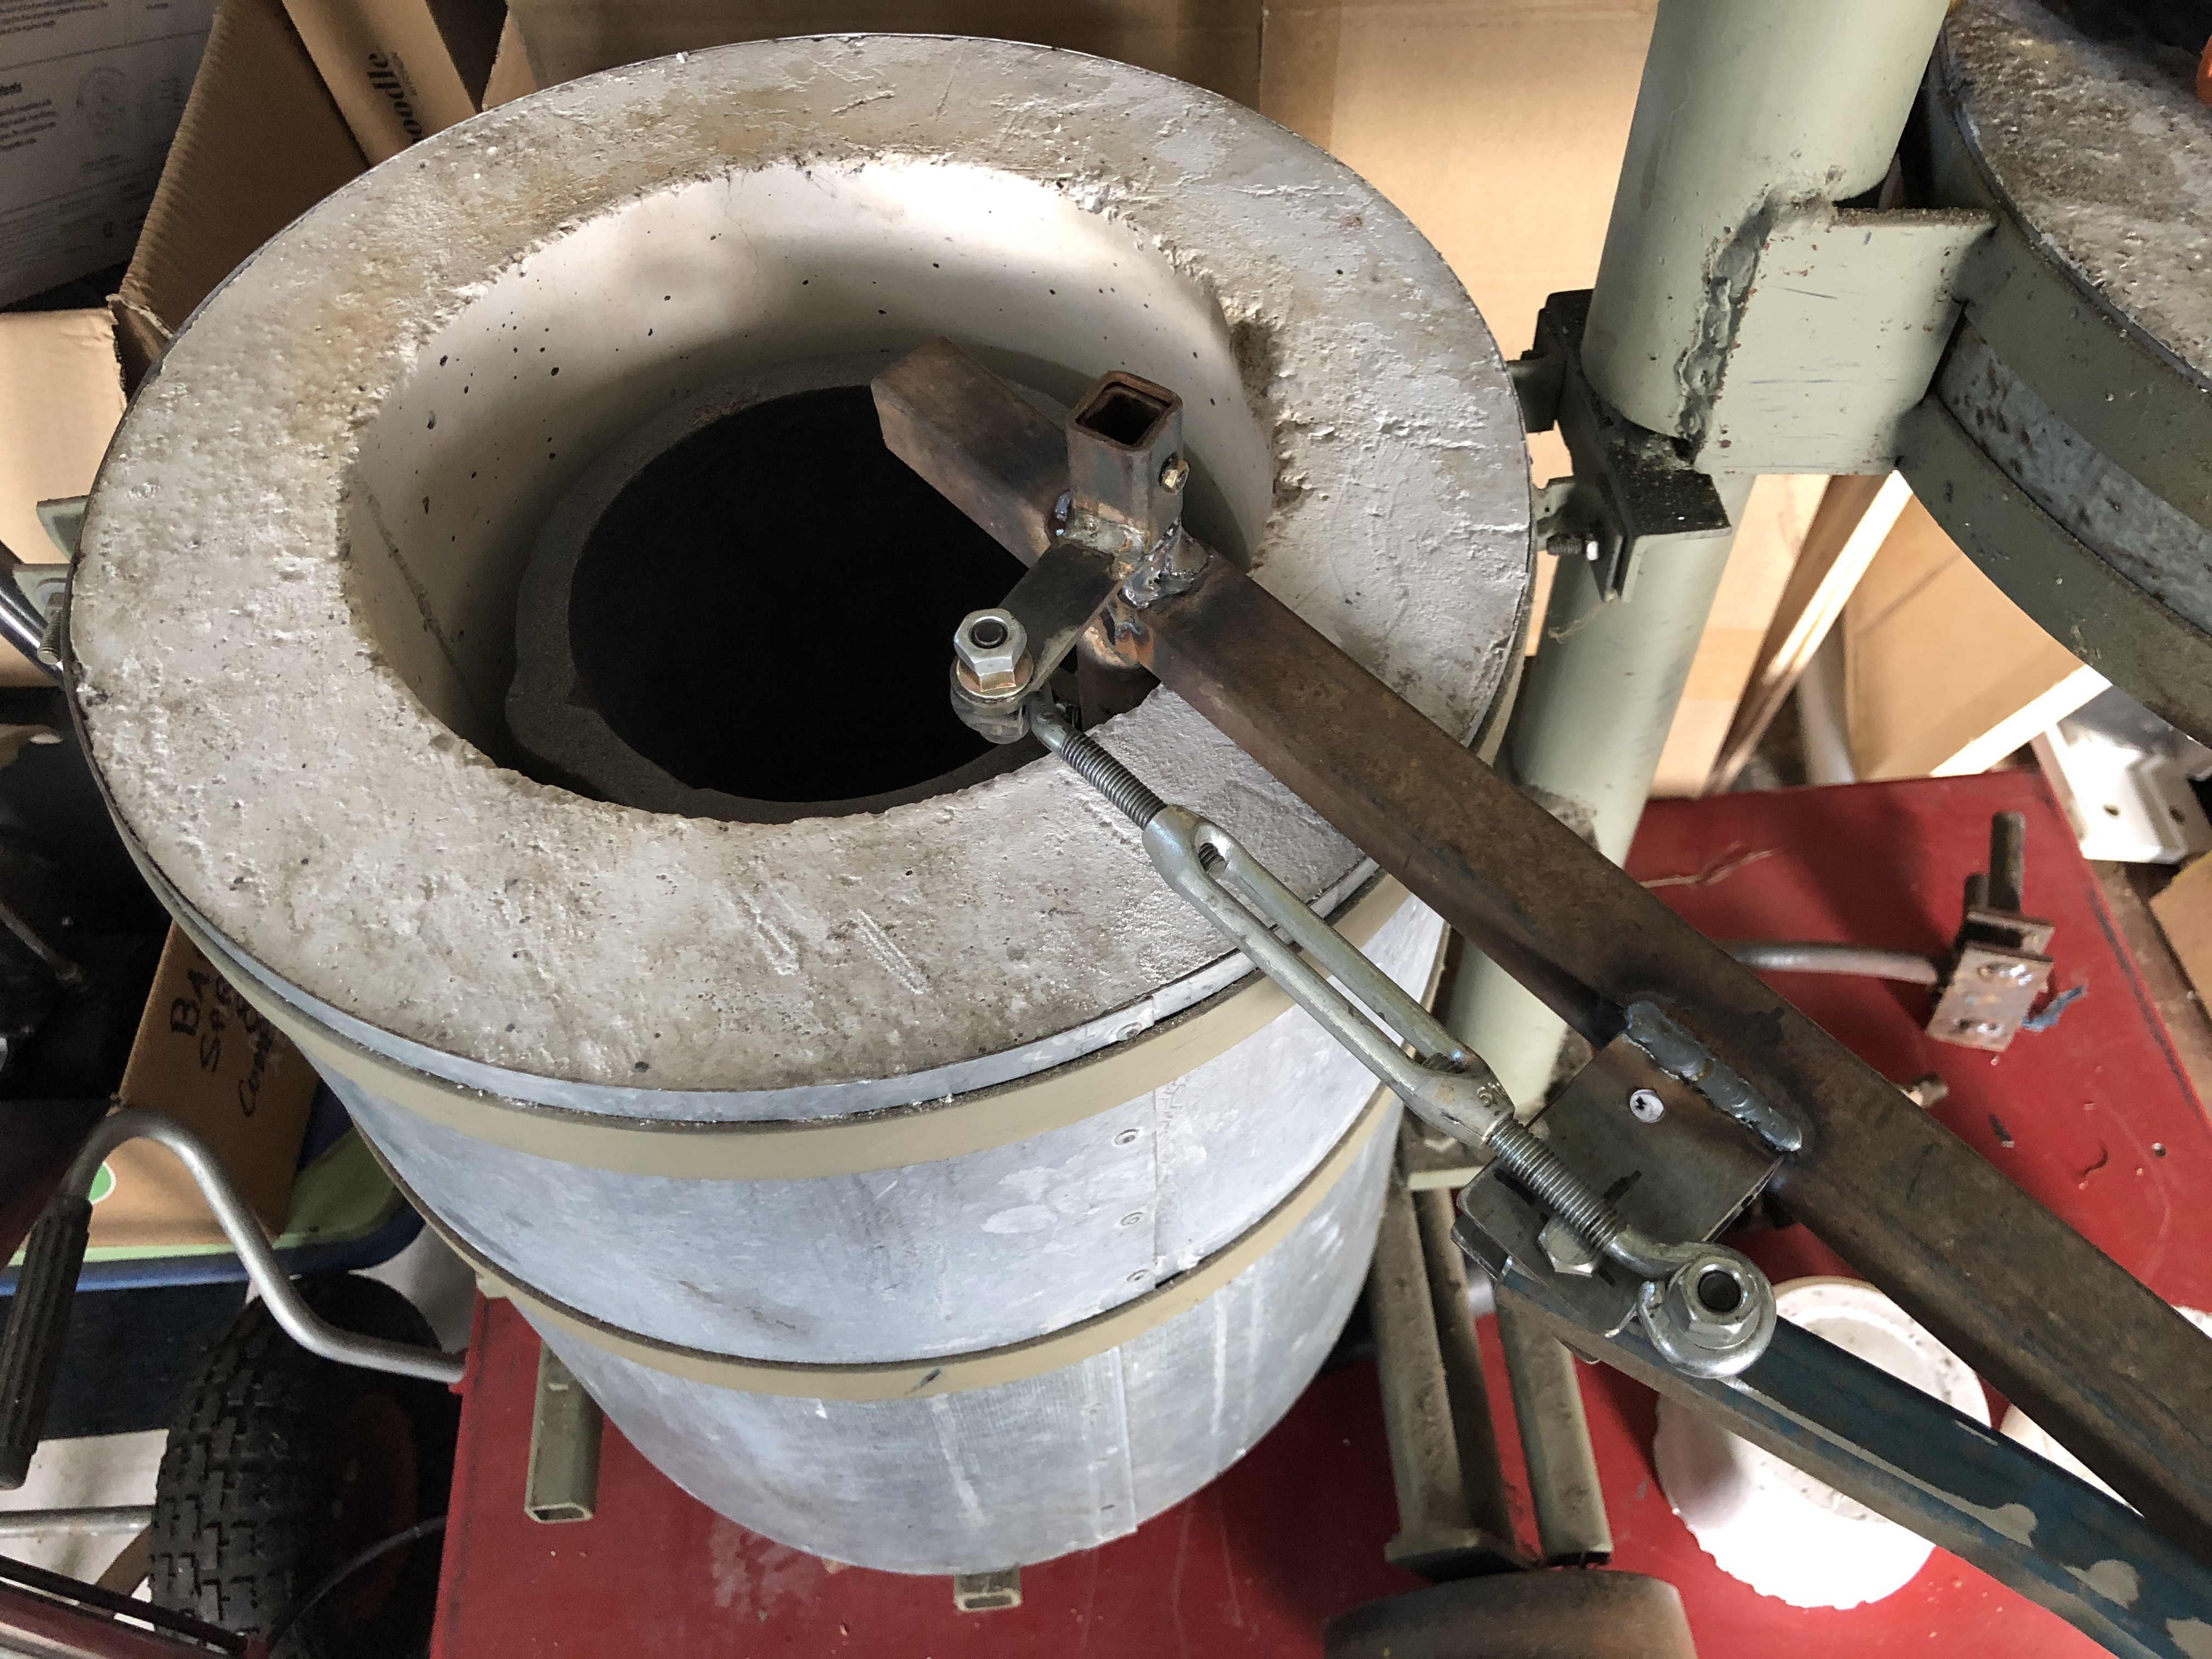
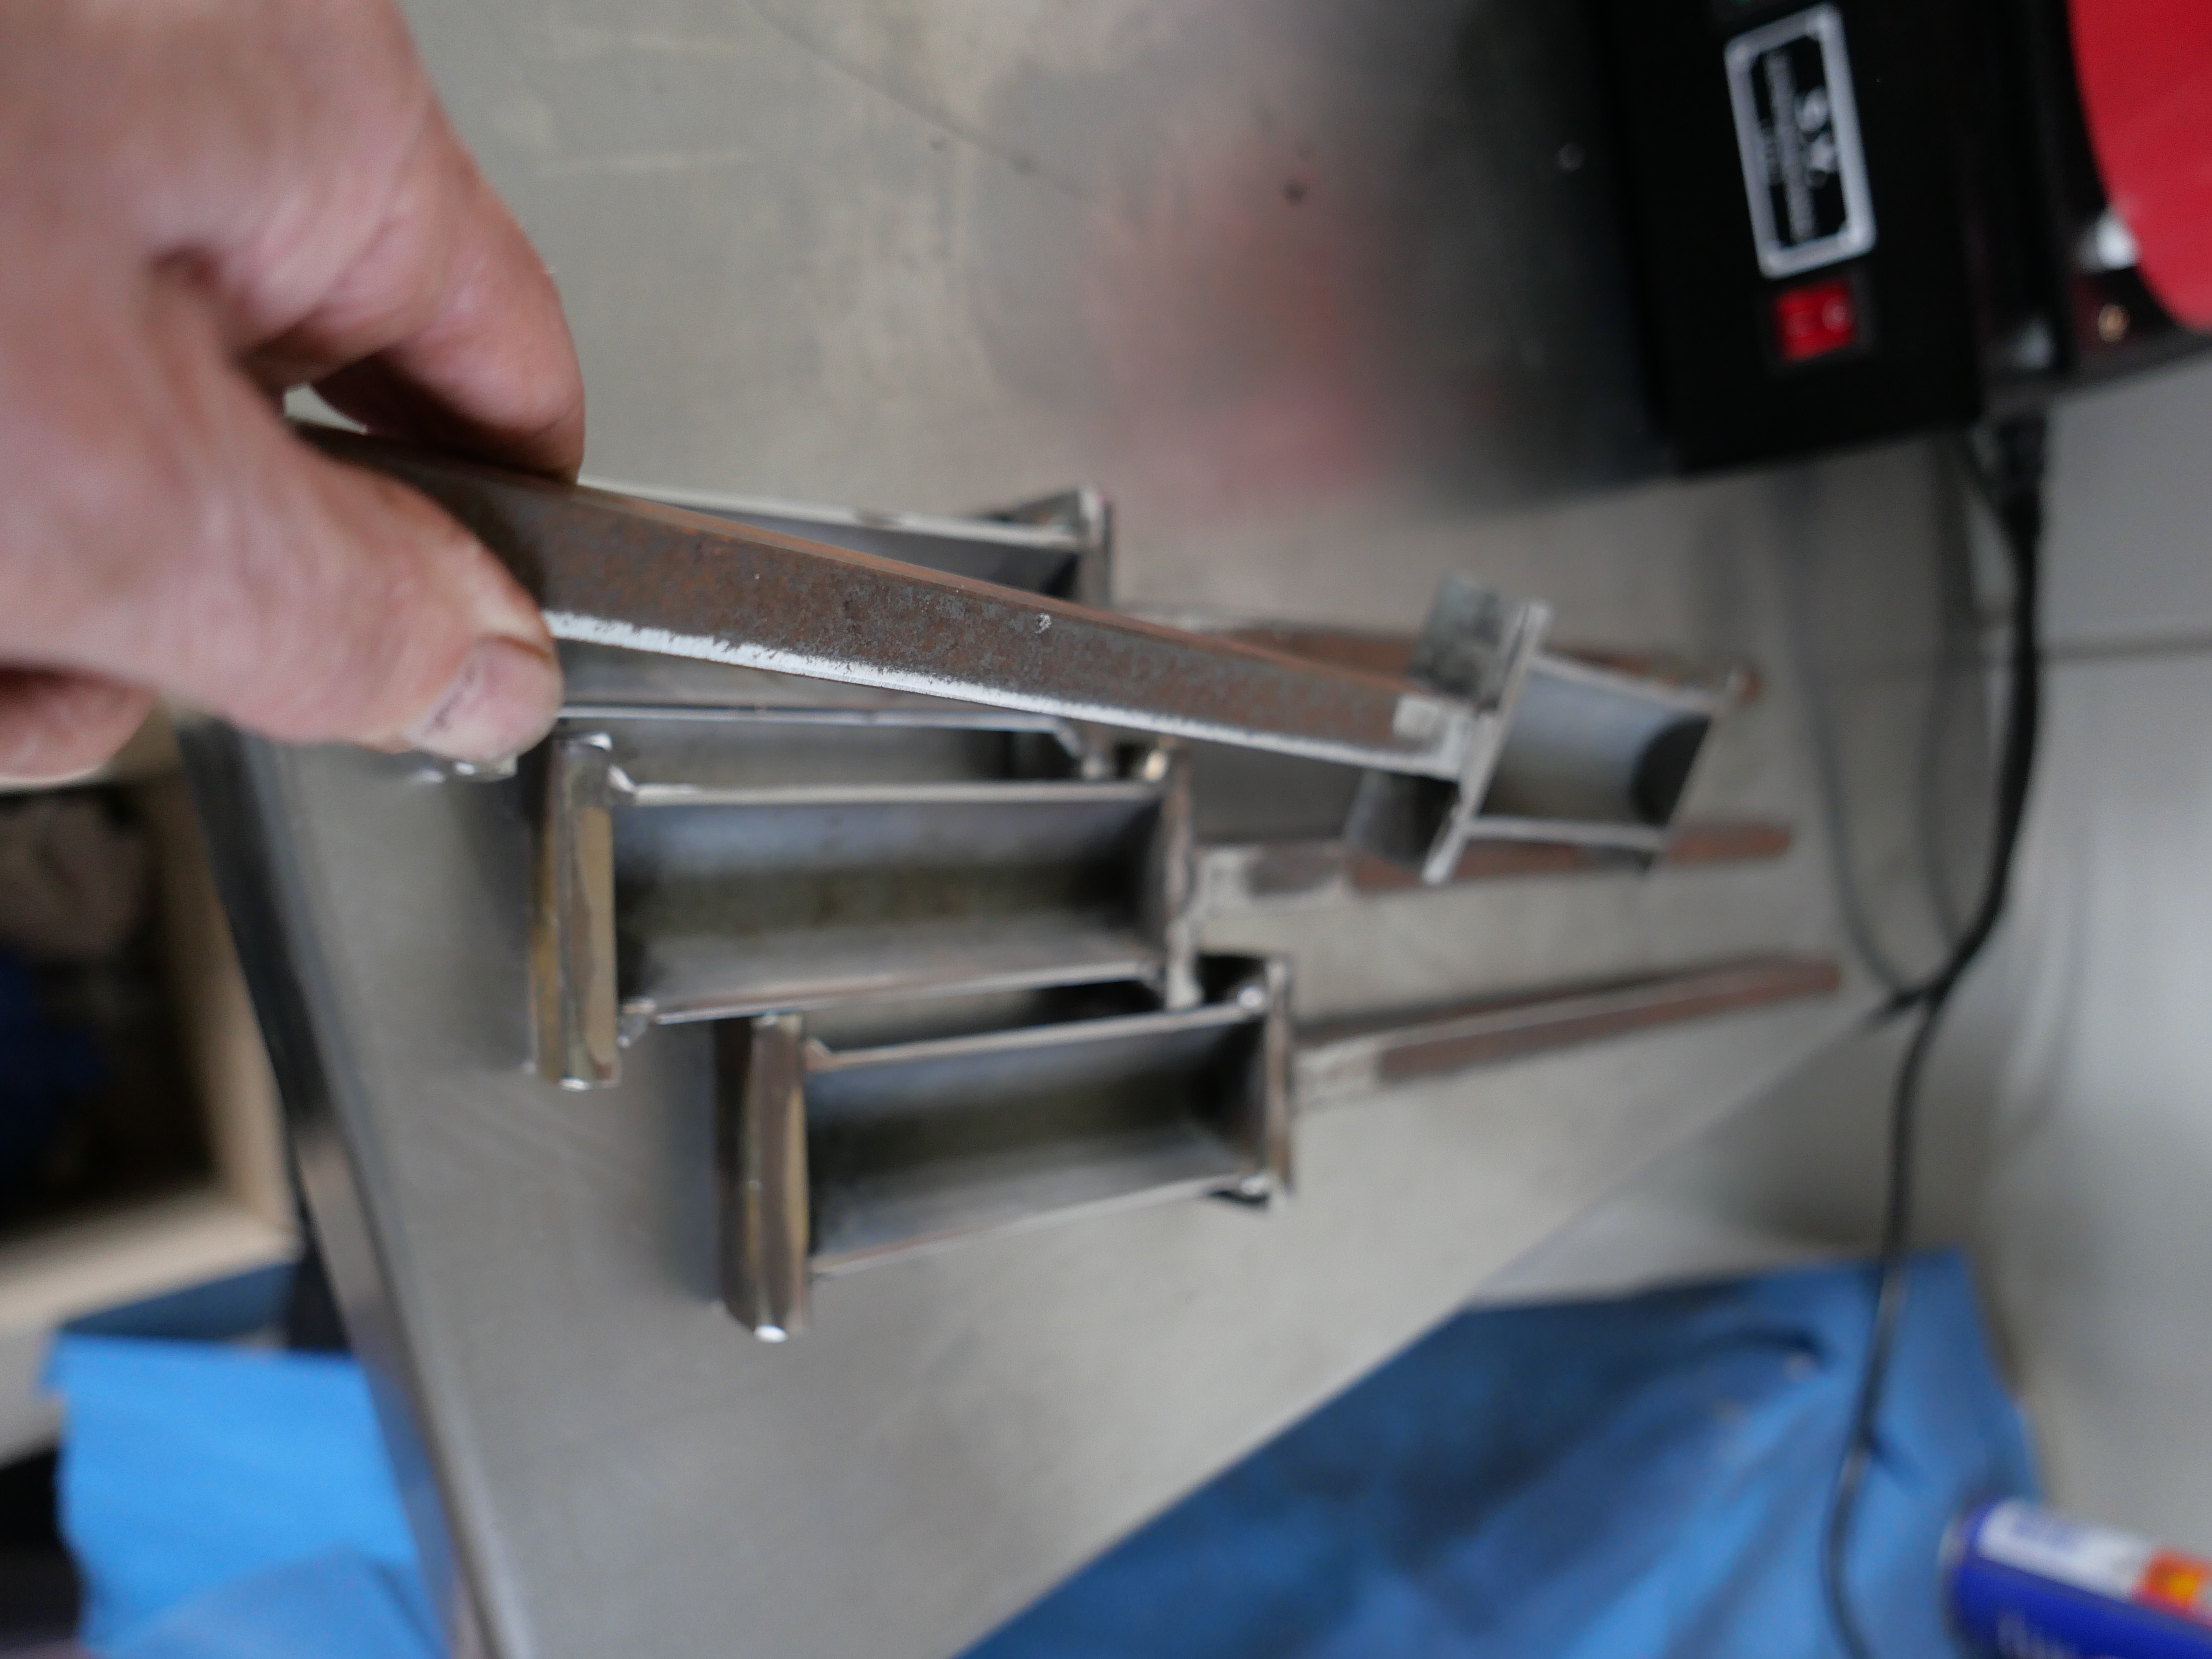
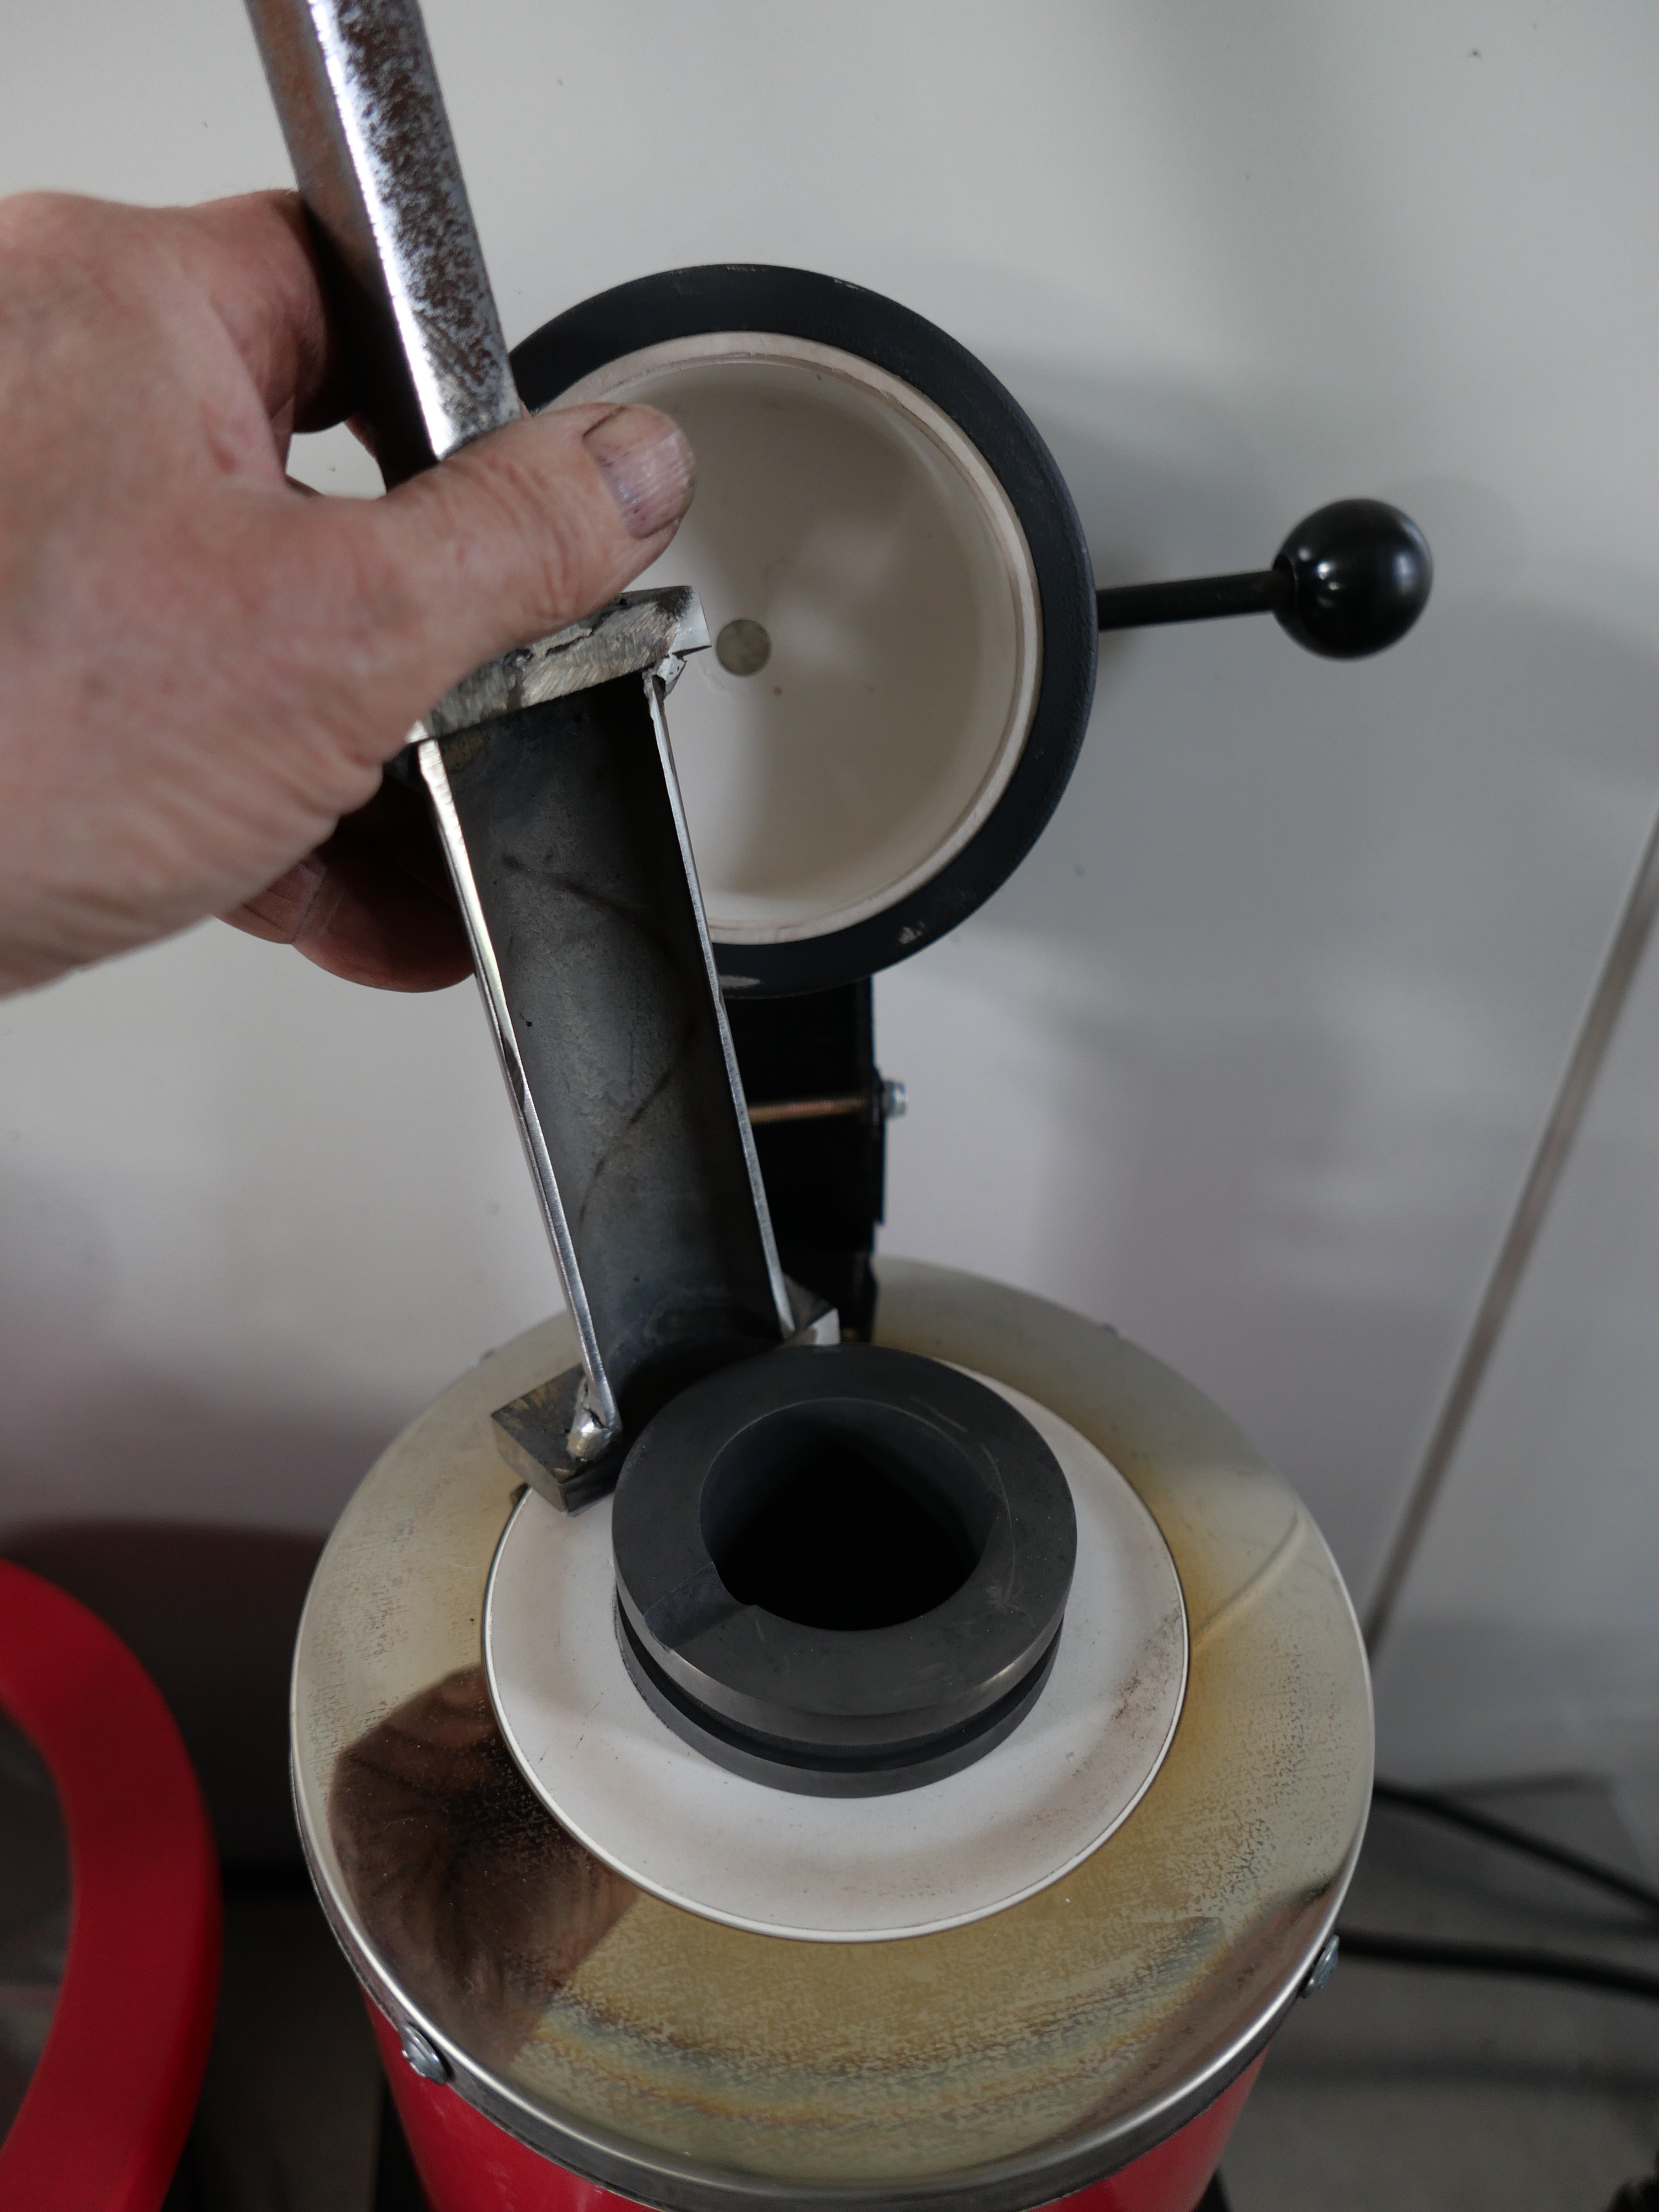
8″/204mm ID pipe. I need to reduce the ID to 185mm To reduce the diameter from 204 to 185mm diameter I cut out 19 x 3.2 = 60mm plus a bit extra, then rolled the new diameter to 185mm ID. (shop made rolling machine)Yep, it fits the crucible.
The remainder of the tongs construction was basic cutting, welding, and drilling.
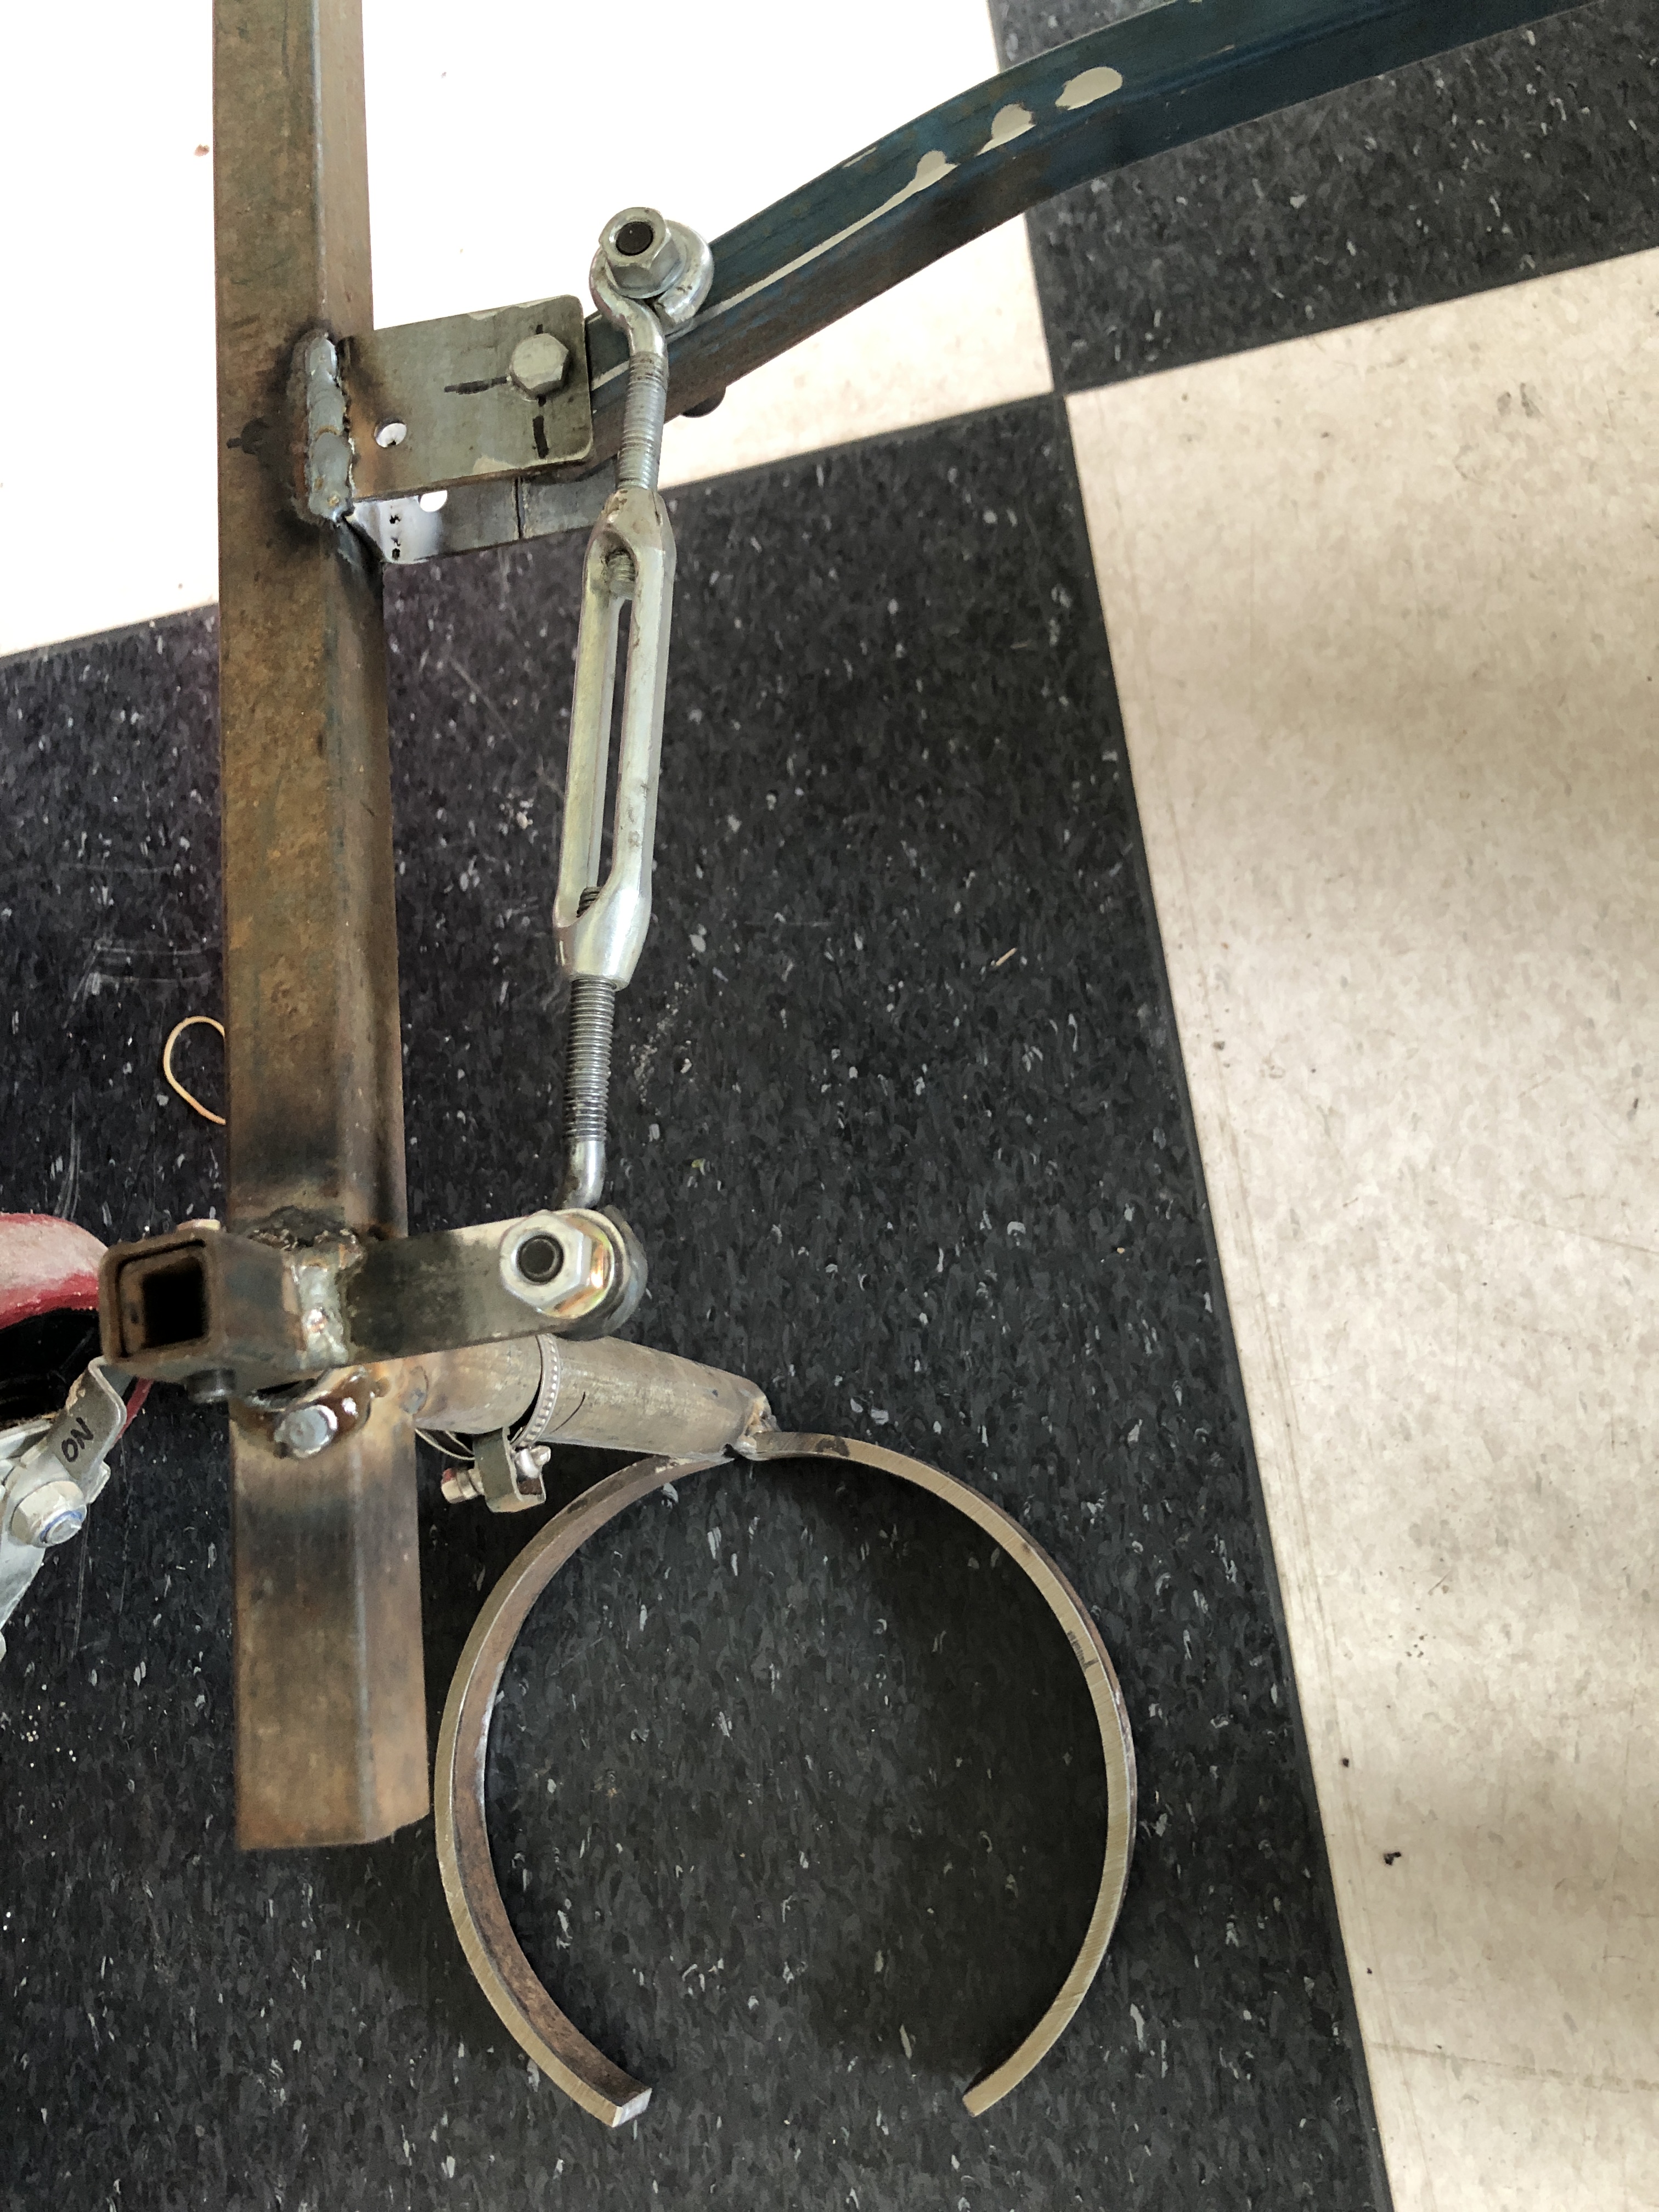
I cut more of the tongs away to reduce the opening diameter, to still fit Stuart’s furnace. The overshot bent handle closure requires a positive action to open the tongs- a safety feature. With the second man handle slotted in placeTesting the crucible and tongs in Staurt’s furnace. Cold.The open position
I used to be a half reasonable amateur welder, but lack of ongoing practice lately, and dodgy eyesight is my excuse for the lumpy welds and essential use of an angle grinder.
Next steps…. I need some dry, non windy weather, and availability of assistance for the pour. I will make the first mould, of the breech since it is shorter than the barrel, dry it, burn out the PLA, and bake it at 750ºc. That will take most of a day. While the baking is in progress (about 4 hours), I will start the melting of the bronze ingot. Stuart says that I will require 2 full 20kg cylinders of propane.
Then the pour. Then after some cooling with fingers crossed. Camera running…..
I have given some thought to how to manage the bronze pour for the barrel of the Ottoman bombard. It will be at the size limit of my potter’s oven for the PLA burnout.
The red 3D printed PLA is the barrel. The breech, although significantly shorter, weighs almost exactly the same, but being shorter, should be less problematic. The wall thickness of the breech is greater than the barrel.
I had thought that the steel cylinder would be adequately long to cast the barrel, but it is about 50mm too short when I take into account the bronze feeder reservoir which will be required. So I will add a 50mm length, probably by arc welding another bit of tube to one end. It wont matter if it is not a perfect join. I will make it waterproof with duct tape. The tape will burn off during the investment melting/burnout.
I will cast the barrel with the threaded end downmost. The molten bronze feeder reservoir will be 60mm deep which I hope will provide adequate pressure and extra molten bronze if required during cooling contraction.
I decided that the usual rubber pouring funnel (pictured above at the bottom of the steel cylinder) would not have an adequately large bronze opening or reservoir depth, so have 3D printed one in PLA. The PLA will disappear during burnout, but will leave its shape in the investment medium and become the funnel and reservoir.
I wont be using the rubber cap/funnel mold. I hope that the 3D printed one works. Despite appearances the thin flat base is watertight. As shown here the funnel is positioned as it will be when the investment medium is poured. The cone seen is not a funnel. It is a distributor for the molten bronze. When the bronze is poured the cone will be point up.
Hard to get your head around that one? It certainly was for me when designing it.
You (and I) need to remember that any space around the PLA will become investment medium. The PLA will disappear and become a void which will be filled with bronze.
This screen shot of the 3D diagram might help. This is the pouring reservoir in the pouring position. The wide disk at top is to position the print on the steel flask. The skinny cylinders are vents to release air during the bronze pour. The stepped cylinder in the middle sits on the inside lip of the barrel. The inverted cone will be solid investment to direct the bronze into the barrel void. Confused? Maybe this will help. This is the position the PLA parts will sit inside the steel cylinder during the pour of the investment medium and later during the PLA melt/burnout.During the bronze pour the PLA components will be voids, which the bronze will fill. (except for the widest disk at the top which will disappear.)
The 3D print took over 8 hours. 0.2mm layers, 210ºc extruder temperature, 3000mm/min. I will need to do a similar 3D print for the breech. If either or both pours fail the whole process will need to be repeated.
Still in lockdown. Cannot visit my workshop due to the 5km travel limit. So 3D designing and printing at home is fairly good use of my time.
Well, 99% finished. I still intend to make sights, a base, and bumper components. But it now looks finished. A few pics.
It has a few differences from the first one of these which I finished for last Xmas. It has side platforms, handles for positioning the carriage on the slide, minor design changes in the rear wheel brackets, minor changes in the elevation wheel, and probably a few more that I cannot remember.
The explosive projectiles would never have been placed on the side platform. The noses contained impact sensitive detonators, and I doubt that the gunners would have risked them falling off.
The positioning gears work well, as does the elevating mechanism/gears, the elevation lock, the clutch and brake.
Oh yes, some fasteners for the rear platform too… And engraving text on the recoil tube cap, and the muzzle mouth. OK, 98% done.
Now, I am getting on with my next project too. Yes I will eventually finish the Armstrong RML cannon. But I am getting impatient to be doing something different, so I have started on the bronze version of the Ottoman bombard.
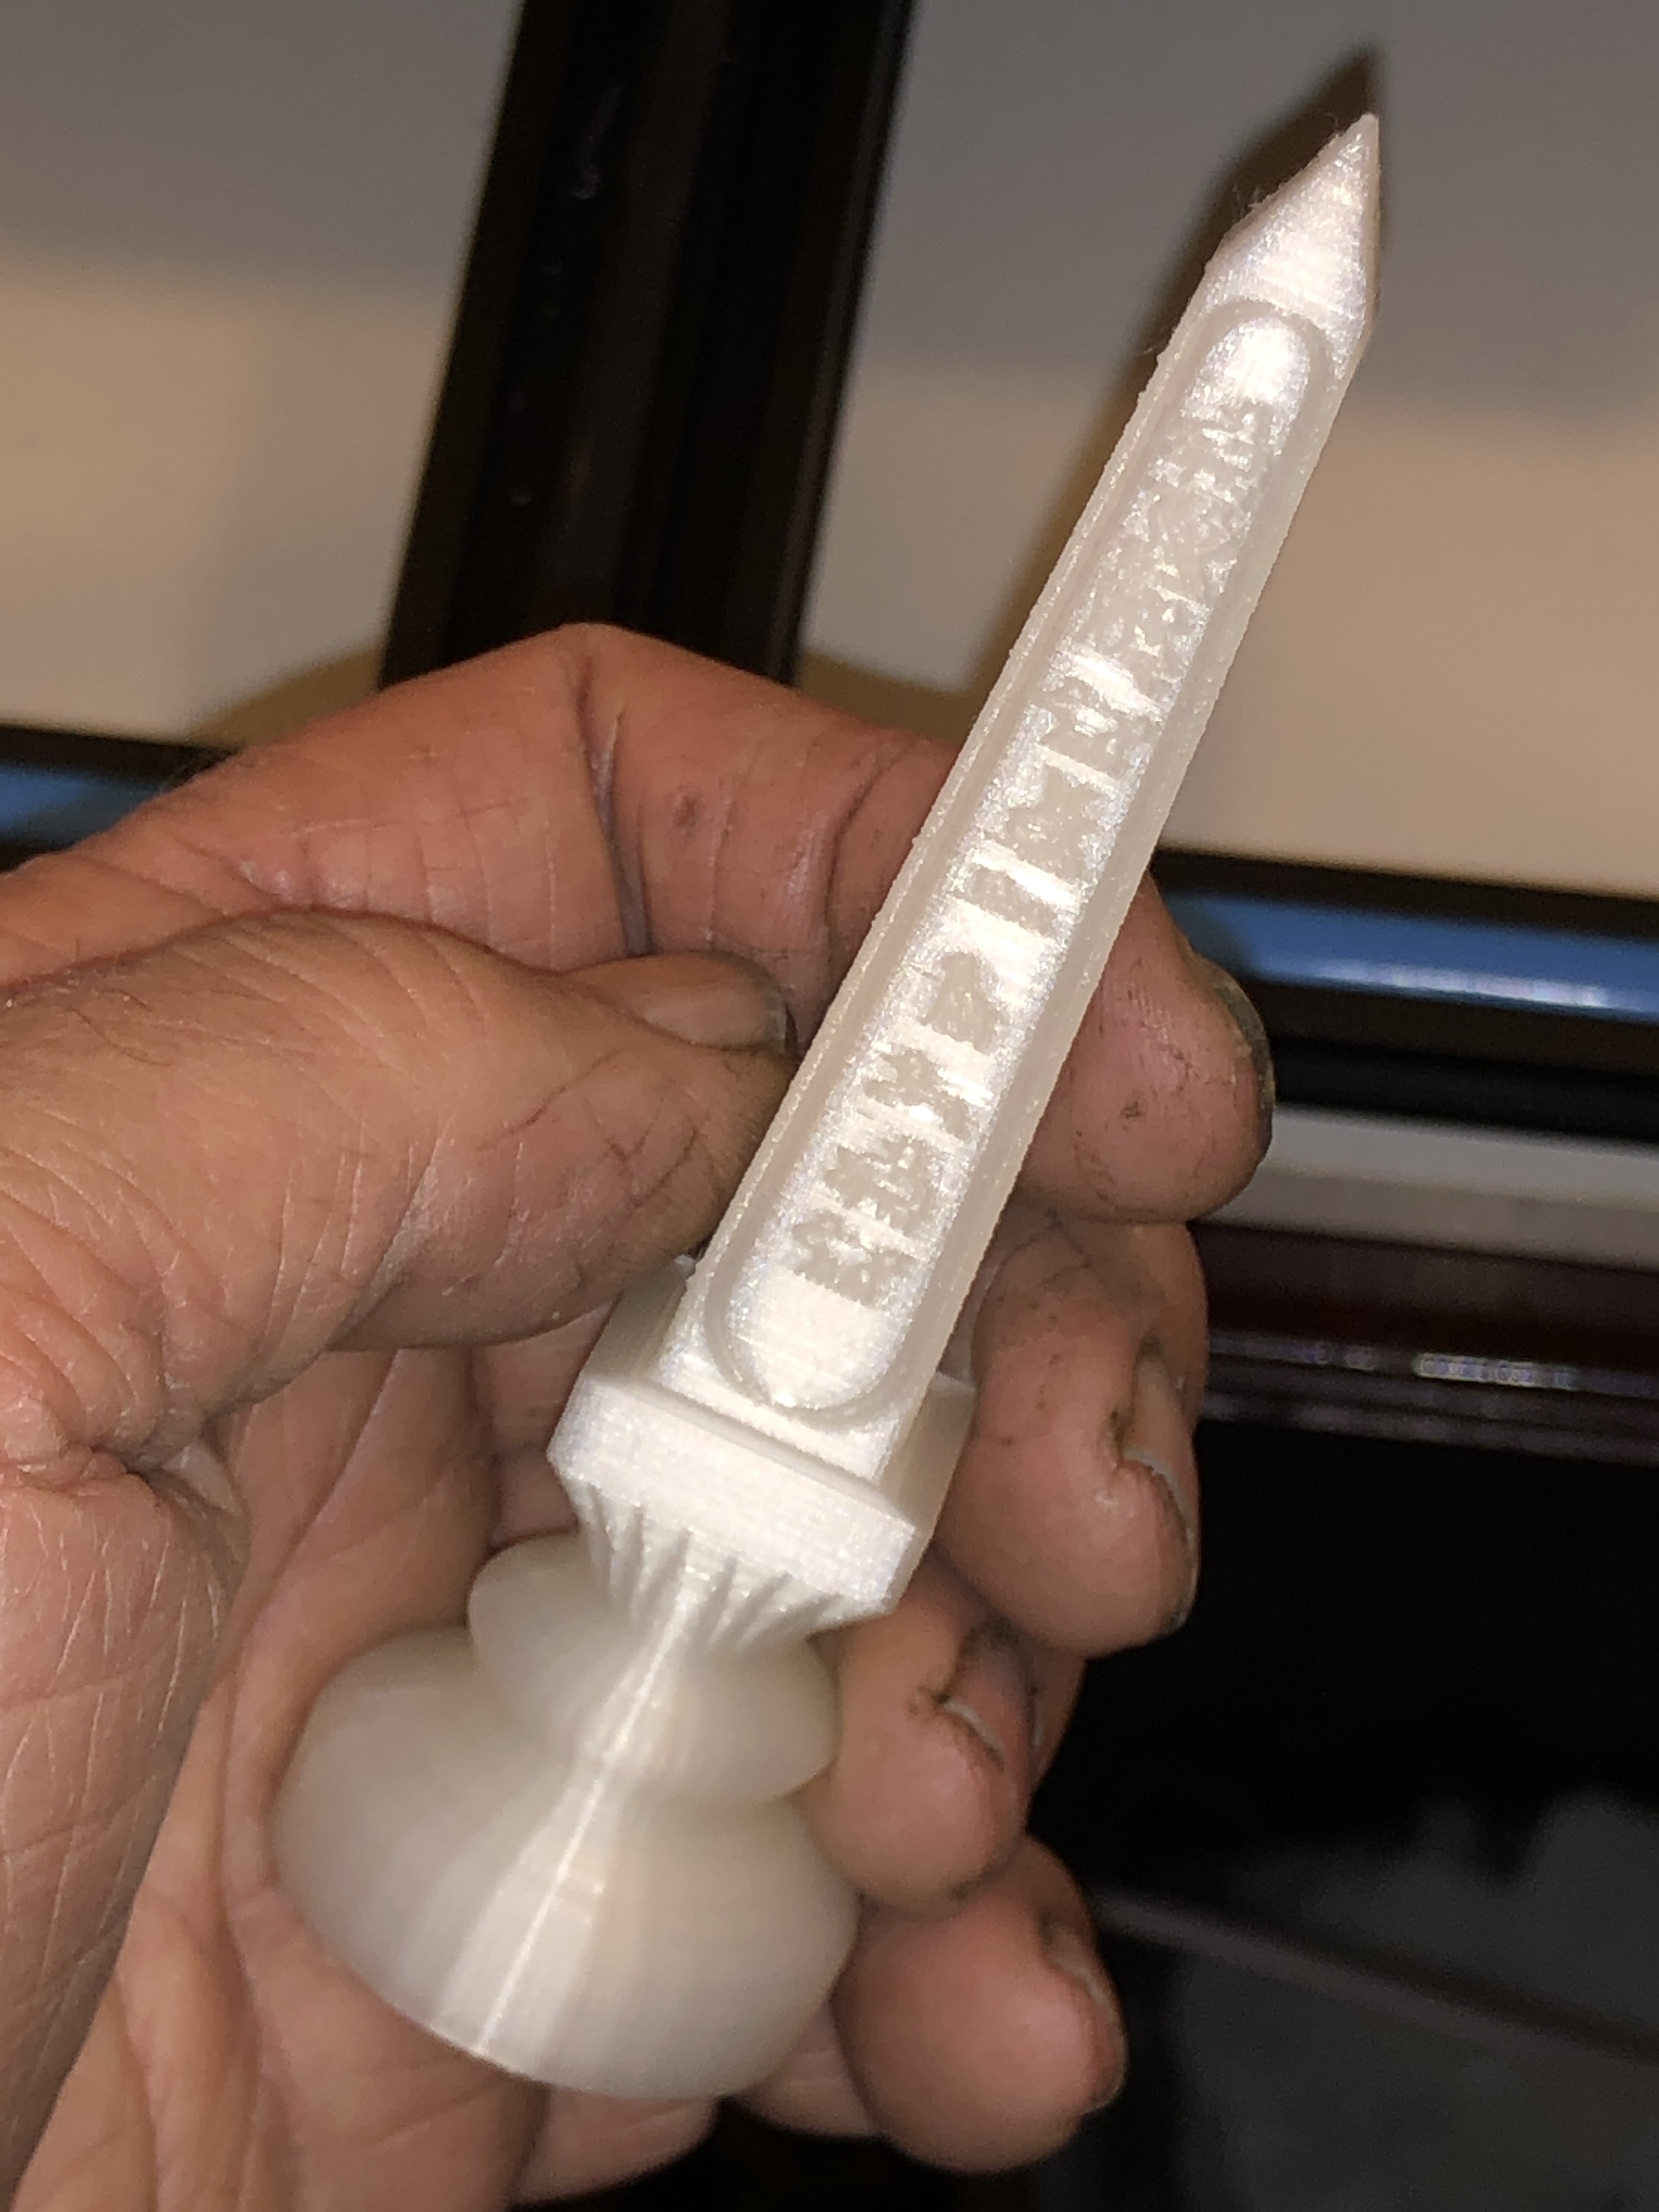
This PLA 3D printed breech is 230mm long, plus thread, and 107mm max. diameter. Still deciding whether to refine the design and print another. For one thing, the threaded section is constant diameter, whereas the original had a tapered thread. Yet to 3D print the barrel. It is 280mm long. That is a lot of plastic to burn out prior to bronze pouring. Maybe I should use transparent PLA in case the black dye (whatever it is) damages my burn out oven, or my lungs.
For another thing I have been unable to get my CAD program to convert the Ancient Arabic Script into vectors. But, I have been able to get V-Carve Pro to recognise them/
That is a tracing from the photograph. A couple of hours of effort doing the tracing. Then scanned the tracing, and imported the scan into V Carve. That worked, and I hope to remove 0.5mm of the muzzle bronze, leaving the raised script and stylised designs. V Carve predicts that will take 5 hours on the CNC mill!! Watch this space.
Almost finished the model Armstrong 80pr RML, and just starting another project. I have mentioned it in previous posts…. a 1:10 scale model of the 17 ton Turkish bombard, which currently resides at the Royal Armories Museum, Fort Nelson, Portsmouth, UK.
The original was in 2 pieces, to make the casting process manageable, and presumably to make transporting the monster cannon more manageable. The museum states that another reason for the screw thread join of the 2 massive parts was to separate the halves for reloading, but I can find no substantiating references for that statement. And it does not make sense to my conception of what would have been involved in the reloading process.
At 1:10 scale the model will be over 500mm long, and will presumably weigh approximately 17kg (37.5lb). Each piece will weigh 8-9kg. I will make the model in 2 pieces, for authenticity, and to make the casting more manageable, and to make the 3D printing possible. My 3D printer has a maximum model size of 300x300x400mm.
I spent several days drawing up the breech and saving it as an stl file, for the slicer (Simplify 3D) to process. The slicer predicted that the print would take 51 hours, and consume 697g (1.5lb) of PLA. I used 0.2mm layers, with 8 top, 8 bottom, and 6 side layers, and 10% fill, and since there wee some 90º overhangs, I decided to add supports.
And guess what. The print took 51 hours, and consumed most of a 1kg roll of PLA.
I chose to operate the extruder a bit hotter than normal, at 225ºc, and heated the platen to 65ºc. I wanted to make sure that this print was water tight for the moulding process, and remained adherent to the platen for the duration of the print. I accepted that the detail of the print surface would be a little coarser than could be achieved at a finer layer thickness, but the benefit would be increased water tightness.
The Ottoman Bombard at Fort Nelson. In the background is the barrel for the supergun which Saddam Hussein ordered, but was prevented from being exported from the UK.After about a day of printing. On our dining room table (which I made many years ago).Phew! Printing completed.Most of what can be seen here are the supports.It took about an hour to remove the supports. They were particularly resistant to remove from behind the pins.I will spend a few more hours sanding and filing and filling the surfaces, before making the molds with the investment powder.
I am still drawing up the barrel. Well, actually, it is fully drawn up, but I am refining the drawing of the Arabic script which is embossed on the muzzle. It is quite difficult to convert the squiggles and patterns to vectors, which can be used to produce the STL file for the 3D printer.
The Arabic patterns and script on the muzzle. At 12, 4 and 8 are floral patterns. The calligraphy reads “Help O Allah. The Sultan Mohammed Khan son of Murad. The work of Kamina Ali in the month of Rejeb. In the year 868″. (CE. 1464). p.s. I did not previously notice the alien watching me , top right.
I have been teaching my 5 year old grandsons to play chess. It started with checkers, but the little buggers are already beating me at that! So I have upped the ante and introduced chess.
Then I thought that a chess set might make a nice present. So I explored THINGIVERSE and found these Egyptian styled pieces. Free download. And I have been printing them. I intend to cast them in bronze and aluminium.
This obelisk is a castle.Queen on the right, knights on the left. Printing in progress so the supports are yet to be removed. Behind are the bishops and the king.
The detail and quality of these Thingiverse STL’s is superb!
The investment plaster is is what the mold is made from when parts are cast in bronze and aluminium.
It is incredibly fine dust until mixed with water, and these need to be in precisely measured weights.
The mixture is poured into the casting cylinder in which the parts are attached to a wax or PLA “tree”. (see yesterday’s post for a photo of a tree).
After casting, much of the investment plaster is blown out of the cylinder when the still hot cylinder and its contents are plunged into cold water. The steam which forms acts like a steam cleaner.
But the parts are still covered with a tenacious layer of investment plaster. More can be scraped off with a screwdriver, wire brush, pressure hose etc. etc. but there remains a lot of plaster in the nooks and crannies, joins and holes.
And it is a fair pain to get it all out.
Yesterday’s castings looked like this after I had sawed the 34 pieces off the trees.
and after more sawing and use of a thin disk abrasive wheel…
there is still investment in the grooves and crevices.
Then most of the unwanted bronze branches were machined and sanded off…
still the investment powder clings on….then the investment powder all disappeared!
It happened serendipitously. I placed the parts in a gemstone tumbler with sharp stainless steel shot, to take off the sharp edges. And hallelujah! The remnants of the investment powder were also removed. The curved arms in the photo are stainless steel and brass, bent around a mandrel. I have not yet decided which to use.
In future I will use the gemstone tumbler at an earlier stage, to get rid of the investment as soon as possible.
And here is another stage of the pruning of the trees…..
I wonder if holding the angle grinder in a vise, and holding the trigger with a spring clip, will void the warranty?
It was a bit too warm for casting bronze today. 33ºc/91.4f. But I went ahead. It was sweaty.
I had installed a new thermocouple in the potters oven and it performed flawlessly. Fumes from burning out the PLA and wax from the mold had caused the older thermocouple to behave erratically, but the new stainless steel type was unaffected.
And, as I displayed yesterday, I had made a very ambitious tree with 32 parts to be cast, and a second tree with 2 largish parts.
No vents. No vacuuming of the melt. Just a straight pour.
A few minutes after the pour, the bronze is still at a beautiful fluorescent red heat.The cast 2 trees. NO bubbles (I painted the PLA trees with a slurry of investment before the investment pour). All parts look perfect, except for a tiny area of moth eaten edge on one of the parts in the top tree. Too small to show up, and quite repairable.The other side. Not much surface oxidation (phosphor copper used).
So, a very successful pour. Some careful hand sawing required to cut off the parts.
I made a 1:10 model of this Ottoman bombard a few years ago. This one was made in 1465, and is thought to be a copy of the bombards which brought down the walls of Constantinople in 1453. This one resides in the Royal Armories Museum at Portsmouth, UK, and I photographed and measured it in 2019. It has a bore of over 600mm, and fired stone balls of over 350kg.
Last used in anger against the Brits in 1807, where it and others like it, were instrumental in preventing a British fleet from invading Istanbul (renamed from Constantinople). How many weapons have an active life of ~350 years?
…and the model turned out well. 550mm long, but, it is made of wood.
So I am contemplating making a model at the same 1:10 scale, like the original, in BRONZE. It will have the same shape and size, but will look like and feel like BRONZE.
I still have my original measurements and drawings of the model. So my plan is to print the cannon parts in PLA, taking into account my extra information from the 2019 visit, then to cast it in BRONZE.
I had planned to stop this blog after finishing the Armstrong RML, but maybe , if there is enough interest, I will keep it going for the next project. You will need to let me know if this project will be of interest. Because lately, comments and likes are few, and numbers have been discouraging. And the renewal date for WordPress is approaching. I get it that people prefer videos, but that is not my style. If this written plus photographs style is not wanted then I will not persist.
I had 3D printed another tree with 4 cannon parts. Brackets. The complete tree fitted into a steel flask 100mm diameter and 120mm high. So I repeated the steps of the last successful pour, and painted the tree with investment slurry, mixed the main investment, degassed it, poured it, and degassed the entire flask, investment and all. That method had worked well before, so I repeated it.
But I was a bit concerned because the investment was only a few mm thick at the bottom of the flask. Would it hold up? Read on.
So then commenced the drying, burnout, and baking cycles in the potters oven. Normally it is about an 8 hour process, and I did not get to start until 12 midday. So I was in for a long day.
But then the oven started to play up. It would suddenly switch off. The temperature gauge would swing wildly. And would not heat above 400ºc and it needed to reach 710ºc.
I did not know the source of the problem. Thermostat? Wiring? Controller? Power supply? I did know that the thermostat wire was not rated for temperatures above 600ºc, but it had worked OK previously. So I turned everything off, and removed the electronics compartment. Changed the thermostat wire to the proper grade (thanks Stuart!), then found a loose main heater element join, so fixed that too. It all took another 1-2 hours.
Started up the oven again. The temperature had dropped to about 200ºc, but the the temperature started rising slowly, so maybe the problem had been fixed? By this time it was 4pm, and there were still 7 hours of heating required, so it WAS going to be a late night in the workshop. Made my peace with SWMBO. She was happily watching the footy, and not too worried about about my travails. (and our team won convincingly!)
To finish this story, I eventually poured the bronze, and my earlier concerns about the thin layer of investment at the bottom of the flask were realised. The bottom fell out, and molten bronze poured out through the breach. I normally rest the flask in a tray of sand when pouring, and fortunately, the bronze seemed to harden when it hit the sand, and the outflow ceased.
This was the result….
Amazingly, the parts seem fully formed, with no voids or bubbles. The ugly lump underneath is the bronze leak through the bottom. Note the length of feeder sprue. And the funnel. If you zoom into the photo you will see that the fine detail of the 3D printing has been reproduced. I will cut the parts off and finish them tomorrow. I got home about midnight. I needed that shot of single malt.The bronze brackets, after sawing them from the tree. I will add a photo after another session of machining and finishing them.After some more tidying. The investment powder can be persistent.
CHEAP SPANNERS.
I have several machines which use 40ER collets. I have enough collet spanners, but only one locking spanner for the chucks, and it is always on the wrong machine. So I decided to get some more locking spanners, and I sent my drawing to the laser cutting company. I picked up 4 spanners from them a few days later. Cost $AUD55. (cheap!)
My Colchester, with ER40 chuck. And one of the new stainless steel locking spanners. Drawn up as a dxf file, which was emailed to the laser cutter. The square hole is to lock the carriage to the bed. A few moments on the belt sander removed the sharp edges. Not elegant, but works perfectly.2 spanners are required to tighten the ER collet. Here I am making a jig which will be used to cut the quadrant gear which elevates the cannon barrel. More about that in a day or 2.
Another small bronze pour yesterday, and it was my best one yet. No bubbles. No voids. And excellent surface definition. What did I do that was different?
First, the 3D parts were printed already attached to the tree. So the trunk and branches were 3D printed with the parts attached. That meant that I could determine more accurately the bronze flow, the gaps, the spaces. The only “failure” was that I added some wax air vent sprues as an afterthought. And those wax parts were the only part of the pour which failed. Fortunately, the absence of the gas vents did not seem to matter.
The 3D printed tree. There are 9 PLA brackets ready to be replaced by bronze. I increased the height of the trunk for extra melt pressure. The air vents failed, and were not needed anyway.
Next, I painted the tree with a slurry of investment. The slurry was much more watery than the normal investment, but it was thick enough to leave a thin layer of investment on the surfaces, paying particular attention to the corners and internal edges.
Then I used my new, 1 hp vacuum pump to degas the investment mixture. It took about 15 seconds to reach maximum negative pressure, compared with about 1-2 minutes which the 1/4 hp unit was taking.
Then, after pouring the investment, I placed the full flask containing the tree and investment, and degassed the entire unit. I was shocked at how much extra air bubbled out.
The rest of the process was as usual, drying for 4 hours (except that this time it started at 6am, having put the process on an automatic start timer), burnout 2 hours, and baking 3-4 hours.
The cast tree was looking hopeful. And not much surface oxidation to see. (I had given the 15% phosphor copper a full 2-3 minutes to work this time.) ….and there are my brackets. 9 ducks in a row. They need a bit of filing, and some time in the gemstone tumbler.
BEVEL GEARS
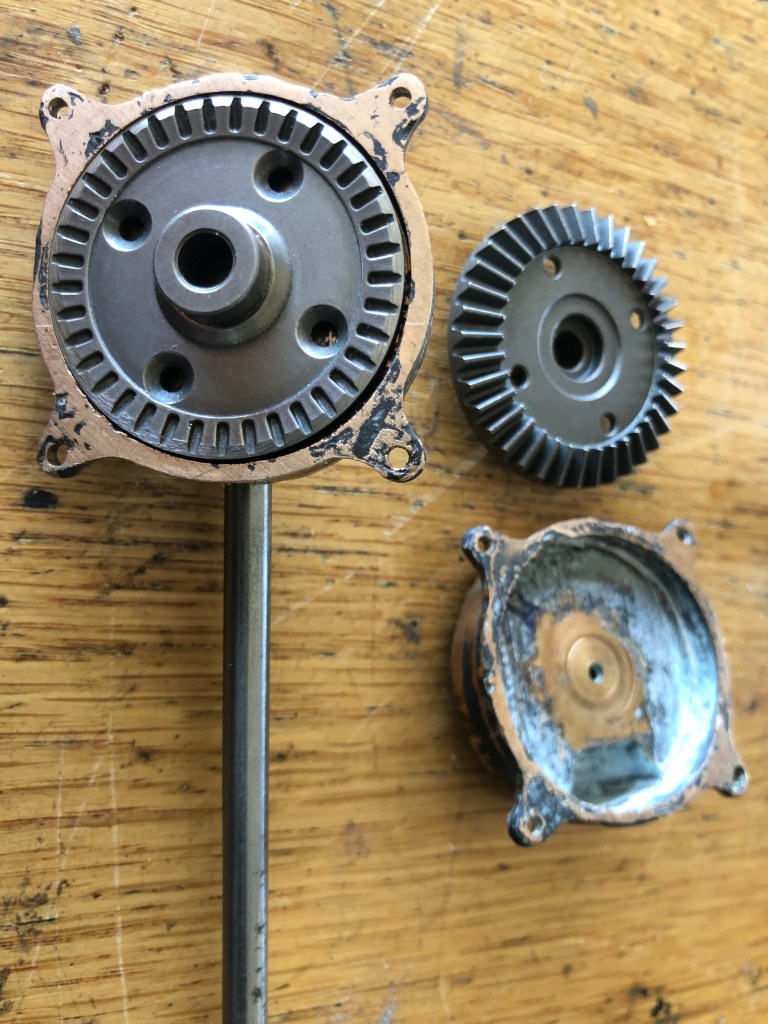
Top is a bevel pinion as it arrived, and a mandrel which I made. Middle row is an unmodified bevel gear which is too big for the case. Bottom row is a machined bevel gear which now fits into the case, and a pinion on shaft, which also fits into the case.
While the investment flask was cooking, I experimented with the bevel gears which move the cannon barrel elevation. I had cast some bronze gears, teeth and all, some weeks (or was it months?) ago, but was not happy with the result. So, I had bought some bevel gears on Ebay. They are spare parts for an RC model car. Not quite the correct size, but close. The metal is HARD. Sintered? But, machinable with carbide cutters. (ps. added weeks later. Even carbide cutters struggled with machining these gears, so for the second set I used a tool post grinder on the lathe. That worked well, and produced a better finish.)
It all now fits.
Now before you all start shouting at me to make the bevel gears from scratch, let me just say that I might do just that. Not yet decided.
When bubbles occur inside a casting, the cause is probably in the design of the pouring system, or the way the melt was poured. If you watched the video a few posts ago by Prof. John Campbell you would think, as I did, that our pouring funnels and sprues should be more complex and more carefully designed. Difficult at an amateur level. I have made some changes in this direction, using a side reservoir to tip the melt into, and trying to avoid the gurgling and glugging.
With the sort of castings which I have been making for the Armstrong cannon, I am not so concerned about internal voids. The scaled down model always has an advantage in strength of the part, compared with the full size part, within limits.
But, bubbles which stick to the exterior of lost PLA/wax models are replaced by solid bronze, or whatever metal is used, and these metal bubbles can be tricky and difficult to remove.
I decided to remake the big gears, which were the subject of the last few posts, and the cause of a lot of bad language. I decided that the gear teeth were too skinny and pointy, and redesigned the part using larger module teeth. To compensate for PLA shrinkage and metal shrinkage I printed the PLA parts with a 2mm machining allowance.
The gears with the narrow pointy teeth.
I printed the PLA blanks, leaving the gears and brake drums as a blank lump which I will turn to shape after casting. But the internal decorative holes and ribs will be cast. And they are the site of many bubbles in previous castings.
So, to avoid the bubbles, I am trying something different in the current casting session. I am trying a method which was suggested by a GSMEE member, and that is to PAINT the first layer of investment material thinly on the tree components, making sure that no bubbles stick to the parts, then to pour the rest of the investment filling the cylinder. There might be some bubbles in the main volume of the pour, but they should not be sticking to the parts. That is the theory anyway. I am waiting for a bigger vacuum pump to arrive by post, which should be more effective at sucking out the bubbles, but meanwhile, I will try this…
The gear blanks, painted with investment, particularly in the bubble prone areas between the spokes.
Today, I heated 2 cylinders/moulds in the investment oven, and melted some bronze.
For the pour I tried the negative pressure apparatus.
I did not notice any change in the level of the molten bronze in the reservoirs when I applied the negative pressure, so I doubt that it added much to the process.
The results were like the curate’s egg… some good, some bad.
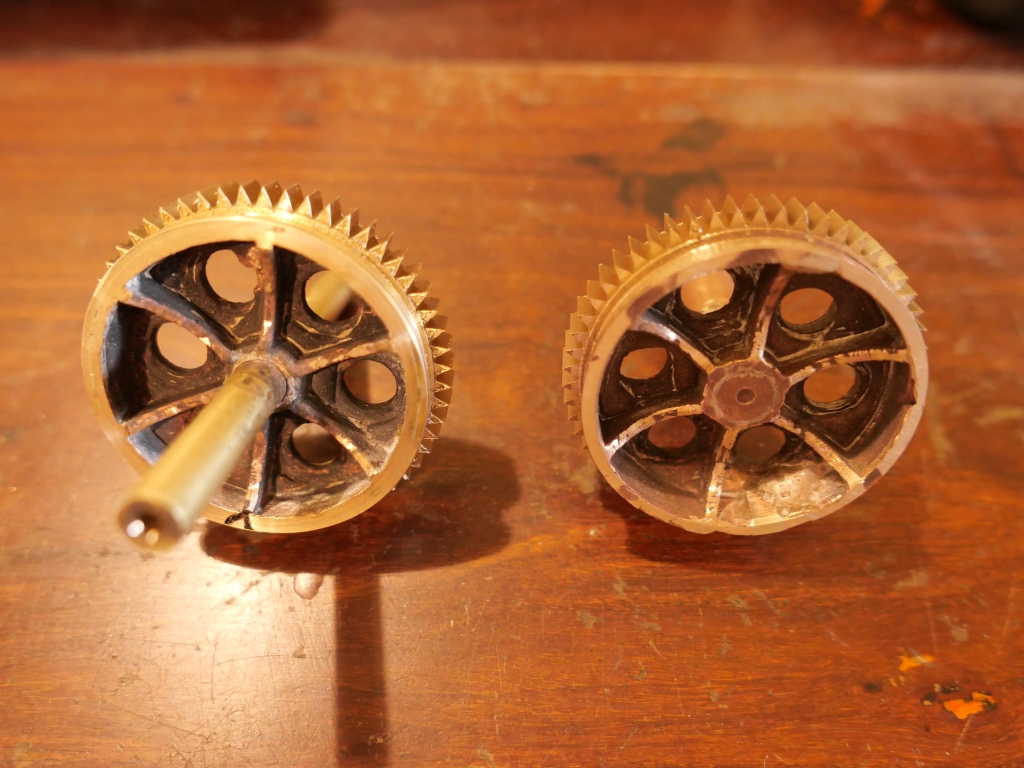
This was one cylinder. The reservoir/funnel at top, then 4 rather spindly round handles. The top one had a defect, the second was perfect, the third had a couple of small defects, and the fourth was unusable.The bottom one will be used to repair the 2 with small defects. There were 4 tiny parts in addition. 2 were excellent, 2 must have broken free from the tree and disappeared into the ether.
There were 2 big gears in the other cylinder. The one at the top did not fill properly and is not usable. It will be remelted. The bottom one was close to perfect.Note the absence of bubbles. I think that my pre-painting the investment into the recesses must have worked. The failed gear again was near the top of the tree. It seems that even bronze requires a bit of head to create filling pressure.These are the tiny 20x19mm fittings. Some time in the gemstone tumbler should polish them up nicely.
I am waiting for a more powerful vacuum pump to arrive by post. The 1/4hp one that I am currently using is too slow, when time is critical. I have a 1hp pump on order. No more casting until it arrives.
Just to recap, I made the trees and investment powder moulds about 2 weeks ago.
The biggest gears on the Armstrong cannon. Some with cast teeth, and some with blanks for teeth to be cut. And some brackets in red on top.And the 2nd tree has 6 brackets on top, and another T rex to fill the spare space.
The first problem was that when I was adding the carefully weighed and expensive investment powder to the carefully weighed water, the f***cking scales timed out and shut down. So I had to guess the amount of powder to add. Then mix furiously. Then a briefer than normal degassing. All to be completed in 10 minutes. 10 minutes sounds like a long time. But it is all too short when there is any hick-up at all. (read.. “stuff -up”). #1.
I knew that the scales had a shut down timeout, and following the Chinglish instructions, I thought that I had turned the timeout off. But apparently I had not. After that I ordered some new scales.
Then I had to wait almost 2 weeks for the 15% phosphor copper to arrive.
Yesterday, after installing a new heater element in the melting furnace the day before, I fired up the investment oven and went through the drying, burnout and baking cycles, about 8 hours. And prepared another tree and mould for the next pour, in a few days time.
The melting furnace with its new element took a lot longer than previously to melt the bronze ingots, about double the time. But that was OK. Just had to ring SWMBO to warn her that I would be very late. (Got home about 9pm. She had organised take away.)
I added the 15% phosphor copper in approximately the recommended amount. And poured the first cylinder. But I forgot to wait the recommended 2″. #2.
Then I poured the second mould. And there was not enough melt!!!! #3. I had underestimated the amount of bronze! Those 4 big gears were guzzling the molten bronze! So what to do? Abandon the second cylinder? Or melt another ingot and just pour it on top of the first one after another 30-45″?. Nothing to lose, so I plopped in another bronze ingot, and waited for it to melt. Meanwhile I put the mould half filled with bronze back in the investment oven to keep it warm at 710ºc. Then, for some reason, the electronic controller of the investment oven shut down, and the element stopped heating. #4.
When the extra bronze melted I added bit more phosphor copper and completed the pour into the now substantially cooler mould which was already half filled with bronze which presumably had solidified. I assumed that the join between the 2 pours would be a problem. And it was.
Forgot my camera. Some photos to be inserted here later.
Somewhat surprisingly considering the guessed amount of investment powder at the original mix, and short duration degassing, the first mould was, apart from a few bubbles, completely successful. The second mould, with its 2 pours, was not a total disaster.
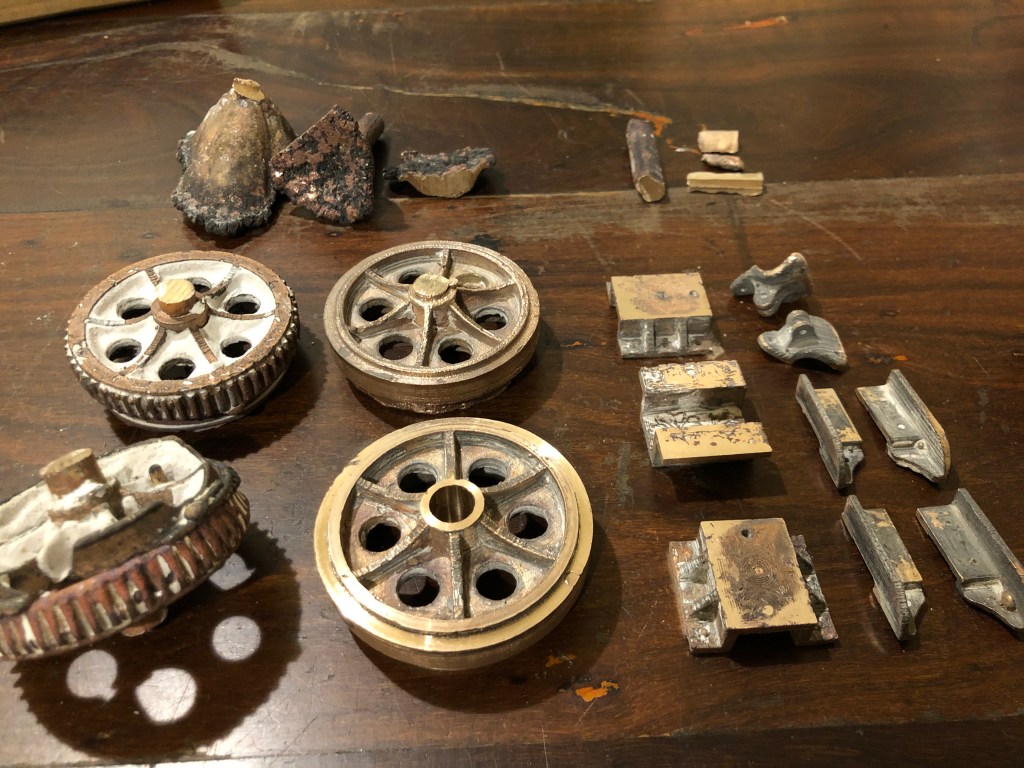
Today I sawed apart the trees, removed the bits of sprue and vents, and partly machined the parts. These are the bits.
The toothed gears and non toothed gears are the biggest gears on the cannon. And they include the drum brake, I was unsure whether the cast teeth would be adequate, or whether I would need to cut the teeth. It was not a fair test, in view of the interrupted pour, and the brief degassing. But I will cut the teeth from the blank wheels to the right. The toothed gears were probably the join between the 2 pours and total failure and will be remelted.
Even the blank wheels are not without problems. I did not allow for shrinkage, #5. and the diameter of the wheels is 57.5mm instead of the intended 58mm. So I cannot cut 56 teeth per wheel. I can cut 55 teeth on the smaller diameter. Still pondering that one. Do I repeat the entire exercise with a machining allowance? Or just be satisfied with one tooth less? I have not decided definitely, but am tending towards accepting a slightly smaller tooth count.
But, at least the brackets to the right came out well. This photo was taken after some belt sanding….not perfect, but not bad at all.
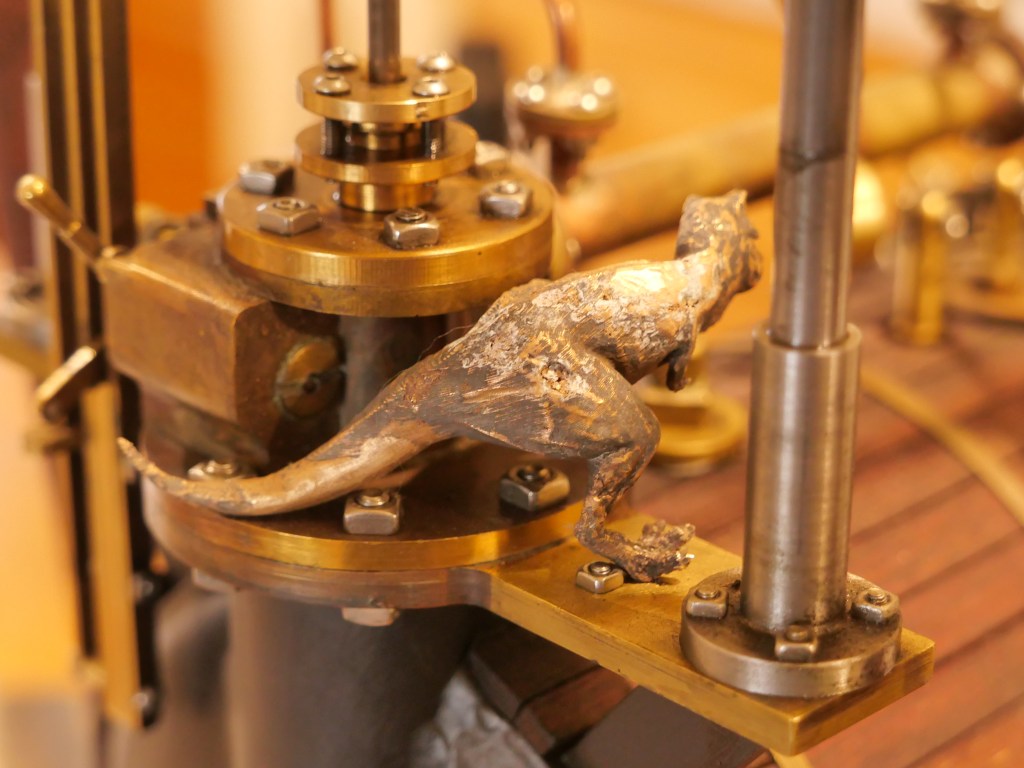
Incidentally, the T Rex is quite good. substantially less surface oxidation, and the oxidation layer that was present came off much more easily. Next pour I will add a bit more of the phosphor copper. And I will wait the recommended 2″.
My bronze castings had been coming out of the investment mould looking like this. I had been expecting to see a wonderful shiny golden bronze colour, and was a bit disappointed in the irregular black coating. But the casting itself was complete, with no voids, and having fine details like fingers, and 3D printing marks showing up clearly. And after laboriously attacking the black coating with Dremel wire brushes, files, sulphuric acid (ineffective), a lot of the black was removed.
This baby T Rex has found a home on my model dredger engine. The variegated skin colouring is reasonably convincing, but was not the shiny bronze colour which I wanted.
Maybe a problem with the LG2 bronze ingot? Something else?
So, I telephoned the supplier, Clingcast Metals, Sydney. Paul answered the phone, and he knew exactly what I was describing. “copper oxidation. Did you add 15 phosphor-copper shot to the charge? (The “charge”, I gather, is the crucible loaded with bronze pieces, for melting?)
“No. What is 15 phosphor-copper shot?”
“Small metal balls. If you add a tiny amount to the charge you will avoid the surface oxidation which you are experiencing, AND it will make the bronze melt thinner and run more freely.”
“Great. Where do I get it.”
“Oh. We have heaps here.”
“Would you post some to me?”
“Sure. How much do you want?”
Quickly thinking….”Maybe a kilogram”.
“That will last you a lifetime. $15, plus postage”.
“Fantastic.” – but I can’t find my credit card. Darn.
Paul. “I will post it. Just pay us when you get around to it.”
So, no more casting sessions until the 15 phosphor-copper shot arrives.
And big kudos to Clingcast Metals.
Meanwhile, I am making up trees and moulds.
Another T Rex, and some cannon parts.The transparent PLA disks are the biggest gear with brake drum. I have not yet decided whether to cut the teeth on this part. And the red PLA parts are brackets for the cannon chassis.
Also meanwhile, I noted that Banggood have a special on melting furnaces which seem identical to the one for which I paid $425, and I have seen advertised at up to over $500. Banggood are asking $AUD290 + $20 p&p. So I have ordered one, as a spare. If you are interested I suggest that you check out this special, ASAP.
p.s. 2 Sept 2020. The 15% phosphor copper arrived today. I found this info on how much to add. I think that my 1kg will last a lifetime.
Description: 15% Phosphor Copper Shot is use as a deoxidizing agent for copper, brass & bronze alloys. It will also increase fluidity and inhibit gas porosity. The shot we carry is approximately 1/8″ x 1/32″ in size.
Usage: Melting of brass, bronze and copper should be done quickly in a slightly oxidizing atmosphere. The crucible is removed and surface is skimmed, then phosphor copper shot is added by simply dropping it onto the surface. The reaction is very visible. The metal will become fluid and bright. Allow a minute or two for the reaction to complete, and pour.
The phosphorus is a reducing agent (deoxidizer). This product must be carefully measured so that enough oxygen is removed, yet a small amount remains to improve fluidity. Too much phosphor can cause the melt to be so fluid that it leaks from the mold and penetrates the sand. A little goes a very long way!
The primary reason to use the shot is because the molds aren’t filling well or have gas porosity problems. The literature suggests that 1 ounce of 15% copper phosphor shot be added to 100 lbs of metal. A teaspoon of shot weighs about 1 ounce.
Start with these amounts: 100 Lbs add 1 Tsp. 50 Lbs add 1/2 Tsp. 25 Lbs add 1/4 Tsp.
For lesser amounts start with about 1 to 4 granules per pound of metal
One to 4 granules per pound of melt! It really will last a lifetime. My crucible will melt a maximum of 3kg/6.6lb.
Bevel gears seem to me to be rather difficult, even with CNC control of X,Y,Z and A axes. The bevel gears on the model Armstrong cannon are rather small, being 32mm and 14mm outside diameter.
I read Ivan Law’s book on the subject, and I think that I understand the requirements, and I was prepared to try and cut the gears. But, first, I decided to try to cast them.
That involved…
Using “Gearotic” to design the gears, and save them as an STL file which was able to be imported into the 3D printer.
Made PLA gears with the 3D printer.
Attached the gears to a wax “tree”.
3 pinions and 3 gears. I need 2 of each. 1 spare of each. Plenty of venting sprues. And a head of about 70mm.
4. Then mixed the investment, poured it into the flask. At least that was the intent. The investment makers specify exactly 40:100 by weight of water:powder. But the bloody scales switched themselves off while I was adding the powder to the water, so I had to guess the quantity of powder. This was not looking promising. First bronze casting pour not off to a good start.
5. Dry the mold flask in the potter’s oven for 2 hours, then 2 hours of burning out the PLA and wax, then 2-3 hours of baking at 750ºc. A few minutes into the burnout phase, the oven died. ?heating coil failure, ? control box failure?, ?thermocouple failure, something else? So I replaced the control unit and thermocouple (I had a spare of each), but problem persisted. I rang my expert friend for advice. “sounds like a broken wire” he says. Suggested 3 or 4 things to try. And the 4th suggestion worked! The oven was working again! Brilliant! Thanks Stuart Tankard. So I restarted the oven at the burnout temperature (400ºc) and continued. Nothing to lose, after all.
6. Melted a couple of bars of LG2 bronze at 1100ºc in the melting furnace. Added a pinch of Borax. Let the investment oven cool to 710ºc for 1 hour to let the core of the mold cool to 710ºc.
7. Without any great expectations of success, considering the various problems, I poured the molten bronze into the mold flask. It seemed a bit more viscous and thick than I was expecting. Oh well. It is experimental.
8. When the mold flask had cooled to 150ºc, I plunged into cold water, and flushed out the investment.
THE RESULT….
Unbelievable. No voids. Hardly any surface bubbles. ALL teeth intact and complete. 6 good gears! You can see the head of molten bronze between the funnel and the top gear. It did not need vacuum or positive pressure.
I will turn the faces, bore the shaft holes, and if necessary file the teeth.
Totally delighted with this result. Beginner’s Luck.
Setting up for casting molten metals into shapes for my model Armstrong cannon. Still getting ready.
Today I made some moulds for dealing with any left over metal melt. Not a big deal, but it does have to be done before the first melt. No point realising that there is nowhere to put the left over aluminium or bronze during the pour. It has to go somewhere.
So today I made some ingot moulds, in readiness.
The ends of the moulds are sloped to allow easy ejection of solidified aluminium or bronze.
4 ingot moulds. Made from 40mm ID thick wall pipe, with long handles. The diameter of my crucible is 48mm ID, so any ingots made should fit into my crucible later for remelting.
It seems a long time since I have done any welding, and the welding of these items was pretty ordinary. But the joins seem water tight, so hopefully they will be OK.
Today I fired up the casting oven, to 850ºC, and the load was some ordinary food tins. They are the correct diameter for investment moulds. I wanted to see if the tins would cope with these temperatures. (after removing labels of course).
3 ordinary food tins, at 850ºC.
It became apparent, that the tin joins were welded not soldered. And the inside and outsides of the tins were covered with some sort of paint or plastic, because it flaked off. But the metal cans remained intact. Admittedly, when hot they were VERY soft, but when cooled they retained their shape, and were quite stiff. I would be prepared to try these for single use moulding projects.
I have realised that my investment plaster mixing bowl is too big for the vacuum chamber which I had bought. So I have ordered another vacuum chamber, and waiting for it to arrive before starting a mix. I am using the delay to gather items like the ingot moulds above.
It will probably be another couple of weeks before I am ready to cast. Meanwhile my 2mm rivets have arrived at last, so I will get back to the riveting.