
How to make small bits of brass (or bronze) into big bits of brass (or bronze).
by John
I needed some brass plate 6mm thick, 50mm wide and 150mm long for the Trevithick boiler-engine..
Prices on Ebay were horrendous for thicker material, and I could find no local supplier.
Silver solder, when properly used, is said to be as strong as the parent metal.
And I had some 75 x 75mm brass square section about a meter long. I bought it years ago for a project and most of it was unused.
So, I cut some slices off the end, sliced bread fashion, and silver soldered pieces together.

2 Bread slices of brass (centre) and machined joined pieces on the sides.

The square section brass log (I can barely lift it), 2 slices at the back, and 2 pieces edge silver soldered and surface machined.
I also needed a large thick piece of LG2 bronze for the Trevithick dredger engine. The middle round piece needed to be bronze because it is exposed to boiler pressure. The outside pieces could be bronze or brass so I used brass.
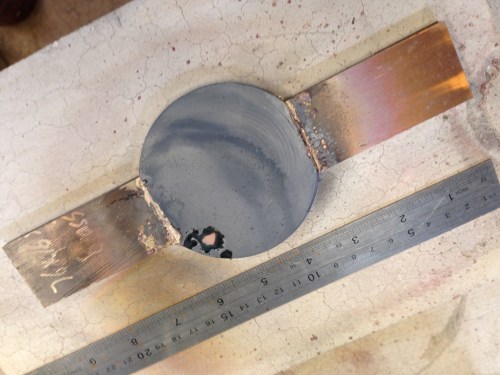
So I silver soldered brass edge pieces to the central piece of bronze. The soldering was done on the very flat Hebel aerated concrete block, and the final piece was very flat, requiring minimal machining.

This is the non machined underside of the brass-bronze-brass piece. It has been rubbed on a surface plate covered with emery paper, just to demonstrate the flatness of the soldered piece.

The Boiler has come a long way in the last couple of months. Really a first class job. I am really looking forward to seeing it when it is complete.
I just started back on my Cotswold beam engine after a week off due to the Midland Model Engineering show.
I realised that I purchased a lathe that was too small for what I have planned. So I wrote to Axminster and asked if they would let me trade in the model C1 I bought three months ago for the new SC2-300 which is a 500 watt 7×12 that replaced the older C3 model.
So I packed up the old one and drove it to their store which was only twenty or so miles from the Midlands show.
To my amazement they allowed me 100% of my purchase pride towards the new machine!
So I have just now got back into my shop and working on my engine.
Sorry to digress…
you should be proud of how far your project is going.
Jenny in Bridlington
LikeLike
Thanks for the feedback Jenny. I am well into the engine components now and next step is a major silver soldering session.
Re your beam engine, do you publish photos?
Sounds like you have caught the dreaded lathe disease. I have got it too. My problem is that I cannot bear to part with the old ones. I would be embarrassed to disclose the number of lathes which I have accumulated over the years. (11). All secondhand. Just cannot part with them. My family declares that I am eccentric. Probably correctly. John in Oz.
LikeLike
Hi John, I have not yet published any images of my beam engine. Mostly because at this juncture it is only a few unrelated finished parts.
Perhaps in a week or so, when I can begin fitting the bits together I will start a topic on a forum an dhoe the build.
Axminster has sent me the arbor that they owe me, it will be here tomorrow,
It is rather frustrating to hxve a brand new lathe in front of you and you cannot drill a center hole! For the want of a nail…
Today I will be finishing up locating, drilling, and tapping all the various holes in the base. When that is done I can begin fitting and assembling some of the components.
Whilst at the Midlands show I picked up a complete to scale ball governor that I am going to use in place of the dummy one that the plans call for.
I am tempted to copy the design and make a few to various scales. I am surprised that a 1/12 scale governor works as well at that one. I was worried that st small scale it could not be done. Simply because there was not enough mass in the bells themselves to actuate the steam valve.
LikeLike