
CNC Mill Upgrade – 7.
by John
2 steps forward, 1 step back. That’s what this project is experiencing.
The axis servo motors, their controllers and connections to power, breakout boards, and computer connections are complete, and all working.
An old laptop has found a use. Installed Mach3, Vectric V-Carve Pro. And the connections to the Smooth Stepper board. Windows 10. Deleted all non CNC related programs to gain space on the hard drive.
A problem with the main spindle. It is essentially unchanged from the original. Same motor (4kw/5hp 3 phase), same VSD, and same 3 phase power which is supplied through a phase changer, because the property has only 2 phases supplied. When powered up, it worked, but the RPM’s could not be altered from a very slow rate. The controlling voltage from the breakout board was not changing despite changing the inputs. ? due to a problem with the settings, or a faulty BOB. Didn’t seem serious.
So I was a bit surprised when later I switched on the mill, intending to change some settings, to hear 2 significant pops, and to smell that disgusting burnt electrical component smell, with smoke coming from the electrical enclosure.
Quickly shut everything down, and waited for the cavalry to arrive.
Stuart found that a 24v power supply had failed. No big deal. Not an expensive component. Maybe got a short circuit from a bit of swarf? But further inspection revealed that the VSD had also failed. A capacitor and diode burnt out. ? caused by a surge from the failing power supply? Repairable, but I decided to buy a new VSD. The failed VSD is probably as old as the mill (24 years), so it had a pretty good run. If the old VSD is repairable, it will serve as a spare.
Meanwhile, as a consequence, the main spindle is not working. I have a list of jobs that I want to get into, particularly the steam pump for the vertical boiler. So I will reattach the high speed spindle and use that. It is 2.2kw, but uses high revs to develop power, so I will be limited to small end mills and drills, until the new components (VSD and power supply) arrive. The high speed spindle is single phase, and the speed control is manually selected. Not quite as convenient but useable for the time being.
While Stuart has his head buried in the electrical enclosure, I have been his gopher and TA. But also fitting in a couple of other jobs which have been on the “to do” list for ages. Like clearing out rubbish from the workshop, tidying up etc.
One task which has been vexing me, was to remove a sheet of flooring board which was under the Colchester lathe. The sheet was originally placed under the lathe to protect the vinyl floor covering, but it was not a good decision. As the flooring board became wet with cutting oil and coolant, it would swell and shrink, and I was aware that the lathe levels and settings were changing. So I decided to remove the sheet of flooring, and let the lathe feet sit directly on steel pads on the vinyl/concrete floor.
But how to remove the sheet of flooring from underneath the almost 1 ton lathe? The lathe was originally placed into its rather tight position with a forklift, which is no longer available. The wooden sheet was the same size as the base of the lathe.
So I made these…
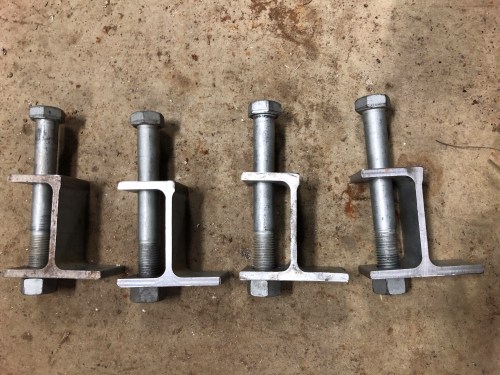
The bolt adjusts the height of the jack.

From a piece of scrap I-beam.
I used a crow bar to raise the corners of the lathe enough to place the jacks into position. A bit of trial and error to get the heights correct. When the lathe was about 25mm clear of the flooring, I pulled the sheet out. Then used the crowbar to remove the jacks, and lower the lathe onto its base plates.
I will reset the lathe’s screw feet in the next day or 2, using a precision level and test cuts. There was an excellent YouTube video by “This Old Tony” on the subject recently.

Hi John , If you have a two Phase supply , its Possible to produce the third Phase with a couple of 240V to 240V Isolating transformers , and you will have the correct 120 deg. displacement and no electronics involved , If your interested I can draw you a Circuit regards Bernie N
LikeLike
Thanks Bernie. I confess that I do not understand what you are saying, but the 2-3 phase converter works, so I will stick with that, at least until I eventually get kicked out of my current premises. The CNC mill is actually currently working with an auxilliary high speed spindle, but I have today received a new VSD, so the main spindle should be working in a few days. John
LikeLike