johnsmachines

machines which I have made, am making, or intend to make, and some other stuff. If you find this site interesting, please leave a comment. I read every comment and respond to most. n.b. There is a list of my first 800 posts in my post of 17 June 2021, titled "800 Posts"

Tag: CNC lathe

Boxford TCL125 CNC Lathe, 3rd AXIS.

Below is a video which was recorded by my machining mentor friend, Stuart Tankard.  Stuart made a milling attachment for his Boxford CNC lathe, and he demonstrates it in the following video by making some lovely small valve control handles.

I followed in Stuart’s footsteps by making a similar attachment for my identical Boxford 125 CNC lathe, but I have not yet video’d it in action.  Not much point when Stuart’s video is so good.  I really like the absence of irrelevant, irritating music.  Just machining sounds.   Enjoy.   (if you want to see it full screen, copy the YouTube address from the settings icon).

Armstrong RML barrel

After 3D printing a plastic 1:10 barrel I decided to have a go at turning one in steel.  I had a length of steel 70mm diameter and 290mm long, which was just too short to turn the entire barrel, so I decided to make one of the breech reduction rings separately, when I make the cascabel.

I did not know what the steel grade was, but it was off a machine so I thought that there would be a good chance that it would be reasonable quality.

P1053584

The length of rod next to the printed barrel.

The turning was initially fairly routine.

P1053594

and I was really pleased with the finish which was appearing.

P1053597

Mountains of hot swarf.

P1053600

The roughed out barrel.  I used the 16mm drill bit to drill the bore from both ends, but there was still 50mm or so beyond the reach of the bit.  So I silver soldered the drill bit into a length of silver steel (drill rod).

P1053604

And quickly completed the drilled hole. 

P1053606

Then transferred the piece to the CNC lathe, and shaped the barrel exterior.

I experienced 2 problems with the CNC turning.  The tapered chase of the barrel, and the rounded fillets came out really well, but the straight sections of the breech developed chatter marks.  I was preparing to take a skim to remove the chatter marks when I bumped the manual CNC control, the cutter dug in, and I got a deep score in the breech.  And broke the carbide cutter.  I turned away the dig in, but it left the breech diameter 3.5mm undersize.

I have no more steel of that size, and it will be quite a while before I get an opportunity to buy some.  So I persisted with the slightly undersized barrel.  It will be 62mm diameter rather than the intended 65.5mm.   I still have not decided whether to scrap it and start again.  But if I can get some more suitable steel I will remake it.  I might even use the undersized barrel to make a 64lb Armstrong RML, which had a smaller diameter breech than the 80lb RML which I am making.  (note added 19 Jan 2021…  The Armstrong 64pd and 80pd barrels had the SAME dimensions.  The main difference was that the inner tube of the 64pd guns coiled iron, but in the 80pd guns was solid ended steel. “Naval Gunnery” Garbett pp52-53).

P1053610

I showed it to SWMBO.  “That is beautiful” she said, somewhat to my surprise, and being surprised by its 3.5kg weight. 

P1053614

Ah…  if only…

Lathe Toolpost Milling attachment (CNC)


Although my recent posts indicate that I have spent  a fair amount of time recently on Google Earth Pro, I have also been busy in the workshop.  Mainly finishing the toolpost milling attachment for the Boxford CNC lathe, but also fiddling with the laser attachment for the CNC mill.  Neither of those projects is completely finished, but I thought that you might be interested in some progress photos.

IMG_8279

This is what the Boxford TCL125 CNC lathe now looks like from the front.  It is substantially modified from the original which I purchased 5 years ago.  To mention a few changes…..

the axis stepper motors are bigger and more powerful than the originals

the ball screws are now 10mm diameter, compared with the original 8mm

there are some adjustable axis limit switches

the 3 jaw chuck is replaced by an ER32 collet chuck

there is a removable toolpost milling attachment with ER 16 Collet chuck, with a speed controller, cables, and panic switch.

there is a removable safety screen (not seen in the photo)

And hidden in the electronics compartment….

IMG_8278.JPG

There is a 750 watt AC Servo spindle motor and controller (RHS, under the coiled cable)

The electronics have been replaced with a Mach3 compatible breakout board and associated peripherals.  Anyone with an original 1985 machine will hardly recognise these components.

And the software is now Mach3, running off an old Windows XP computer.  And using “Ezilathe” for most of the G coding, especially threading, and interpreting shapes which have been drawn as CAD dxf’s.

The new toolpost spindle works, but the software  needs a bit more fiddling to tie it into the CNC controls of the lathe.

The Boxford has provided an excellent base on which to make these changes, and I look forward to producing some videos soon of the renewed machine in action.


CNC Lathe Toolpost Mill

Just a quickie to show you a progress photo of my current project.

It is a very small milling motor with a small ER collet, mounted onto the toolpost of my Boxford CNC lathe, which will convert the lathe from 2 to 3 axes.

IMG_8265.JPG

At this early stage the toolpost holder and cylindrical motor have been mounted to the water jet cut bracket on the right side.  Pulleys and drive belt yet to be fitted and I will trim the shaft at the left hand end of the motor.  Then the motor wires are connected to a speed and direction and on-off controller.

The usefulness of this tool is apparent in the following video of a completed unit in use.  The main spindle motor of the lathe is now a 750w AC servo motor, which can be controlled from Mach 3, to go to programmed positions and hold the position while a milling procedure takes place.  Of course the milling procedure will be with small cutters or drills, perhaps up to 3-4mm diameter.

The idea, plans, and some of the parts are courtesy of Stuart Tankard, my very clever friend, whose completed machine is the subject of the following video.

Stuart’s video is republished here with permission.  The original, with comments, is visible on YouTube.  If you have technical questions about the setup, I suggest that you contact Stuart via his YouTube post.

Steam Powered Water Feed Pump

My CNC mill is now mostly functioning, although several functions are yet to be connected.  The main spindle and XY&Z axes are working, and responding appropriately to Mach3 commands from the laptop computer.  It has taken longer than anticipated so far, mainly due to difficulty in understanding manuals supplied from Asia.   Axis limit and homing switches, oil pump, coolant pump, work light, and cooling fans still to be connected.

So there has been little of general interest coming out of my workshop.  Hence no posts on this site.  Not that I have been idle.

I disassembled the top slide on the Colchester lathe to discover the cause for excessive back-lash.  It was a worn acme thread bronze nut.   No luck yet in finding a new nut for this 45 year old lathe.   I will have to make one.  Meanwhile, I used a quick and dirty trick to reduce the back-lash which I will detail soon.

IMG_8156.JPG

The top-slide acme screw and bronze nut which needs replacing.

I also cleaned and freed up a 3 jaw 10″ chuck which I bought on Ebay.  It was frozen solid, so I soaked it in kerosene bath for a few months.  Actually, I forgot all about it while it was in the kerosene, and accidentally rediscovered it.   This time, after using an impact screwdriver, I was able to open it up and expose the gears and get them moving.  Might be worth a photo also.

IMG_8161.JPG

The 240mm diameter chuck.  I was tempted to buy by the removable, reversible  jaws.  Thinking that I could make some soft jaws.   Trouble is that it is an industrial production line chuck with very little movement.   But it is nice and tight.  Still deciding.  At least I can wind the jaws in and out a bit now.

And I finally got around to installing piston rings in the triple expansion steam engine.  Used Viton O-rings.  Not a difficult task, and it should not be difficult to replace them from time to time in future.   Will be interesting to see if the engine performance improves.

Now to get onto my next project.  I have plans and bronze castings for a Southworth design water pump, for replenishing the vertical boiler water while it is in use.  It was a surprise to me, just how much water is consumed by a boiler which is powering a model steam engine.  To date I have used a hand pump, but having seen a steam powered pump in action, I have decided to make one.

The steam is supplied from the boiler which is being replenished.  The pump has to use steam at boiler steam pressure, to force water into the boiler.  So the pump has to raise the pressure of the feed water above the pressure of the steam which is powering the pump.   The clever pump design uses large steam driven pistons to drive smaller water pump pistons.

IMG_6664

Larger steam pistons top right 5/8″ dia,  water pistons bottom left 3/8″ dia.

Here is a video of a Southworth pump in action.  It was made by Stuart Tankard.  Here it is running on compressed air, but I have seen it working similarly on steam.  I will be making one of the same design, hopefully approaching this level of finish.


A build of larger version of the pump was described by J. Bertinat in  a series of articles “Model Engineer” in 1993 (first article 18 June 1993).

Screen Shot 2019-08-20 at 9.39.27 am.png

Southworth castings.jpg

The unmachined castings.  Lumps of rough bronze.   And the plans.

water cyls casting.jpg

One of the castings after preliminary machining to establish some faces.  The “water cylinders” block.   Part no. 6

P1032886.JPG

Good quality castings.


Boxford 125TCL CNC Upgrade

This small CNC lathe was converted from the original c1985 electronics, to components which are compatible with a PC running Windows XP and Mach3.

Reader Paul M asked about circuit diagrams.  I must confess that I do not have such.  Indeed, I would not understand them.  The electronic connections were made by my expert friend Stuart T.   I believe that Stuart intends to write up the conversion for one of the Australian magazines, and possibly this post might give him a gentle shove~.

In passing, I should give Stuart a thumbs up for his excellent CNC lathe program, which is far superior, in my opinion, than Mach3 for running the CNC lathe.  It is called Ezilathe and is available as a free download.

Anyway Paul, here are the promised photographs of the electronic components of the Boxford, after the conversion.  You should be able to work out many of the connections by zooming in.


IMG_5380.JPG

The Boxford 125TCL sitting on a bought trolley which could have been made to measure.  The PC is on the bottom shelf, the extra toolholders and tools in the drawers, the wireless MPG on the front, and upgraded stepper motors in black.

IMG_5394.JPG

The rear view to show the extra power outlets to supply the screen and PC.  I still operate this lathe in a spare bedroom of my house.  Very handy if I have a sleepless night.  It is so quiet that it does not disturb SWMBO.

IMG_5382.JPG

The view with the back open.  The only components from the original setup are the spindle motor, the main switch, and the Gemini controller (RHS with orange cover).

IMG_5384

Power outlets, main switch and power supply.

IMG_5385.JPG

Transformer.  Can’t remember what the Fotek is for.

IMG_5386.JPG

IMG_5387.JPG

IMG_5388.JPG

Gemini with cover removed.

IMG_5389.JPG

C11 R9 Breakout board, the optical indexer (top), and Gecko stepper drivers (LHS), parallel cable from the PC,  all mounted on an aluminium plate.

IMG_5390.JPG

Spindle motor, original.  But now considering upgrading to a more powerful motor.

IMG_5391.JPG

new cable junction box for the stepper cables.

IMG_5392.JPG

New cooling fan, top LHS

So, I hope that these shots are some use.  If you do not recognise the components, I suggest that you follow my example and bribe an expert friend to do the connections.

Making Hubcaps

IMG_5140

I made 5 of these

Hubcap blank.JPG

The 50mm diameter aluminium blank had a 12mm bolt inserted into a blind threaded hole.  The bolt was held in the lathe chuck.

The 2 short videos which follow show 1. the final rough cut 2. the finish cut.

The shape was drawn as a DXF file using CAD, the G code was generated using Ezilathe, and the lathe was controlled with Mach3.


Error
This video doesn’t exist


Error
This video doesn’t exist

Total CNC turning time was 16 minutes per hubcap, plus cutting the groove for the O-ring, then a quick polish with a cleaning pad.

Chariot Racing

Another little job for my CNC lathe.

A fellow club member asked me to turn some hub caps for his car restoration.  And the shape was a bit unusual.

This is the first effort at complying with his request.

IMG_5140.JPG

It is aluminium, and will be held in position with an O-ring in the groove.

If I had put a knife edge on it he could have justified new car number plates…..

BEN-HUR

Metalworking for a cabinet maker

Our model engineering club has been locked out of our club rooms because MOULD has been detected in the building.   Apparently a lengthy process to reduce the mould to acceptable levels.  (note to self…. make sure that the inspectors never set foot in our house).

So our meetings have been held in various locations, including a sports centre and a basketball building.   I feel quite virtuous when I enter these buildings, but for some reason I do not feel any fitter when I exit.

A recent day meeting was held at my farm workshop.  Not my farm anymore, just the buildings.

walls-of-constantinople

Not that one….   the other one.

And one of our more senior members requested a display of CNC machining, from design to product.

So, I drew up a finial which was required to complete a bookcase which I had built 30 years ago.  Then imported the DXF drawing file into “Ezilathe”.

Ezilathe on screen.JPG

Showing Stuart Tankard, the author of Ezilathe, scrutinizing my drawing ….  and offering excellent suggestions for improvement using Ezilathe.

Then used Ezilathe to generate the G codes…..

Then to the CNC lathe…..

turning the finial.JPG

CNC turning the finial in 51mm brass rod.  1600rpm, 100mm/min.  Controlled by Mach 3 Turn.  I removed the tailstock shortly after this photo was taken, to permit completion of the ball.

GSMEE CNC close.JPG

Some GSMEE members watching the CNC turning.  I spent 3 days clearing up the workshop so the 16 members could fit in.   Amazing how much space was revealed in the workshop.   This is the Taiwanese lathe which I converted to CNC.  See old posts for details of the conversion.

I watched anxiously as the part was gradually revealed.  Admittedly, I had had a test run in wood to check the parameters, but this was the first run in metal.

finial in hand.JPG

The finial.  The bar stock was parted later.

finial on bookcase

Bookcase finally finished, after 30 years.

If you are interested in CNC lathe work, you should take a look at “Ezilathe”.  It is superb.

If you are on Facebook, (of course you are if you are reading this), you might like to take a look at the GSMEE Facebook site.


NEW SPINDLE MOTOR for CNC LATHE?

Now that I have replaced the stepper motors in the Boxford CNC lathe, (see “New steppers for an old CNC lathe”)  I am considering whether I might replace the spindle motor for the same reason…  that it has become less powerful due to the age of its permanent magnets.   Sometimes I am aware that it struggles to keep up the revs while cutting.

Watch the YouTube video about the next generation servo motors.  They use modern rare earth magnets.  They are powerful, compact and precise.  And not cheap.  Stuart T, who has the same Boxford CNC lathe as me, has suggested that these Clearpath motors would be suitable replacements for the ageing Boxford spindle motors .


The Robert the Bruce approach to turning problems.

Robert the Bruce was watching a spider making a web in the cave they were sharing, so the story goes.  The spider tried 6 times to make a difficult connection, and on the 7th attempt, it succeeded.  Robert, who had tried many times to become king of the Scots, was inspired to try yet again, and he did indeed become King Robert 1 of Scotland, eventually.

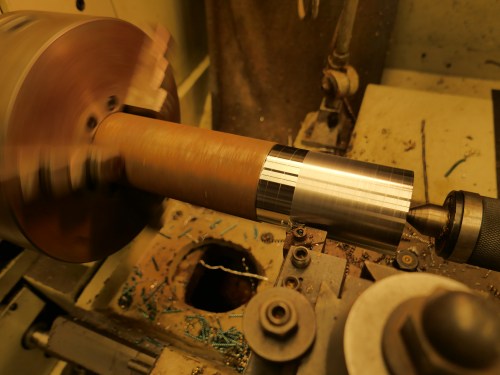
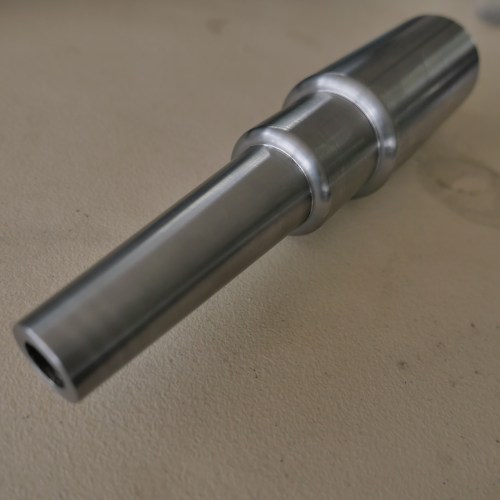
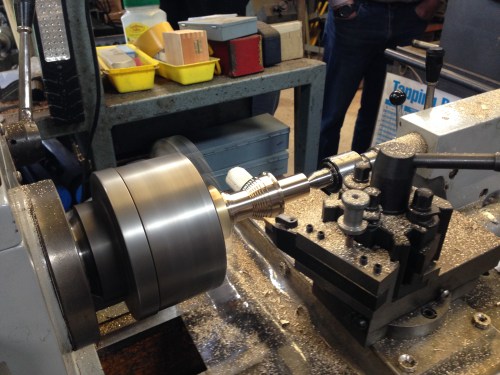
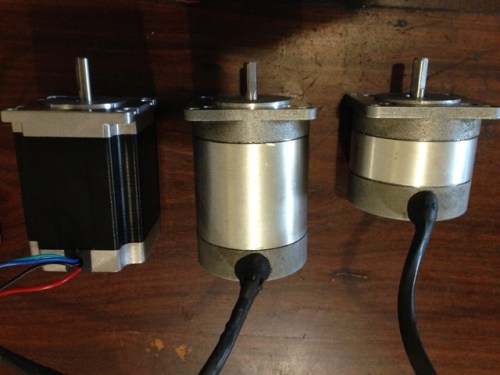
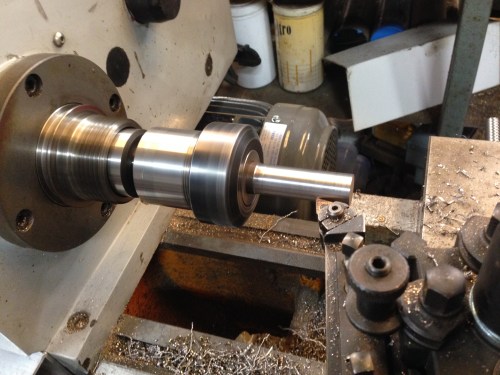
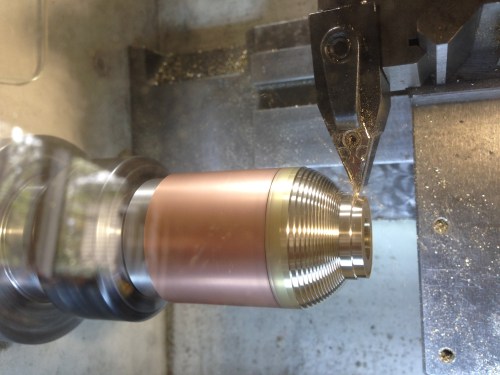
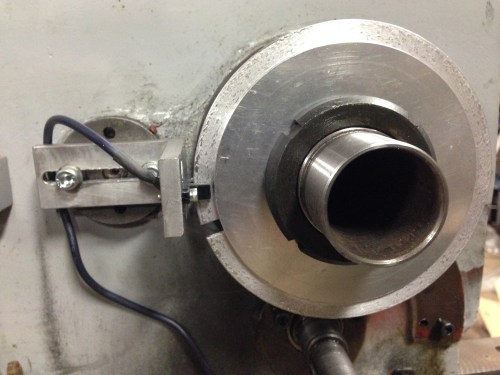
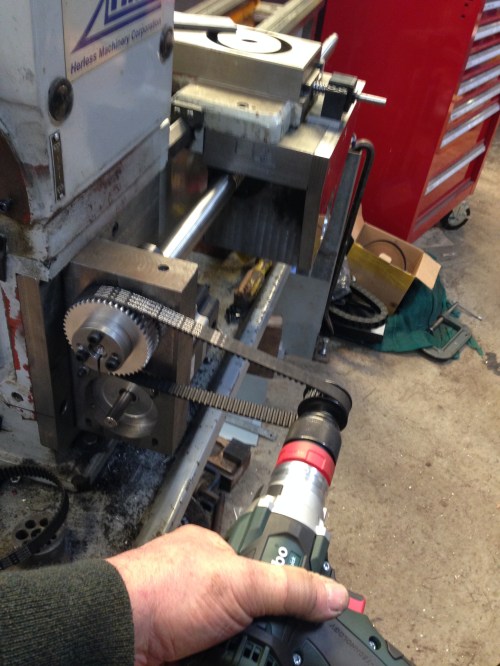
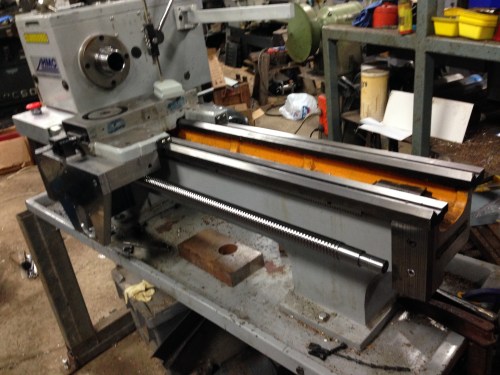
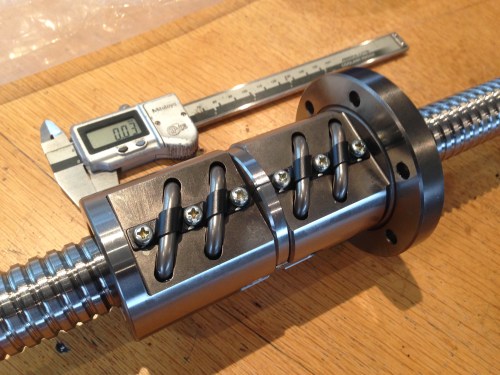
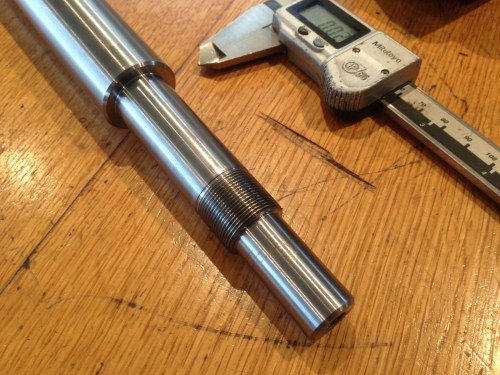
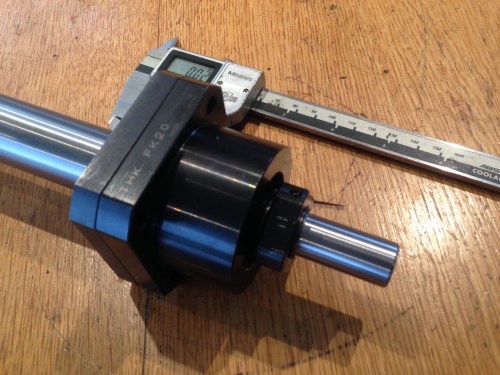
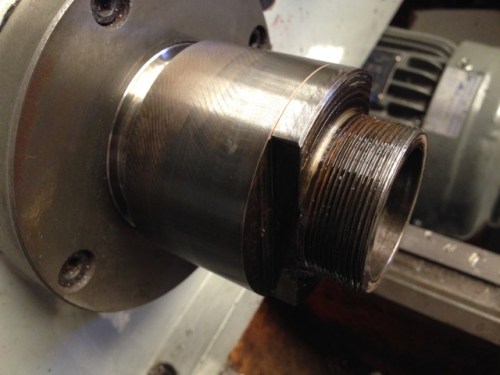
I thought of Robert more than once recently, when I was making an ER40 collet chuck for my CNC lathe.  The particular  collet chuck involved making a 2.25″ x 8tpi internal thread, a 50mm x 1.5mm external thread, and cutting an 8 degree internal taper.   Not too complicated you say.  I agree, but for the chuck to be useful, each step had to be extremely accurate.

I made 4 successive collet chucks until one was adequately accurate.
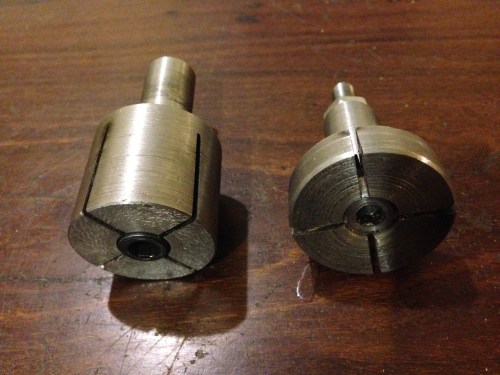
CNC lathe - 3.jpg

CHUCK 1, 2 and 3

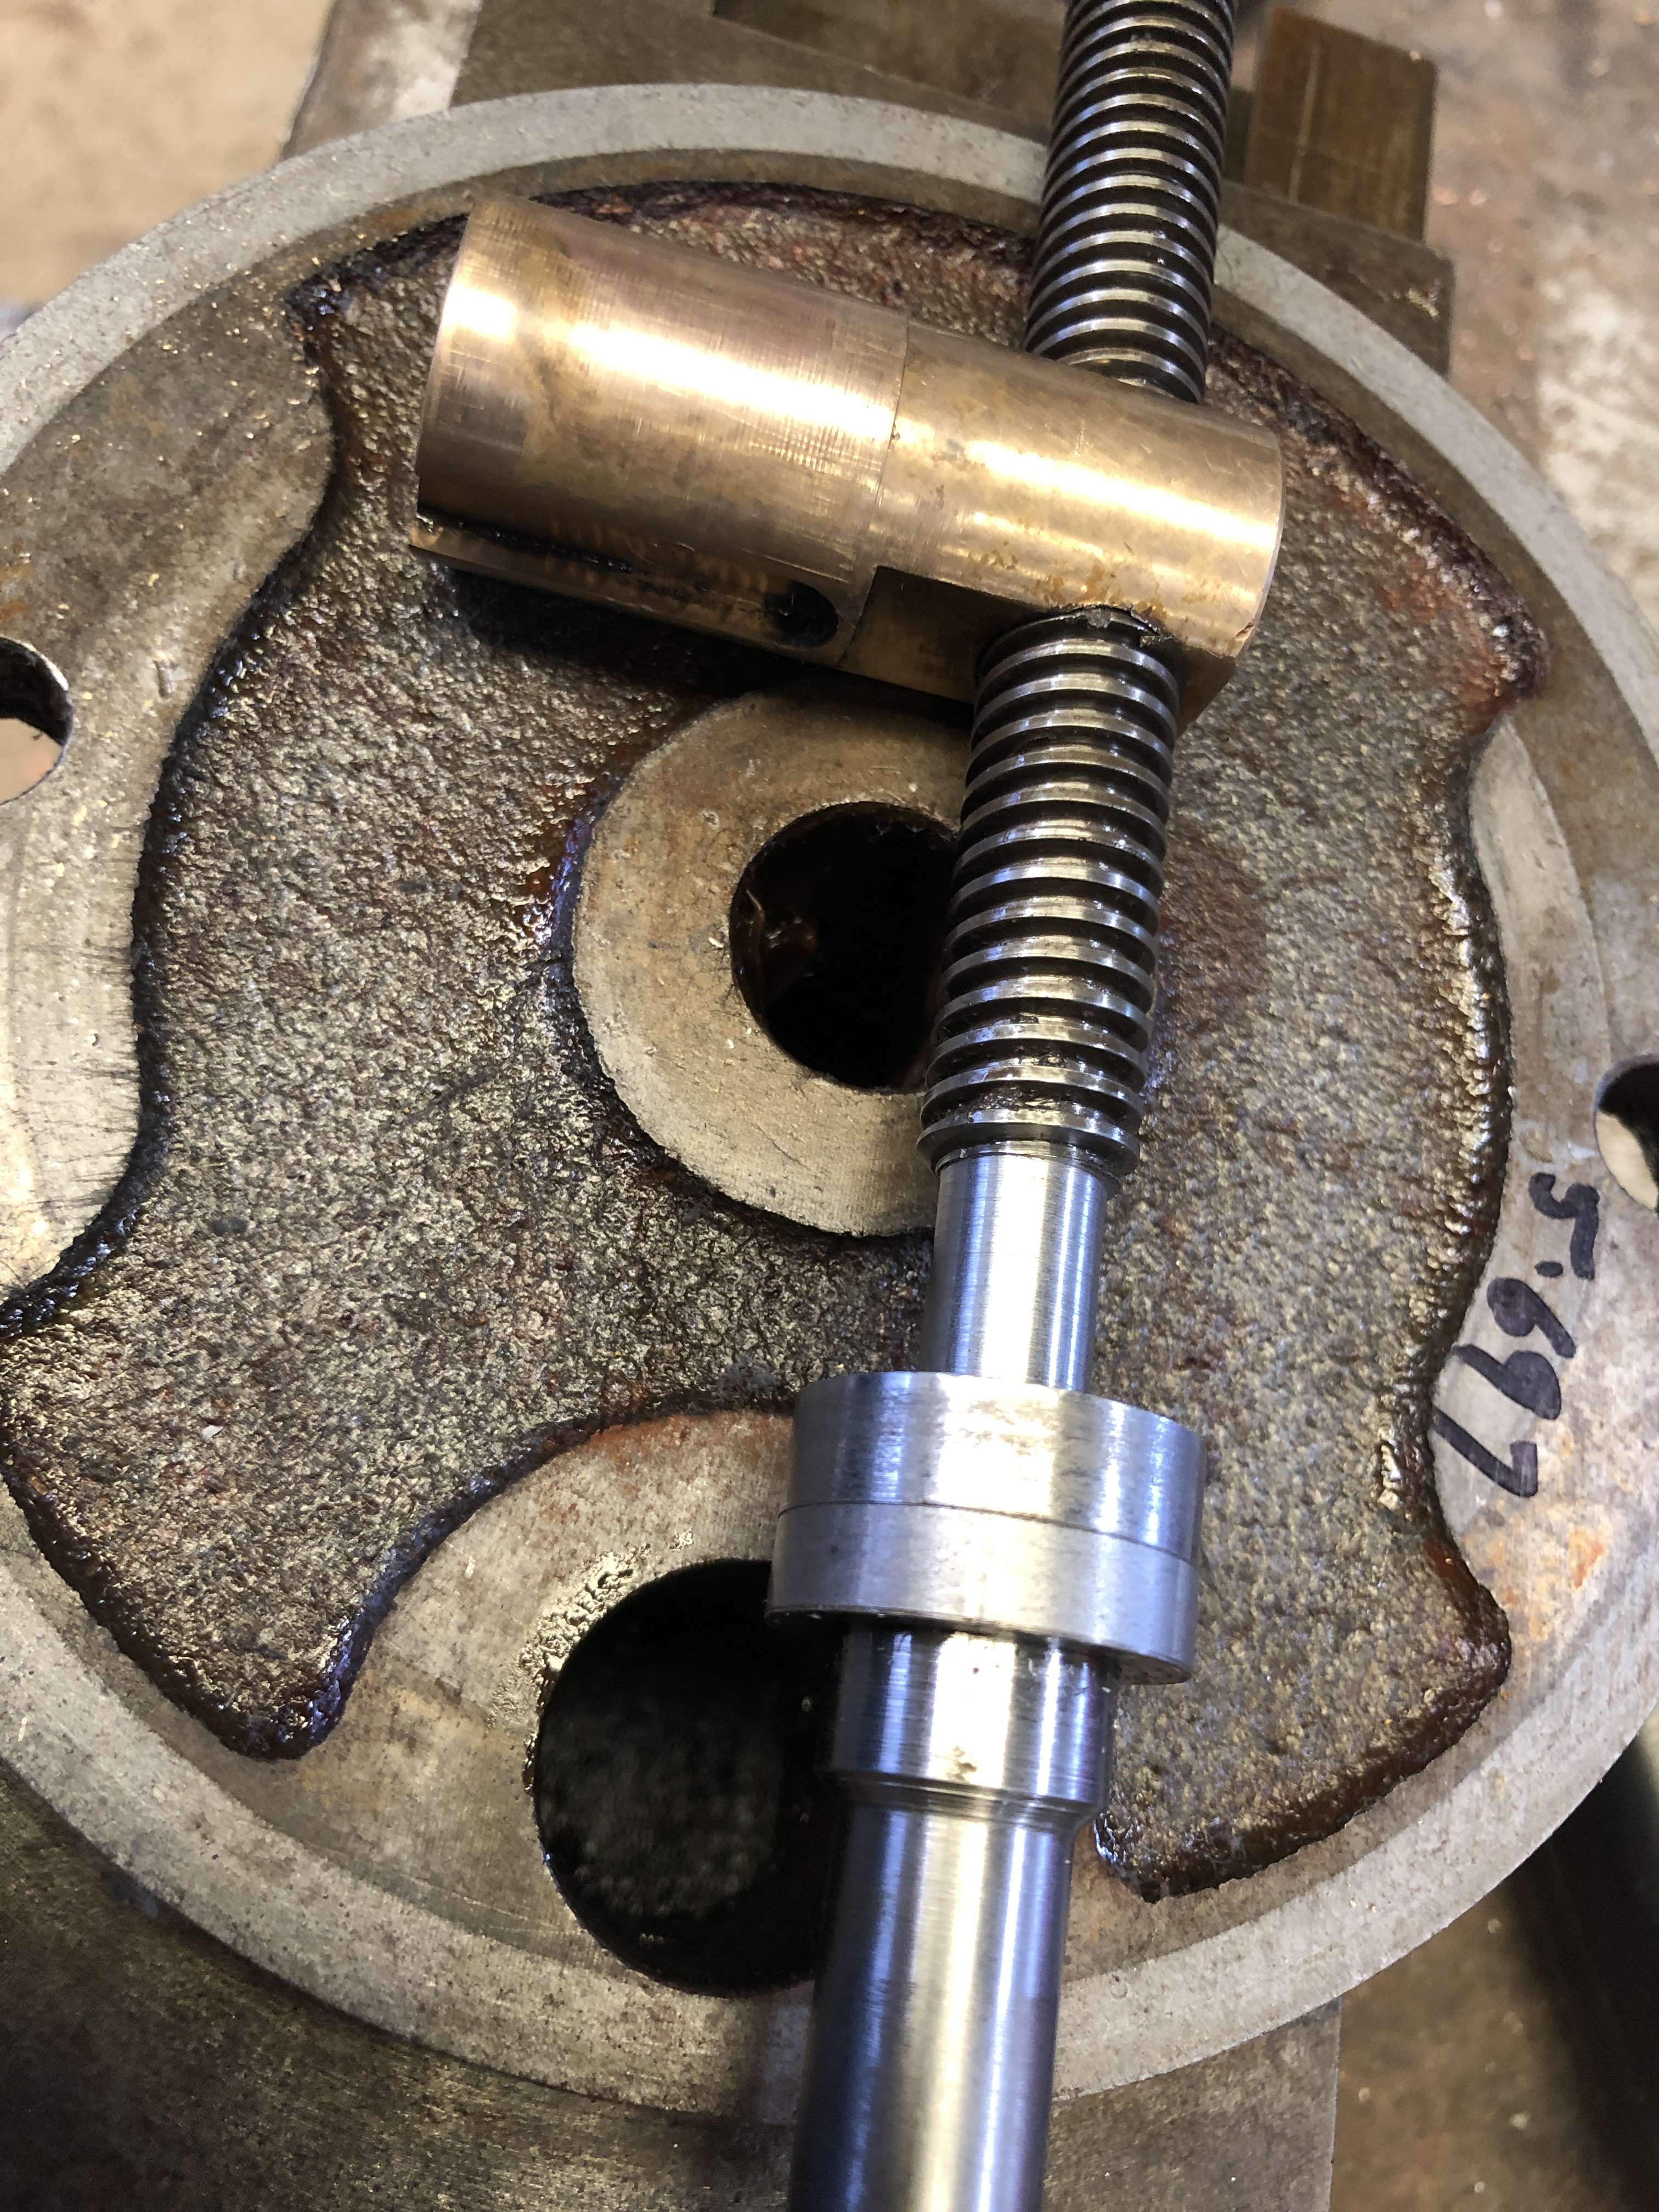
Chuck 1 actually went very well.   Nice tight spindle thread, taper good, and external thread just right.  But the chuck did not quite seat firmly.  Could it be that the spindle thread (the internal one) was not quite long enough?   So I cut a deep distal groove.    Wound out the carriage.   Oh shit!   Forgot to clear the spindle thread.   Totally destroyed it.   The chuck actually fitted the spindle quite nicely, but with only 10% of the thread remaining, it was useless.

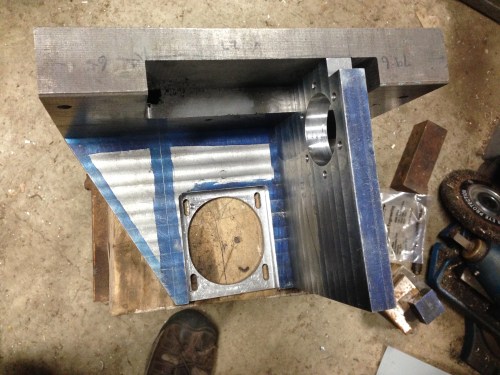
Chuck 2 was made in 2 pieces, on suggestion from Stuart T.  The idea being that if there was any inaccuracy in the lateral runout, the piece with the taper could be adjusted.  OK.   Sounded sensible.  Again all went well, but the spindle thread was not correct.  For some reason the thread cutter seemed to make a new path about half way through making the thread.   So the spindle thread was thinned  excessively.   But still tight.   So I made the tapered half, and joined it all together.  Fitted it to the lathe and measured the runout and taper.  All good.  Less than 0.01mm runout and perfectly parallel to 100mm from the chuck face.   But.   The next day I removed the chuck, replaced it, and did the runout measurements again.  I did not need a gauge.  I could see the wobble.  Chucked the chuck  into the rubbish bin.  That thinnned out spindle thread was hopeless.   But what caused the problem?  The thread was CNC cut, and it should have been perfect.

So chuck 3.   One piece again.    All seemed to go well, but again the big spindle thread was wrong.    Again there seemed to be 2 thread paths.

Then the penny dropped.   The spider made the web connection.   Robert got the throne and John saw the light.

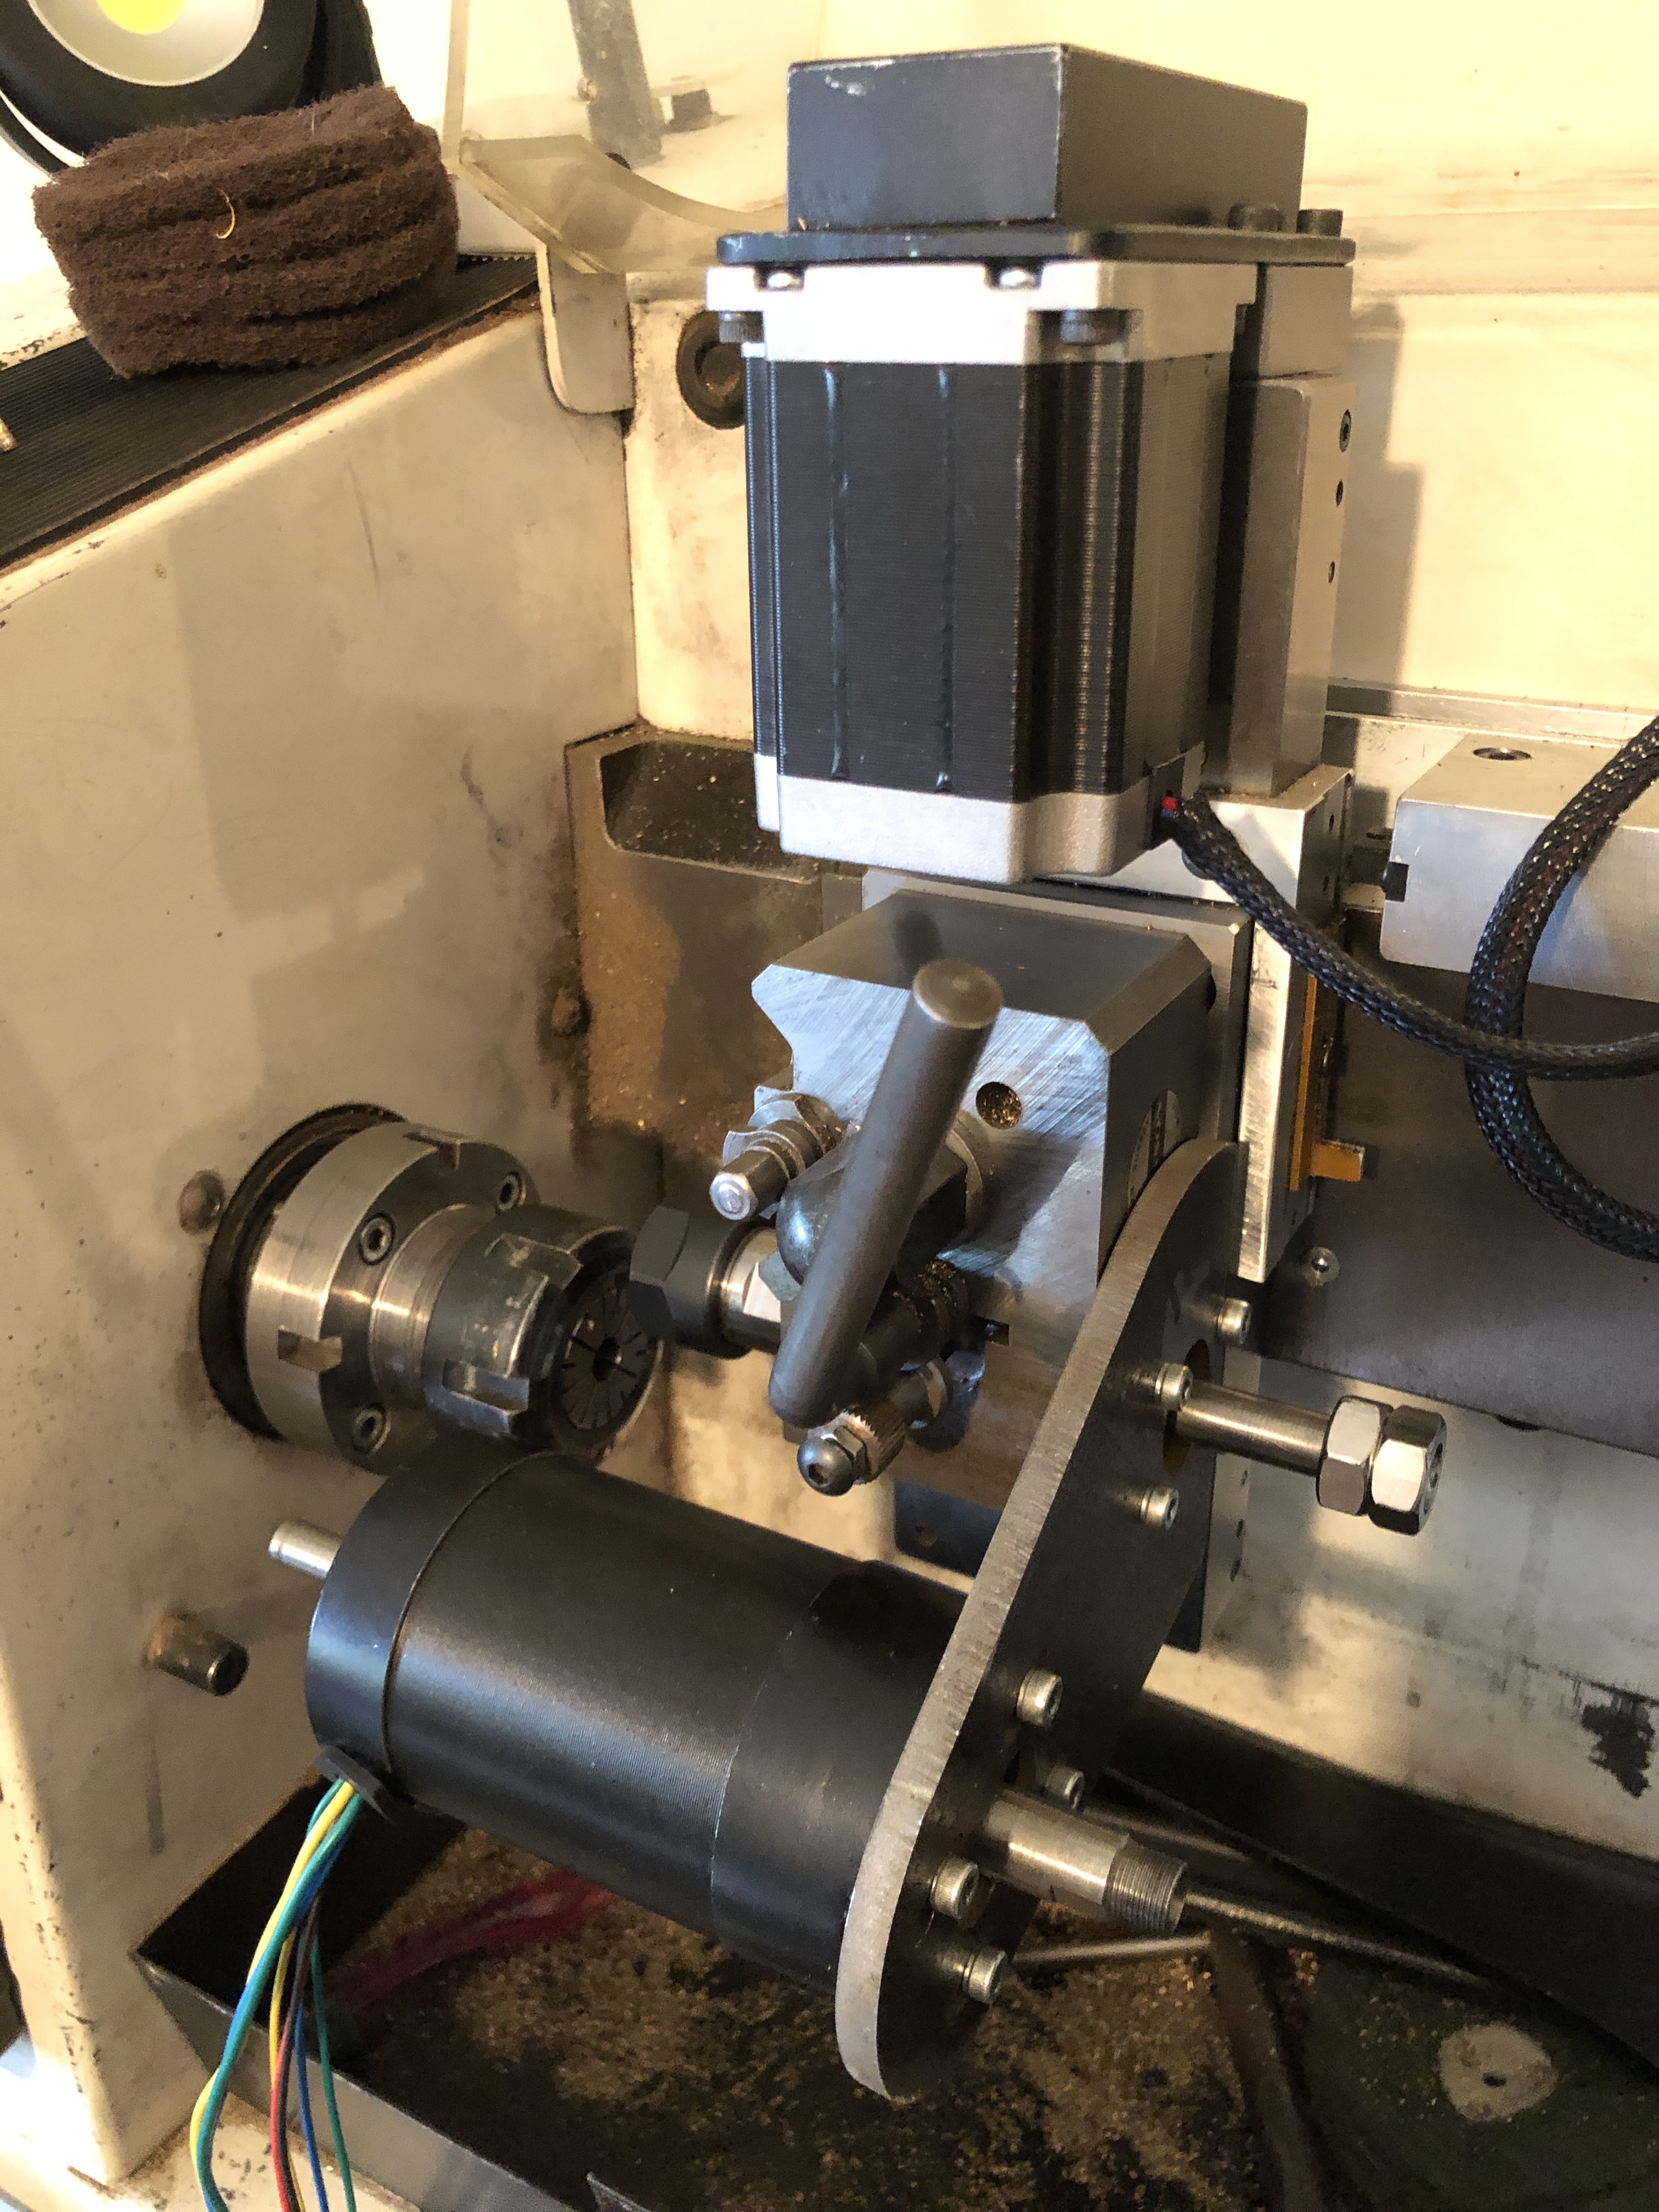
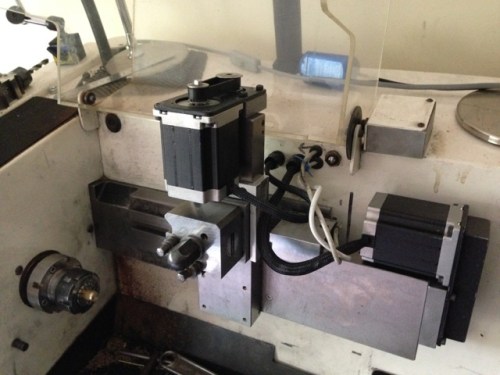
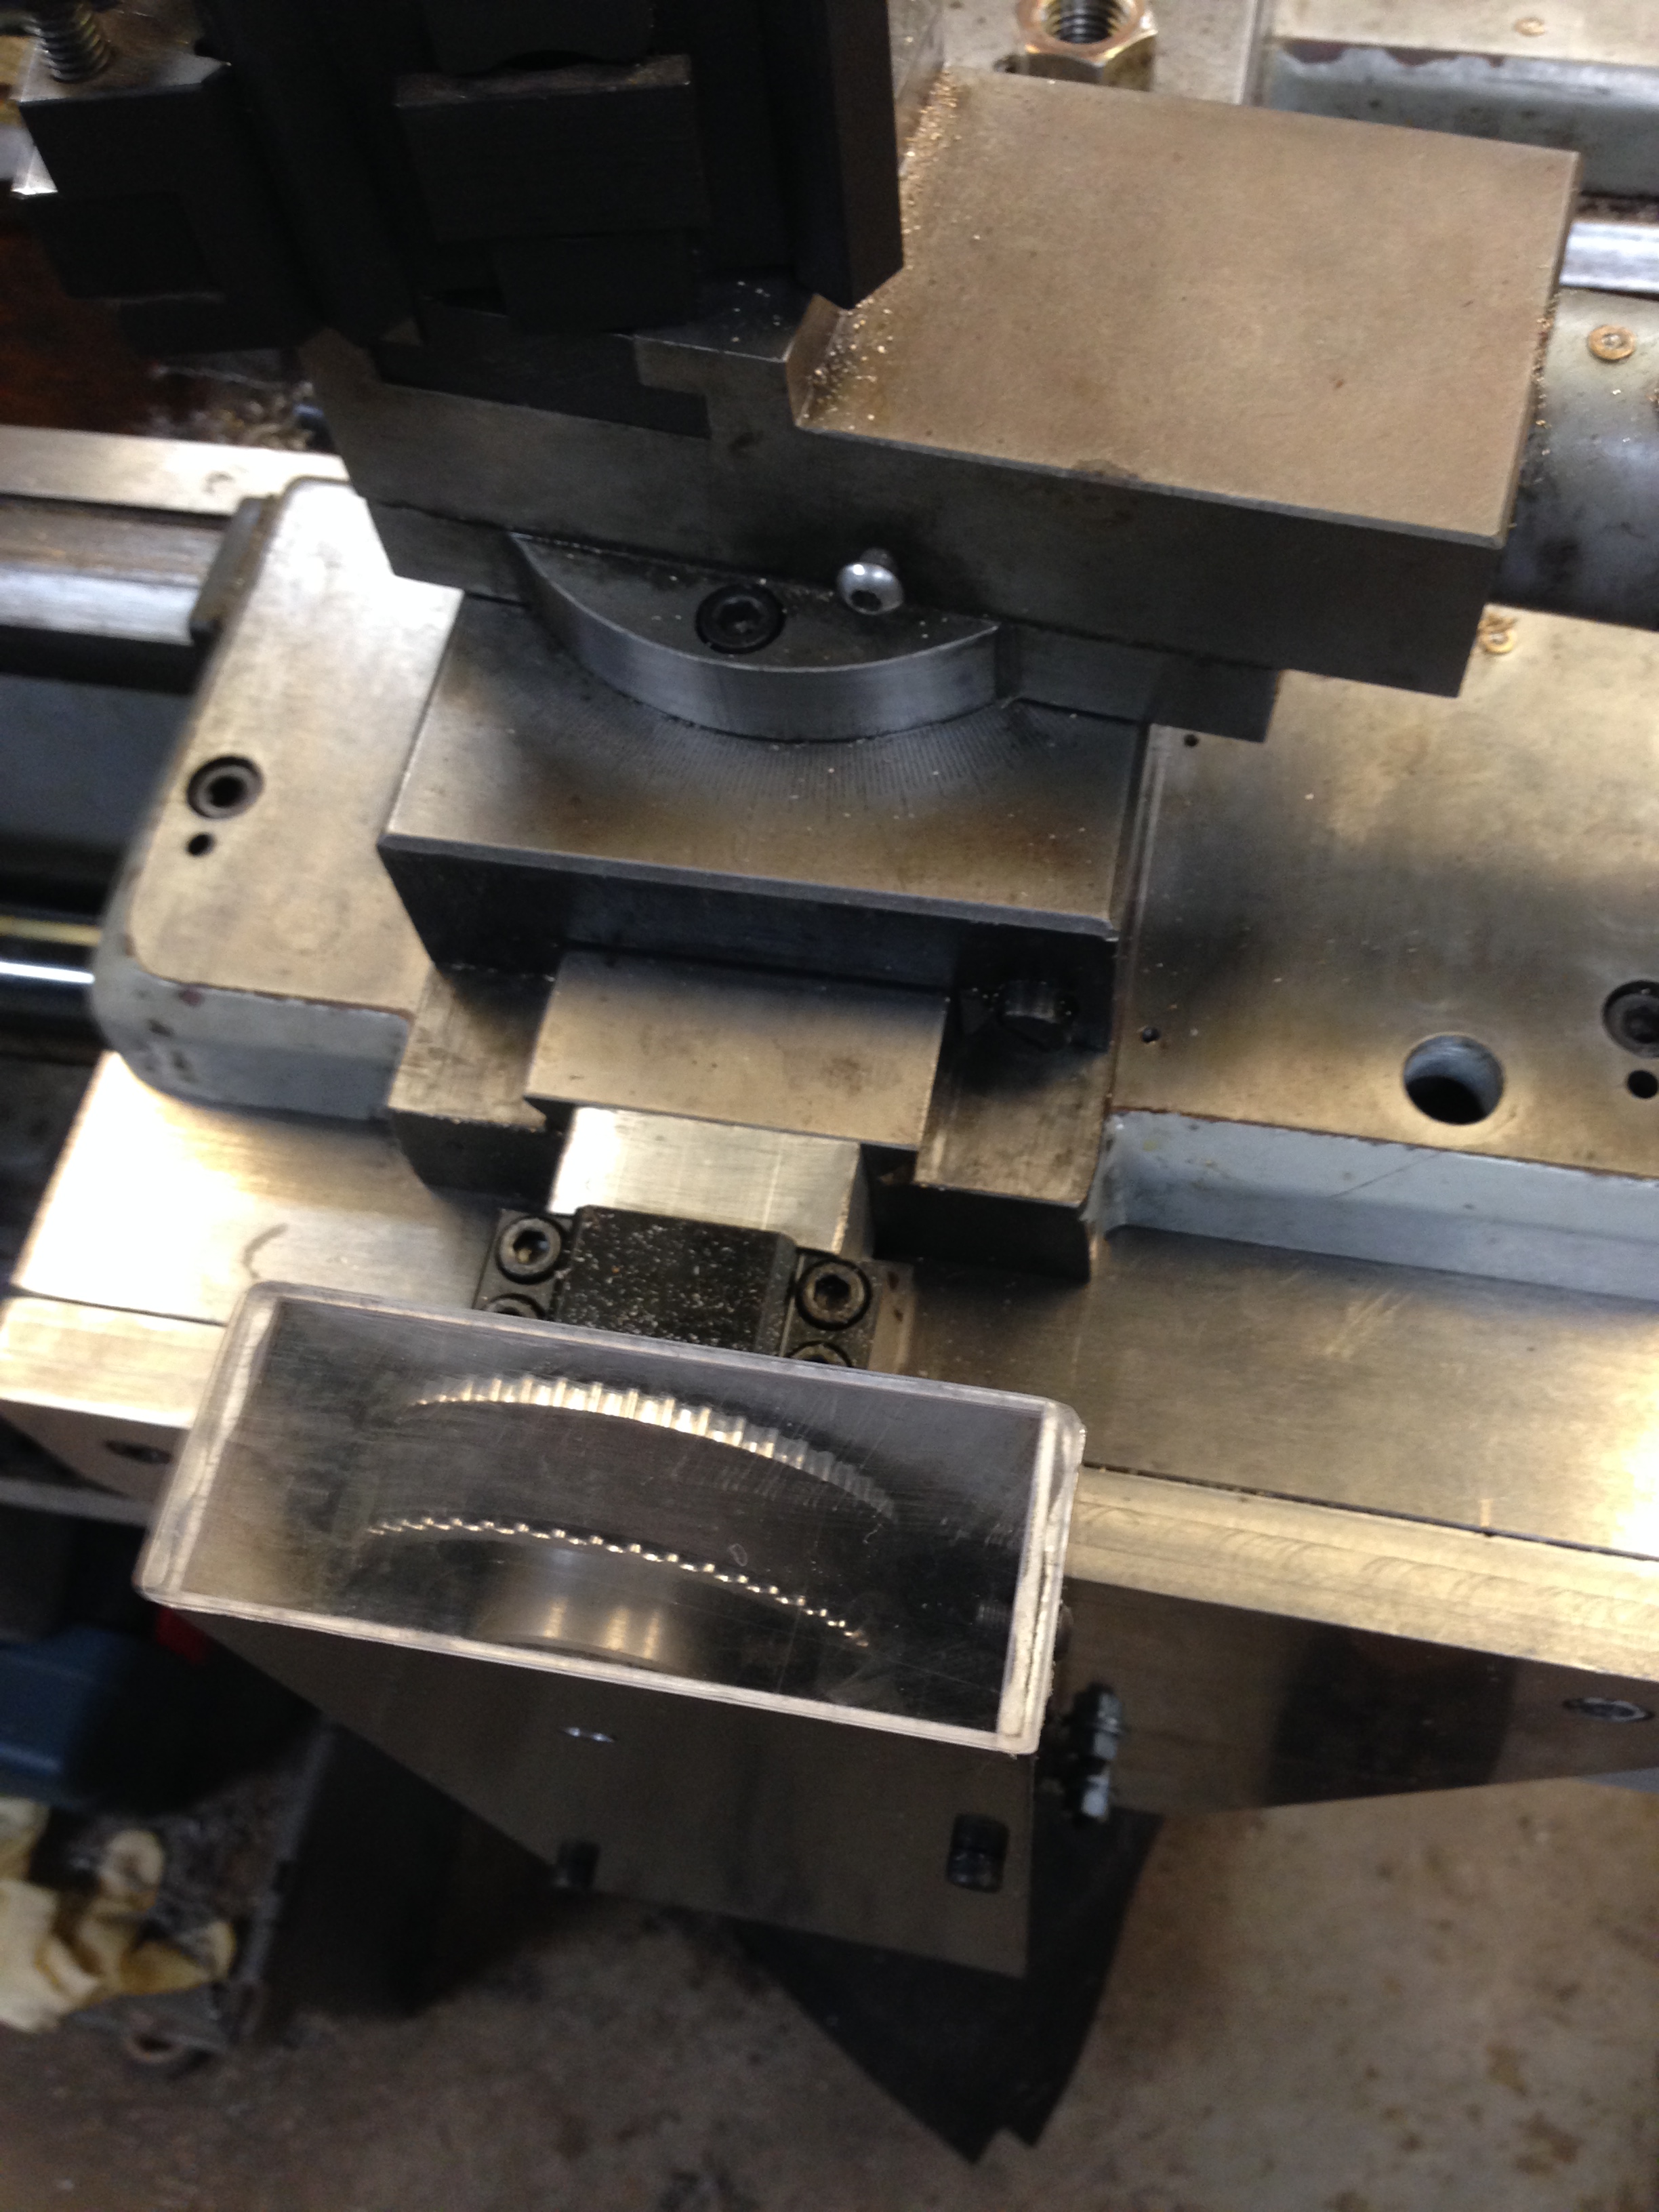
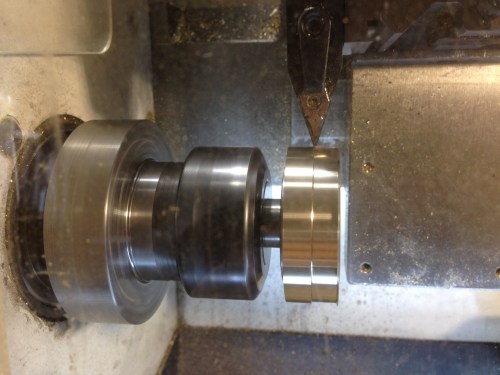
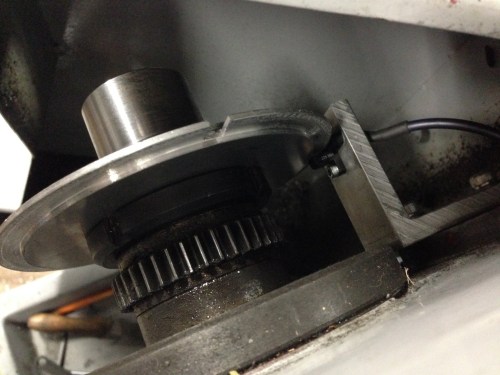
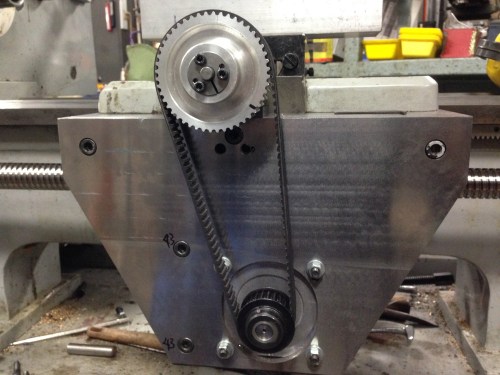
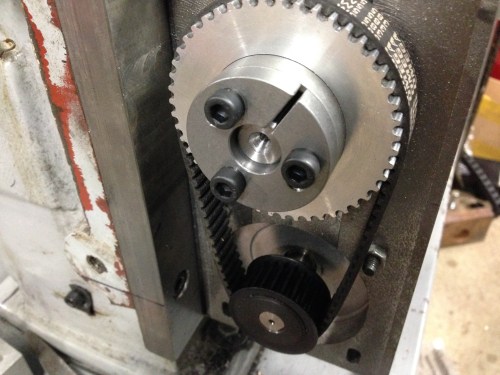
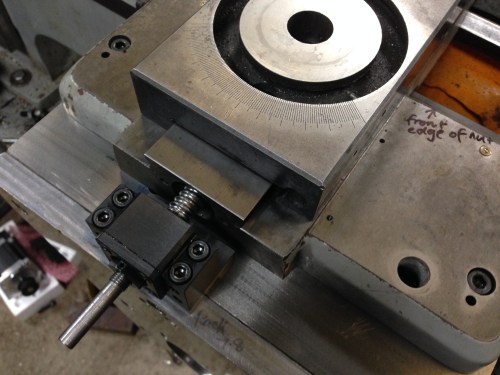
The tool post had moved slightly during the threading!  It had twisted a little, as a result of the T piece in the carriage slipping.  F**K    F**K  F**K!!!

I replaced the T piece grub screws with more solid cap screws, and really tightened them.  Then made another chuck.    I must point out that each chuck was about 6-8 hours of machining, normally a very pleasant time.  But by this time, I felt like that  bloody spider in the cave.

cnc-lathe-5

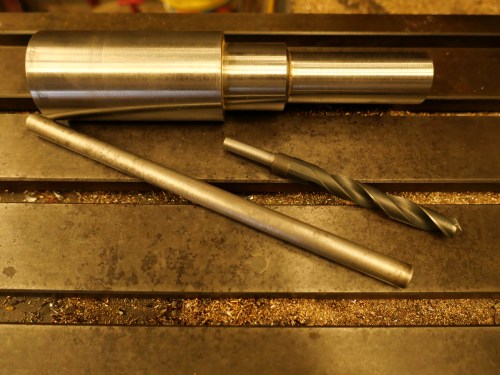
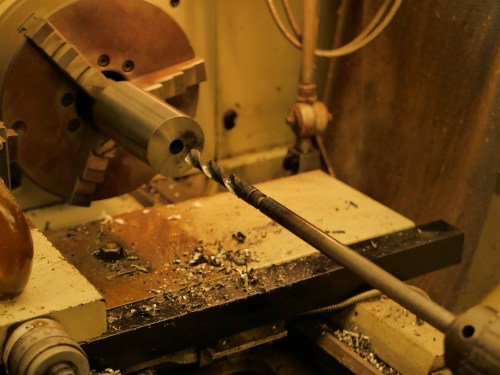
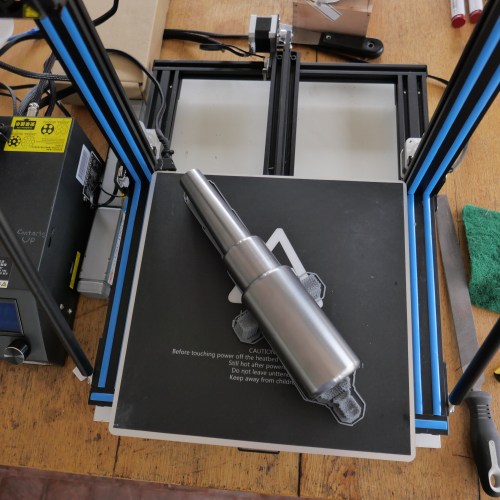
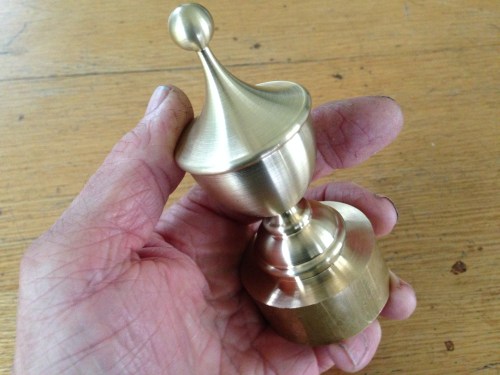
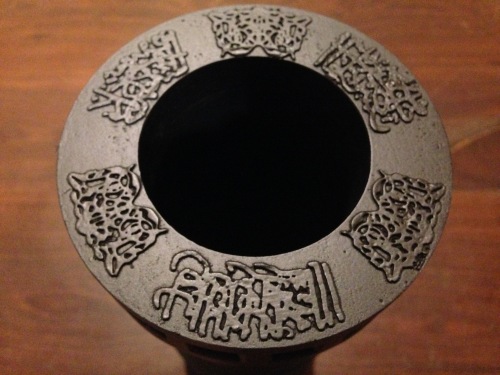
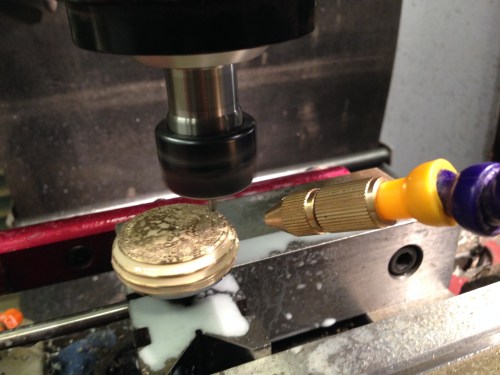
ER40 Chuck Number 4.

One advantage of making 4 chucks is that each one was made faster, and with more confidence.   This one was made in about 5-6 hours, including painting with selenium oxide to give it a black appearance.

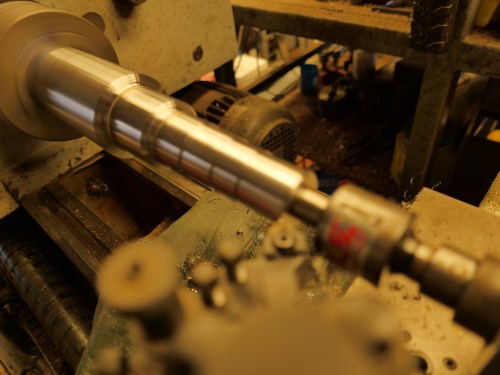
It has a runout at the chuck face of 0 – 0.01mm (which might have been due to inaccuracy in the rod which was being measured), and a taper of 0.02mm at 50mm from the chuck face.  It feels nice and tight when being screwed on.   OK,  Success.   Eventually.

Next job, the throne of Scotland.

But obviously that slipping top slide on the CNC lathe has to follow chucks 1,2 and 3 into the rubbish bin.   It will be replaced by a fixed, immoveable tool post.

New Steppers for an old CNC Lathe

My Boxford TCL125 CNC lathe was missing steps in the cross slide, with resulting inaccurate work.  Obvious causes, like cutters not sharp, or gibs too tight were excluded.  Changes in the stepper motor settings maybe helped a bit, but not enough.

Stuart T suggested replacing the stepper motor, since the machine is a 1985 model, and the steppers look original, and therefore the 32 year old stepper permanent magnets are probably not as strong as they were originally.

We had changed the electronic controls in the lathe 3 or 4 years ago, so it would work with a Windows PC, and Mach3.  Mostly I use “Easylathe” for generating the G codes.

Stuart had a spare stepper motor in his junk box, and it was the correct size (Nema 23), but more powerful than original.  So I swapped it, and missing steps disappeared.  Hooray!  A minor problem was that Stuart’s stepper had shafts at both ends, and I was not comfortable about cutting off the unwanted shaft end, and I had decided to change the Z axis stepper also , so I ordered some new stepper motors.

A carton of 3 motors arrived a few days after placing the order.  They are made in China, and are nicely finished.  Each new motor had 4 wires, whereas the originals had 8 wires each, but reference to the wiring diagrams quickly determined the connections.  Total cost for the 3 motors was $AUD90, including postage, and now I have a spare.

A big advantage of the NEMA mounting system is that the motor mounting dimensions are fixed, so swapping motors is simple.  More powerful stepper motors are longer, but the dimensions are all available online, and can be checked before ordering.

cnc-lathe-1

The black and silver new stepper motors fitted to the Boxford TCL125.  One cover waiting to be reinstalled.

cnc-lathe-2

The old steppers on the right.   

A simple CNC turning test worked well, so I am hopeful that this problem is fixed.


Turkish Bombard – the barrel mouth

IMG_4572.JPG

Except for a name plate I have finshed the bombard.  The floral design at 12, 4 and 8 is not as clear as I wished, and the Arabic script at 2, 6 and 10 is even worse.  But it is cut in wood, and it is a first effort at such work, and it is not easily seen in a model only 106mm 4.2″ diameter, so I am reasonably satisfied.

Also, this was always a prototype, in wood, and I have not totally dismissed the idea of making it in cast iron or brass.  In metal I am sure that the detail work would be a lot finer.

Bombard Model -2. Big Thread

The breech and the barrel are joined with a very large thread.  On my 1:10 scale model it is 60mm diameter, and has a pitch of 6 mm.  These dimensions are measured off Internet photos of the original bombard, so they might not be faithfully accurate to the original bombard.  If anyone has accurate plans of the bombard I would be very interested to hear from them.

I experimented with various spindle speeds, feed rates, depth of cut, and finally decided that red gum wood is not the ideal material to be cutting a thread with sharp points.  However, at 200rpm, and taking 50 cuts to reach the full depth, and using a very sharp tool, the end result was OK.  I will fill the tearouts.

In order to make a functional join in the wooden cannon, I truncated the apex of the thread.  In the gunmetal version I will attempt a more faithful to the original, sharp look.

For some reason, the wood held together better during the internal thread cutting than the external.


The male thread was cut on my newly CNC converted lathe,  between centres, but the fixed steady on that lathe was just too small to hold the barrel, so the internal thread was cut on my bigger Chinese lathe.

Next I will bore the barrel to 63mm, then turn the exterior of the barrel.


Bombard Model. Turning the Breech


So if you watched the video, you can see that I have a problem with the big thread between the breech and the barrel, at least in the wooden prototype.  It might work better in brass or gunmetal.

The thread has a pitch of 6mm and a diameter of 60mm.   It is big.

My plan at this time, is to make a brass male threaded section, and glue or screw it into the breech.  Then to make a steel tap using the same G code, and cut a thread into the wood of the barrel.  (p.s.  note 30 Sep…  I continued to experiment with feeds, speeds, and cutter shapes in the wood.  The final result was OK so I did not make  metal threads.  That will have to wait until I do this project entirely in gunmetal or brass…  maybe never)

CNC Lathe Conversion- final

Before I am hung, drawn and quartered, for operating a lathe without guards, here is the proof that I have been sensible.

IMG_4292.JPG

Guard over the X axis pulleys.  I like to watch the wheels going round and round, hence the transparent top.   Also note the cover over the exposed ball screw.

IMG_4293.JPG

Cover over the Z axis pulleys and belt, again transparent.  If I wore a watch it would be transparent.

IMG_4295.JPG

I also installed an ER40 collet chuck.   I will be using this for all work with diameters under 26mm.

A Matter of Scale

Before I get onto a brief reflection about scale, the photo below shows 2 cannon barrels.

The big one was what impelled me to converting a manual lathe into a CNC lathe.  That time consuming, costly, and ultimately very satisfying project, started because the CNC lathe which I used to turn the big barrel could only handle the job by doing it in two stages…. doing the breech first then the muzzle.  That was due to the big barrel being too long for the lathe, at 300mm (12″).

The small barrel was a test for the CNC converted lathe just finished, being the first complicated shape which I have made.   To save on material, I made it at exactly half the scale of the big one, ie 150mm long (6″).

IMG_4291.JPG

Comparing the two barrels reminded me, that if an object is twice as big as another, in all 3 dimensions (height, width, depth), it is 8 times as heavy.   And any projectile, and weight of black powder, would also be 8 times the weight.  But the wall thickness of the explosion chamber is only TWICE as thick.

My point is, that if scale is maintained, the smaller the cannon, steam engine, boiler, whatever…..  the less likely it is to explode.

Not that these cannons will ever be fired.  Just hypothetically.

CNC Lathe Conversion – 17

First Test Run

After some test runs without tool or material, I performed some measurements.

500mm movements along the Z axis were reproduced multiple times with a deviation of 0.00mm!  (the Z axis has a ground ball screw)

100mm movements along the X axis deviated 0.02mm.  (the X axis has a rolled ball screw).

I was delighted to note that the lathe is extremely quiet and smooth.  The only noise is some belt slap from the very old belts, and from the stepper motors.

The video below was taken from my iphone, while I was operating the lathe controls, so please excuse the erratic movements.

The steel is 27mm diameter.  750rpm, 50mm/min feeds.

And the guards will be made next step, without fail.

The G code was generated using Mach3 for these very simple shapes.  For more complex items I use Ezilathe.


The lathe is 600mm between centres.  38mm spindle bore.  Swing about 300mm.

Steam Engine Oilers

Knowing that I have an interest in CNC machining, Tom, from the Vintage Machinery Club in Geelong asked me to make a pair of oilers for a very old Wedlake and Dendy steam engine.  The engine is a large (to me anyway) stationary engine, which is run on steam several times each year.  The oilers for the cross slides were missing.

We searched the Internet for pictures of W&D steam engines, but could find no pictures or diagrams of the oilers.  So Tom sketched a design, and I drew a CAD diagram.  The dimensions were finally determined by the materials which I had available…  some 1.5″ brass rod and some 1.5″ copper tube.

This is the almost finished product.

IMG_4250.JPG

Just needs 1/4″ BSPT fittings and and oil wick tube so they can be fitted to the engine.

IMG_4222.JPG

The copper tube silver soldered to the brass cylinders (top), the brass blanks for the lids (bottom) and the mandrel to hold the assembly (bottom centre) during CNC turning and drilling.

IMG_4246.JPG

The mandrel to hold the body (left) and the mandrel for the lid (right).  The cap screw head and hole in the mandrel have a 2 degree taper.  The slits were cut with a 1mm thick friction blade.

IMG_4243.JPG

Rough turning the base.

IMG_4231.JPG

Turning the lid.  The mandrel is held in an ER32 collet chuck

IMG_4245.JPG

Engraving the lid.  Using a mister for cooling and lubrication.  16000rpm, 200mm/min, 90 degree TC engraving cutter.

IMG_4251.JPG

The oilers work by wicking the oil from the reservoir into a tube which drains through the base onto the engine slide.  When the wick tubes are fitted the oilers can be fitted to the engine.

IMG_3196.JPG

The 1865 Wedlake and Dendy

IMG_3195.JPG

1865

My lathe is a Boxford TCL125, using Mach3.  The G code is generated using Ezilathe.

Below is a link to an oil cup from “USS Monitor”, of American civil war fame.   One of the first ironclads, powered only by steam.

http://www.marinersmuseum.org/blog/2010/04/one-oil-cup-down/

(ps. The  lathe which I was converting to CNC was the subject of previous posts and is now working, but needs some guards fitted and a bit of fine tuning.)

CNC Lathe conversion -16

The wiring of the lathe is complete.  (Except for limit switches.  They can be added at any time).

Mach 3 is configured.  The wireless hand control is installed and working.  Ezilathe installed and waiting for input.

Some covers to be made.

IMG_4154

Hook ups in progress.  That’s the faulty VSD on top of the electronics enclosure.  The CNC engineer lost his hair trying to figure out the problem.

Still some testing and fine tuning required.

But nothing much will happen in the workshop for the next  3 weeks.


CNC lathe conversion -15

Another couple of advances in the conversion.  Today I installed the lead screw cover and the cable protector to the cross slide stepper motor.

The cable protector was easy and straightforward. It flexes in one direction only, and is fixed at the ends after the cable is threaded through it.  The length is adjusted by adding or removing links.  It was placed so that coolant liquid will drain out of it, and to minimise the accumulation of swarf.   The cables themselves have a thick covering and are well protected.  The link protector will not kink, further protecting the cable.

It was cheap.  About $AUD20 for 2 meters, posted from China.  I used about 1.1m.

cnc lathe - 2.jpg

Showing the stepper motor cable protector, and the lead screw protector (one half of it.  The other half is on the other side of the carriage.)

The lead screw protector was another story.  It is a spring steel coil, about 50mm wide, and as it is compressed the coils fit inside each other.  I made a big mistake in allowing it to spring open before I had installed it (there were no instructions).  It immediately opened to a length of over a meter, in coils about 50-60mm diameter.   No big deal, I thought.  I will just compress it back to its original configuration.    Big mistake.

It was what I imagine coiling a live, oily, biting, boa constrictor would be like.  (OK, boas constrict rather than bite.  How about an anaconda, or a big eel.)

I fought it for about an hour.  And eventually succeeded.  Minus a few bits of my skin.

So I did not allow the protectors to expand again until after I had them on the lead screw.

This is what they look like.   Pretty cool IMO.  They just expanded into position when I removed the restraining clips.

cnc lathe - 3.jpg

The lead screw stepper motor and protector.  The Estop box above will get some ends to exclude swarf.

It was not cheap.  The best price that I could find was from South Korea.  $AUD200 inc postage.  But it is excellent Japanese quality.

The wiring is happening, but the variable speed drive seems to be dead.  It has been sitting unused on a shelf for 2 years, so no point asking about warranty.  Took it apart to check for broken wires, fuses, burnt out components etc, but nothing visible.  Will order another one.  About $AUD200.  An unexpected expense.


CNC lathe conversion -14

These lathe CNC conversion posts are probably becoming a bit tiresome, but just in case there is someone out there who is interested, I will continue until the job is finished.

The latest was to make and install a spindle speed (and position – thanks David M) sensor.  It consists of a disk with a slot cut in the periphery, attached to the main spindle.  And an opto-electronic sensor which is connected to its own electronic board, thence to the breakout board and VSD.

cnc lathe - 1.jpg

The disc with the slot at 8:30 and the sensor at 9:00.  I must have chosen the wrong cutter or turning speed for that disc aluminium…  looks a bit rough.  (note added 13/7    Stuart T says that I should have used coolant-lubricant).

cnc lathe - 4.jpg

View from above.  Any clearer?   That gear is now superfluous except as a spacer.

So there is one electronic impulse per spindle revolution.  That is enough to measure the RPM’s.   Essential for cutting threads.

The beauty of this system is that there is no gear selection or changing, and ANY thread pitch can be selected…  metric, imperial, BA  etc…  any odd ball thread that your heart desires.

cnc lathe - 2

cnc lathe - 3

The HTD (high torque drive, I am informed by many readers) pulleys and belts and taper lock fittings.  Unfortunately I could not find a taper lock to fit the small pulleys, so when it is all finally, definitely, absolutely, correctly,  positioned, I will Loctite them in position.  Protective covers yet to be made.  I quite like to see the mechanicals in action, so I am intending to make the covers from clear polycarbonate.(Lexan) .

CNC Lathe conversion -13

IMG_4125

Adjusting the lead screw.

The 48 tooth HTD pulley has been installed using a taper lock.

Then some time was spent adjusting the parallelism of the lead screw.  That requires quite a few movements of the carriage along the 600mm thread.  Each 360 degree turn of the lead screw advances the carriage 6mm, so you can understand that I became a bit impatient with all of the repetitive hand actions to move the carriage from one end to the other.

So this was a solution to that issue.  That HTD belt is the one that was too long, so I was happy to find a use for it.    The variable speed battery drill shot the carriage end to end in a couple of seconds.

All is now adjusted parallel.

A few more little installation issues, then for the wiring.

CNC Lathe conversion -12

Today I fitted the lead screw.

No big deal, I sense that you are thinking.  After all, the ends are machined, the bearings fitted, and all waits in readiness.

True, but there is a strict sequence of events.  And since it has been 3 or more weeks since it has been together, I had to rediscover the sequence, by trial and error.  And each bit of the fitting is very heavy, very delicate, very tricky.  So it took me several hours to get to the  final photo in this blog.

But first a view of the inside of the newly machined apron.

IMG_4122.jpg


IMG_4123.JPG

The lead screw fitted.  The cross slide screw is also fitted.  Note the red E Stop panic button fitted to the left.    Next job is to fit a support bearing at the right hand end of the screw.  Then to check and adjust parallelism of the screws.  A rough check showed that they are within 0.25mm

CNC Lathe conversion -11. Ball screw machining.

Hooray!

Today I collected the lead screw after the ends were machined by Statewide Linear Bearings.

I decided to drive the 100km each way to pick it up, in preference to using a courier.  I wanted to ensure that all of the small bits were there, and also just to make sure it was handled properly.  Mostly freeway, listening to Dan Carlin on the Persian-Greek wars, so it was a pleasant way  to have 3-4 hours to myself.  (If you do not know about Dan Carlin, Google him and download an episode.  If history at school had been like this, we would all be history addicts.)

IMG_4117.JPG

This is the lead screw, ends machined, and support bearings fitted.  1100mm long. 28mm dia

All good, except that the nut was back to front.  That nut is pre-tensioned, which means that the 2 halves are separated by a precisely machined washer.  I was nervous about removing it and replacing it the correct way around.  However I had previously asked the ball screw expert about that aspect, so armed with the technique I made up a sleeve of the correct size, removed the nut and replaced it.   No balls fell out.   So all good!  The above picture shows the nut in its correct position.

IMG_4118.JPG

The nut.  Looks expensive?  Is expensive.  And beautiful.

IMG_4120.JPG

The machined driven end.   $AUD250 machining there.  But it is perfectly done.

IMG_4119.JPG

And with the support bearing installed.  A pulley for the HTD belt goes on the distal bit of shaft.


CNC Lathe conversion – 9

The CNC lathe conversion has been happening, despite no posts on the blog.

I have mounted the electronics enclosure, and mounted the various components inside.  No wiring yet.

IMG_4110

This stainless steel tool box is the electronics enclosure.  It fits the space quite nicely, and is adequately big.  The back gear cover to the right will be retained, although the back gears have been discarded.  The main switch and emergency stop will be mounted somewhere on this cover.

IMG_4109

The Variable speed drive (VSD) sits on top.  That will control the spindle speed.  The transformers, stepper motor drives, and Breakout board (the heart of the system) are positioned inside.  Plus cooling fan and filters.  Ready for wiring.

IMG_4107

Drilling the apron to attach the cross slide ball screw bearing.  One chance only at this one, so the setting up took a couple of hours.  The apron is clamped to a large angle bracket on the milling table.   M6 threading followed.

IMG_4108

The end result.  The bearing as attached to the apron and the ball screw is in place.  I machined the end of this ball screw to fit the bearing, cut a thread (M10x1), and machined the end to accept the pulley.  All good.  There is 0.25mm adjustment available if required, but it all seems pretty correct.  The bearing sits on a carefully machined block which is 7.85mm thick.   Still waiting the lead screw machining.(!!)

NOT MUCH GOING ON TODAY

IMG_4092

This is my workbench after I had almost finished tidying it.  Really.  


Then I thought about machining the ends of the cross slide ball screw.

IMG_4095

So I mounted the collet chuck and checked the runout.   0 to o.01mm.  Then I did a test cut in the ball screw.   Hard hard hard.  But it did cut.  Then I chickened out and decided to finish it another day.

So, looking around the workshop for something else to do, I decided to pretty up the new CNC lathe apron.

IMG_4087

Before (milled surface).

IMG_4093

During


And I forgot to take a photo of the after, but it did look nice and smooth and shiny (look at the mirror finish behind the wheel).

Being retired is great!

Workshop Tidy

I sometimes feel a bit ashamed when I have visitors at my workshop.

The reason is that when I am in the middle of a project, I really concentrate my energy on the decisions, the machining, working out how to fix the mistakes…

…. and tidying up as I go, is near the end of the list of must do’s.

Consequently, tools tend to be put aside at the spot where I have been using them.  And off cuts of steel or brass or wood or whatever, lay where they fall.

And as mentioned in a previous post, I have a policy of leaving swarf on the floor, to discourage wildlife from slithering into my workspace.  (see the old post about the tiger snake between the lathe and the milling machine).   And if you are not Australian, look up tiger snakes.   They are just about the most dangerous reptile on the planet.

So my workshop is not the tidy, organised sort of workspace which you might expect from a retired gynaecological surgeon.

But occasionally, the mess becomes so extreme, that I cannot find tools, I trip over stuff on the floor, everything is really dirty, and it is dangerous and embarrassing when visitors call in.  And some of those visitors have workshops where you could eat off the floor.

So yesterday I spent a whole day tidying, sorting, putting away tools, throwing out rubbish, and sweeping the floors.

What about the tiger snakes I sense you asking.

Well, here in the antipodes, we are in the depths of winter, and it is bloody cold.  And all sensible cold blooded reptiles are asleep in their homes. So for a few months it should be safe to sweep up the swarf.   Here’s hoping anyway.

CNC Lathe Conversion – 8

Continuing the installation of the ball screws, and stepper motors.

I have completely removed the digital read out module and glass slides, and they will not be reinstalled.  Not sure what I will do with them.   They are only a year or two old, and in good condition.  I will probably put them on Ebay.  Same with the old gearbox, carriage apron, and electric controls.

Here are some pics of the plates and blocks which support the ball screws and steppers.

IMG_4089.JPG

This is the steel plate at the headstock end, bolted to the bed.  And the block with the holes is cast iron 42mm thick, to support the leadscrew and leadscrew stepper motor.  It was machined out of an old piece of machinery, hence some unintended holes.   Being cast iron it was fairly easy to machine, but incredibly dirty. Turned everything in the workshop black, including me.  (whoops.   Unintended not PC)

IMG_4087.JPG

This is the block which replaces the gears and controls of the apron under the carriage.  The thick block is cast iron, and the stepper motor support is 20mm thick steel.  Very heavy.

IMG_4086.JPG

This plate is hidden under the carriage.  It secures the lead screw nut.

IMG_4085.JPG

The slot in the carriage had to be widened and deepened a bit, in order to accomodate the slightly fatter and taller cross slide nut.  See the next photo to see the setup for milling the hole through the carriage.

IMG_4084.JPG

A rather confusing photo.  The carriage is clamped to a large angle plate on the mill, and I am enlarging the hole which accommodates the cross slide ball screw.  It was at the limit of what my mill could manage.  An intermittent cut, with a lot of tool stick out.   Not the best way of doing the job, but it worked OK.

IMG_4088.JPG

Plastic covers attached to the stepper motors, and toothed belt pulleys fitted.

IMG_4075.JPG

Checking the centres between the pulleys, using 2 wooden wedges to push the pulleys apart.

IMG_4083.JPG

The underside of the carriage.  The hole and channel at the left side of the picture was machined to accept the larger cross slide screw

So you can see that I have been busy since the last post.

At present the lead screw is at Linear Bearings in Melbourne, having the ends machined to accept the driving pulley, and support bearings.  I did consider doing this machining myself, but decided to leave it to the professionals because of the high cost of the item and the hardness of the material.

CNC lathe conversion-6. EBay problem

My first hitch occurred today.

I was very excited to receive the nut for the cross slide ball screw.  If you have been following these posts you might recall that the ground ball screw for the cross slide came from Taiwan, and arrived in 3 days.  But I had to order the nut from a seller in USA.  The nut was advertised as new old stock, but with no packaging.  That was OK, but the postage cost for such a tiny item was ferocious.

It was the last item to arrive from overseas.   However when I looked at it, it was obviously NOT new.

IMG_4043.JPG

The cap screws holding the ball recirculating tube were different from each other, and the washers underneath were too big for the screws.  Obviously not the way that TNK made it.  Somebody has had the nut apart.  And the ball retaining tube was very scratched  and loose.  Again, not TNK standard.

But no biggie.  If it works — fine.

So I turned up a retaining tube to remove the previous nut from the ballscrew, and it came off without any drama.

cnc lathe - 1

But when I tried to fit the “new” nut, it just would not go on.  Tried reversing the direction.  No go.  Bugger bugger.

Somebody has altered or changed the “new” nut.  Maybe installed balls which are too big, or maybe damaged the entry thread.  I do not know.

What to do.  I have been waiting 2 weeks for this to arrive.

First, Ebay email to the seller.  See what the response is.  Ask for a refund.  The postage was almost as expensive as the nut. If unsatisfactory response, they will get the worst Ebay feedback ever.

There is one other seller of these nuts on Ebay, also in USA, and 50% more expensive, and the postage is also 50% more expensive. (how DOES ebay come up with the postage charges.  It seems more related to the cost of the item rather than the weight-size etc.)  But the nuts are in original packaging.  And I want to get going with this, so fuck it.  Pay up and get it.

I will report in a later post.  (if the bad language in this post seems to reflect my state of mind, well, yes it does.)


PS.  Next day.  After sending photos of the issue, the seller accepted responsibility, and I am getting a full refund.  That restores my faith in Ebay/Paypal.   I hope that the next one is in better condition, and comes a bit more quickly.  Sorry for the bad language.

CNC Lathe conversion -5

This is a list of the components which I have accumulated to convert a manual lathe to a CNC lathe.  It is not quite complete, but close.

  1.  Lead ball screw and cross slide ball screw.  Both with nuts and end bearings.  (no pic yet)
  2. The electronic components.
IMG_4021.jpg

The electronic components, not including computer and parallel cable and manual pulse generator.

IMG_4023.JPG

Two stepper motors.  Nema 34, 1200 inch – oz.  With rear covers.

IMG_4024.jpg

A Gecko microstep drive for each stepper motor

IMG_4022.JPG

Cable and connectors for the stepper motors

IMG_4026.JPG

A transformer-power supply (48 volt)

IMG_4025.jpg

Another transformer-power supply (5 volt).

IMG_4034.jpg

3 phase 1.5kw motor (top) to replace the single phase motor (bottom)

IMG_4031.JPG

Timing belt gears 24 and 48 tooth, 5M.  Order belts when size is definitely established.

IMG_4032.JPG

FK20 lead screw bearing and Ball screw covers

IMG_4028

The electronic heart of the system- the breakout board.  A C11R9

IMG_4029.JPG

The index pulse board and sensor.  A C3.

IMG_3342

Manual pulse generator, wireless.

IMG_2718

Variable speed drive, identical to this one on the mill

IMG_4035.JPG

An electrical enclosure, to hold the various components.  This stainless steel box was originally an item of medical kit.  Here I am checking out one possible location.  Not yet definitely decided to use this.

Finally in the electronics section, I will need a computer, loaded with Mach3 and Ezilathe.  Surprisingly, it does not need to be a particularly powerful PC.  And there are advantages in using an older operating system such as  XPpro.  I think there are a couple of those in the attic.  If not, I should be able to pick one up for under $100.

3. Various structural items.  Most of these will be 20mm thick x 200mm wide steel, cut to size and shaped and drilled.  I will take pics of these as I make them.  I was planning to have them water jet cut, but the shapes a fairly simple so I will cut and machine them myself as I go.

So, that is most of the items for the job.  I have spent about $AUD1100 on the ball screws and nuts, about $AUD1500 on the electronics and electrics, and maybe another $AUD500 on pulleys, belts, steel, taper locks, fasteners etc. I will add it all up accurately at the completion.  The lathe was cheap, bought sight unseen a few years ago.   So all up, I should have a CNC lathe for under $AUD4000.  And many pleasant hours of design and machining.  And a great learning exercise.  Stay tuned!

CNC Lathe conversion -4

I am in the process of collecting all of the components for the conversion.  Parcels are arriving from South Korea, Taiwan, China, USA and Australia.  Next post I will take a photo of the bits, before I commence assembly.  I have spent a lot of hours on the computer drawing up the positioning of the new components, deciding which components to get, then communicating with the sellers and making the purchases.  Not to mention hanging around home when parcels are due.  If I duck out for 10 minutes, that’s when the delivery van arrives.  And of course he leaves his little card “sorry we missed you”.

This post I will show you some of the drawings of the proposed conversion.  Of course the first step is to strip the lathe of all of the old manual controls, gears, motor, Digital read out, carriage apron, lead and cross slide screw, electric control box and contents.  (taking photos of every component insitu in case of a change of mind, and restoration required later).

Then measuring the bed and carriage in minute and accurate detail, and drawing it in CAD.

cnc lathe - 1.jpg

This is the lathe side on and end views, showing the new lead ball screw in red and green.  The cross slide ball screw is also there, but not well seen at this scale.  The 4 ball screws at top left are the possible combinations for eventual installation.  The second red one is the position eventually decided.  The green ones are with the nut re-installed in reverse direction.   I really did not want to remove and re-install the nut, because it is pre-loaded, and I do not want to risk disturbing the setup.

Many drawing versions are required, and as the components arrive, I find myself making changes.  This is definitely not the final version.   The two carriages show the carriage in its extreme positions on the lathe bed.

cnc lathe - 1 (2).jpg

This was an early sketch of how I thought I would arrange the cross slide motor and lead screw nut.

cnc lathe - 1 (1).jpg

This is a fairly accurate drawing of a cross section through the cross slide.  Black is existing.  Red is the new nut and ball screw.  You can see that removal of some of the cross slide bed iron will be required.  After looking at this I decided to move the nut and screw up a couple of millimeters.

cnc lathe - 1 (3).jpg

The Internet has been very useful in showing what fittings are available.  These are a few of the catalogues and tables which I have downloaded.  Some sites even provide CAD drawings so their components can be inserted into my CAD drawing to see if they will work together.

Lathe conversion to CNC -3 Ball Screws

I have learnt a lot about ball screws in the past few days.  And I have purchased 2 ball screws and nuts on Ebay.  For those relatives and friends who follow this post, who have no idea what I am talking about, the “ballscrews” are what determines where the cutting tool on the lathe is positioned.  Very crucial.  (can something be “very” crucial?  It looks a bit like “very unique”. )

1

Ball screws are the usual positioning screws  for CNC machines these days.  The alternative is Acme or square thread screws, but the few manufacturers who used to use these have all switched to ball screws (as far as I know).  Even Wabeco, the respected German lathe manufacturer no longer specifies any threads except ball screws.

Ball screws require less power to turn due to friction being a fraction of the alternatives.  Ball screws are silent.  If they are noisy there is something wrong.  They are generally more accurate than square or Acme threads.  They used to be many times more expensive than the older types, but since China/Taiwan has taken over most of the manufacturing, often using equipment sourced from US/Europe/Japan, the costs have plummeted.

And the backlash is minimal or zero.   Another name for ballscrews is “antibacklash screws”.

Backlash is annoying on a manual lathe, but it is very important on the cross slide of a CNC lathe.  Interestingly, it is less important on the CNC lathe lead screw, because most CNC lathe machining  on the leadscrew occurs in one direction only, towards the headstock.  However,  the cross slide is machining in both directions, in and out,  so the absence of backlash is necessary to maintain workpiece accuracy.

Ballscrews have grades of accuracy varying from C0 -C20.  The bigger the number, the less accurate the screw.   In general, it is recommended that industrial lathes should be C3-C5,  which means zero backlash, and accuracy of about 0.001mm.  That degree of accuracy is quite expensive, costing thousands of dollars per screw, and only attainable in ball screws which have been finished with precision grinding.  The alternative is ball screws which have been “rolled”.  These are much less expensive, costing hundreds of dollars per screw, depending on the degree of accuracy.  The best rolled screws can attain an accuracy of 0.01-0.02mm (C7), down to 0.1mm (C20).  These are approximate figures which I have gleaned from several manufacturers’ specifications.

So from scale drawings of the lathe bed and carriage and cross slide, I worked out that I needed the following…


IMG_3978.JPG

This is a photo of a ball nut and screw very similar to what I have bought for the cross slide.  THK brand, 14mm diameter screw, 4mm pitch, and BNT nut style.  Note the rounded channels that the balls occupy.


  1. Cross slide screw 14mm diameter, 400mm long with at least 200mm of thread, and a thread pitch of no more than 5mm.  The cross slide nut needed to be a THK BNT pattern in order to fit into the cross slide with a minimum of space making machining.  THK is a large manufacturer, with intermediate prices, and a very good reputation.  The screw needs to be a specific length, and one end needs to be machined to go through a bearing/ bearing housing and have a tooth belt pulley attached.  I contacted a ball screw supplier, to enquire about ground ball screws, but discovered that these were rarely specified due to their cost, and delay of 3-6 months.  A C7 rolled screw with the BNT nut was going to cost about $AUD400-450.  So I searched Ebay Australia, Ebay USA, and Ebay UK.  Eventually, I found and bought a used ground screw with end bearings and housings from Taiwan for $AUD250.  The nut was the wrong type, but I found a new correct style nut on Ebay USA for $AUD100.  I know that sounds like I have not saved much money, but that gives me a super-accurate ground ball screw!  Of the correct size and type.  I am keeping my fingers crossed that the pieces sourced from different countries will go together.  Theoretically, they should.  (same manufacturer, same size, “ground” specification, etc etc.  but finger tightly crossed).
  2. The lead screw approximately 1000-1100mm long, 25-32mm diameter, and 5-6mm lead.  Super accuracy not required in the lead screw, and I could have bought a new rolled one from China for about $AUD300-400.  But then I spotted one in South Korea, new old stock, 28mm diameter, 6mm lead, with unmachined ends.  THK brand.   Asking price just within budget.    And this was a C5, ground screw, possibly more accurate than I expected for the price, and unused, but hey, it sounded like a bargain.   So I offered about 15% less and was somewhat surprised to have the offer accepted.   So that one is arriving in a week or two.  Then to buy mounts and arrange end machining of the screw.  Although not crucial it will have zero backlash, due to the C5 designation, and the fact that it has two ballnuts bolted together in a “pre-loaded” fashion.  I expect that it will be the most accurate component on the lathe!  No decent photo to post.

(ps.  see the comments section for discussion about axial accuracy and backlash.  A super accurate C5 ballscrew has axial play (backlash) specification of 0.020mm, but the double ballnut configuration will reduce that number substantially.  “zero backlash” apparently does not really mean zero.)


Lathe Conversion to CNC -2 and Wall Smashers

After removing most of the lathe gear which will not be required after the CNC conversion, the lathe is looking a bit naked.

The carriage apron, the lead screw, the back gears, the drive rod and control rods have all been removed.  Also the cross slide screw and handle.  The cross slide itself is temporarily removed, but available for measuring for fitting a ball screw.

I have now made accurate measurements and drawings of the lathe bed and carriage, in order to choose ball screws and nuts for the lead screw and cross slide.

The lead ball screw is easy.  There is plenty of room and machined surfaces for attachment.  I see no particular problems there.  Just time, careful machining and expense.  Chinese or Euro-American?  As usual, there is a big price difference and maybe not such a big quality difference as previously.   Looking at 25 or 32mm diameter, with 550-600mm of thread.

The cross slide ball screw is another matter.  The current cross slide square thread screw is 14mm diameter, and I would like to use a ball screw about the same size.  The problem is that a ball screw nut is considerably bulkier than the existing square thread nut, so some machining of the cross slide will be required to make space.  The cross slide dimensions are already fairly tight, to maximise the swing over the carriage.  I do not want to weaken the cross slide too much.  So it is all a bit tricky.  Time to consider options. And to get another opinion.

No lathe pics, so here are some of Turkish wall smashers.


Turkish cannon

This one was given to Queen Victoria by the Turkish sultan.  It was made about a decade after the fall of Constantinople.  It was cast in 2 halves.  There is a giant thread connecting the halves.  I imagine that the strange square holes are to allow levers to be inserted for the screwing by many strong men.  No double entendre  intended.


Turkish wall smasher


Turkish cannon and ball

This one could have been used to make the breach in the wall at the fall of Constantinople 1453.  That stone ball is 600mm diameter.  With no trunnions or other supporting mechanism the barrel was probably dug into the ground for support.  That would allow repeated shots at exactly the same point in the walls.  8-11 shots per day.  It was made for the invading Turks by Orban, a christian who had previously offered his services to the defending Byzantines.  The Byzantines whose empire by this time had been reduced to a tiny fraction plus the city itself, could not afford his services.  The rest is history.


Lathe conversion to CNC

The carronade is finished, as far as I intend to take it.  At some future date I might make pulleys and ropes etc, but at this stage I am putting it on the mantlepiece.  (mantelpiece groans).   Some detailed pics in a future post.

I have commenced my next project.

I have a CNC lathe but it will accept work up to only 125mm diameter and 125mm long.  It was not big enough for the long gun, and barely fitted the carronade.   And I have some ideas of further larger projects (field artillery pieces, and possibly a model of a Turkish wall smasher like the ones which allow the Turks to conquer Constantinople.  That one was almost 6 meters long, and fired stone balls of 600mm diameter!!!   So even at 1:10 I need a bigger lathe.

OK, so I could use a manual lathe, but that is not the point.  A bigger CNC lathe would be fun.  And I have a Taiwanese one which I think would be suitable for conversion.  It is 600mm between centres, (just big enough for my Turkish smasher), and about 300mm swing.  It is not pleasant to use as a manual lathe due to very noisy spur gears.  So I have decided to convert it to CNC.

The steps are:

  1.  Remove the existing lead screw, cross slide screw, apron, back gears, gear box and more.
  2. Measure for ball screws and buy them.
  3. Buy the electronics.   Stepper motors (7amp NEMA34), break out board, Gecko stepper drivers, limit switches, power supply, 3 phase 2hp spindle motor, etc etc
  4. Fit the ball screws and motors.
  5. Fit the electronic components and hook them up (Stuart, I hope that you are reading this)
  6. Configure Mach3 and Ezylathe on an old computer
  7. Make a Turkish smasher

I have made a start.  Removed most of the unwanted manual components from the lathe today.  It felt very threatening and unnatural to be wrecking a perfectly good lathe.  See the photos.  At this stage I am taking lots of photos in case I have a change of heart and restore it to its original state.  But I will press on.  Watch this blog.  I expect that the conversion will take a couple of months, by the time components arrive from overseas.


IMG_2362.jpg

The lathe prior to CNC conversion


CNC conversion - 1

After removing the lead screw, apron, gear box, cross slide back gears etc etc.  Looks a bit naked.  Not much remaining.


Video of Making the Model Naval Cannon

Click on the arrow in the screen link below to connect to the YouTube video of the making of the 1779 model cannon.  Probably of interest only to machine aficionados, but it does feature some very pleasant music composed and played by Lis Viggers.

The labels appear too briefly, so use the pause button to read them.

The segment on boring the barrel is really boring. (really)

And a few editing errors appeared.  I typed cascobels when it should have read astragals.  Not prepared to delete, re-edit and re-upload given my very slow Internet connection.


And this is a link to another YouTube video with an excellent description of how these type of cannons were made originally.  Definitely worth watching.

1779 Naval Cannon Scale Model

It is almost 2 months ago that I started this model.

I thought that it would take 3 or 4 days!

Anyway, here it is.

It will look interesting on the mantelpiece.

cannon - 3.jpg

Note the hinge and square bolts and keys on the trunnion straps.

cannon - 4.jpg

A good view of the elevating apparatus, the quoin.

cannon - 6.jpg

A trunnion, trunnion band, trunnion bolts and key.

cannon - 7.jpg

Powder pan and touch hole.

cannon - 8.jpg

The underbelly

cannon - 2.jpg

It goes on display at the Geelong Wooden Boats Show next weekend.


Cannon Trunnions

I am unsure whether the trunnions are the semi circular holes in the carriage, or the cylindrical bits of the metal barrel which support the barrel.   I am going to assume that the trunnions are the part of the barrel.  (I checked.  The trunnions are the cylindrical parts of the barrel which support the barrel.)

So, today I made some trunnions and silver soldered them to the barrel.  In the full size original version they would have been part of the barrel casting.

But before that, I polished the barrel with a Scotchbrite type pad, impregnated with some polishing compound.  And it made the barrel sparkle!

cannon - 1.jpg

Then I attached the knob at the breech end, M4 threaded rod attachment.

cannon - 2.jpg

cannon - 4.jpg

Looks OK, Yes?  This protrusion would also have been part of the cannon casting.  It was used to attach the huge ropes which limited the recoil movement when the cannon was fired.  


cannon - 3.jpg

Turned some brass for the trunnion.  It was later cut into two pieces.

cannon - 7.jpg

Drilled the holes with an endmill in the barrel for the trunnions.  Stopped short of the bore by 3mm.  Jerry Howell specified threaded trunnions, but I decided to silver solder them in place.

cannon - 8.jpg

This is my silver soldering forge, for this project. (actually a hearth).   The barrel is still a hefty lump of brass, and I predicted that a lot of heat would be required to raise it to a suitable temperature.  The base is steel, and the bricks are fire bricks.  I used oxyacetylene as my heat source.

cannon - 9.jpg

After the silver soldering.  Not quite so pretty now.  I waited an hour before I could handle the hot item.  Note that the spigot in the bore which was Loctited in place, has come out.  Eventually, I became impatient, and applied wet rags to speed up the cooling process.

cannon - 10.jpg

Then a soak in dilute sulphuric acid for 15-30 minutes, to remove the flux.

Turning a cannon barrel

Today the exterior surface of the model 1779 naval cannon barrel was turned.

The piece of brass material weighed 5.1kg, was 300mm long and 50.8mm diameter.

I had used Loctite to glue a spigott in the bore, to provide a center and a driving diameter which the small CNC lathe would accept.

Although the lathe was nominally 300m between centres, the toolpost would move only about 200mm.  So the turning had to be accomplished by turning the cannon mouth end first, and then reversing the workpiece to turn the breech end.

The CNC lathe, owned by Bob Julian,  is about 30 years old, and it came out of a school.  In the course of this  job, it seemed to progressively free up, making us suspect that this is possibly the first time it has ever been seriously used.

The lathe electronics had been replaced by Stuart Tankard to use Mach3.  The G codes were generated by Stuart’s program “Ezilathe”, which is available as a free download on “CNC Zone”.   It is an excellent CNC lathe program, and I thoroughly recommend it.

I will eventually post some videos of the turning progress, but my Oz internet connection is so slow, that for the moment I will post photos only.

I started by turning a piece of rubbishy pine as a test.

cannon - 1.jpg

That’s me, watching carefully.  Later we installed the swarf cover.

cannon - 3.jpg

The metal turning lathe does not miss a beat chomping through wood.  These are the roughing cuts.  F300mm/min, S800/min.

cannon - 6.jpg

The Mach3 picture of progress.

cannon - 1.jpg

The finished distal half of the cannon barrel in pine.  If I stuff up the brass version at least I can have a wooden barrel. 

cannon - 10.jpg

Roughing the barrel in brass.  1mm cuts, feed 100mm/min.  It took almost 50 minutes for this section, and about 15 minutes for the breech section.

cannon - 11.jpg

The barrel mouth.  No gouging resulting from the 22 degree HSS cutter.

cannon - 14.jpg

Finish was quite good.  Will require minimal polishing with ScotchBrite.

cannon - 19.jpg

The workpiece was reversed in the lathe, the Z zero carefully set, the X unchanged, and the breech end turned.

The starting weight was 5.1kg.  The end weight, including the spigott was 2.9kg.  So at least 2kg of brass swarf, most of which I swept up and saved for possible future use.

Next to machine the trunions and some silver soldering.


Homemade lathe with ONE MICRON accuracy.

Watch the video.  It is inspirational.

Boxford CNC lathe (5)

The following pictures and video were supplied to me by Stuart Tankard.

They show the rarely used tailstock in use, supporting a relatively long thin workpiece.

The lathe is Stuart’s, and his control panel is fixed to the lathe cabinet.  (Mine is an identical machine except that I use a  wireless MPG).

The tailstock is the part coloured bright yellow, and it normally sits unused in a drawer, or hinged down and out of the way.  As you can see however, it occasionally is useful.

20160102_160913.jpg

Stuart’s lathe.  Note that the G code for the part was generated by a program called EZILATHE.   I also use this very handy program.  Ezilathe is a free download.


20160102_155138

The part is the first step in making a link for the beam engine which Stuart is completing.  The headstock end is held in an ER collet.  The tailstock contains a small roller bearing held in a shop made fitting.  After turning, the tear drop ends will have flats milled onto the sides, then holes drilled and reamed for shafts.

Check out the following Youtube video to see Stuarts lathe in action.

SOFT JAWS FOR LATHE

I have recently made two sets of soft jaws, and tested them.  One set was successful and the other set was not.  Read on to see what made the difference.

The purpose of soft jaws is that the jaws themselves are turned to the exact size and shape of the workpiece,  and the workpiece should therefore be held perfectly concentrically.  It should be possible to remove the workpiece from the lathe, and to replace it accurately.  It should also be possible to hold very thin disks, which was what I aimed to do in this exercise.

The first set of soft jaws was made for a 200mm 3 jaw chuck.  The aluminium cylinders were bored to fit snugly over the last step of the jaws, and held in position with cap screws.   I cannot remember where the idea originated.

IMG_3360

These soft jaws fit onto existing jaws, and are held in place with cap screws.  Here shown clamped onto a brass cylinder, ready to have the rebates turned.

IMG_3361

Showing the turned rebates in the soft jaws, ready to accept the workpiece.

IMG_3362

The workpiece is a 3mm disk, 38mm diameter.  The rebate is only 0.5mm deep.

The method was successful, allowing the workpiece to be faced, but during a second pass, one of the soft jaws came loose, and the workpiece dropped out.

I suspect that the cap screws did not allow enough purchase on the hardened jaws of the chuck.  Also, the workpiece was positioned beyond the end of the chuck jaws, and it acted as a lever on the soft jaws, working them loose.

I think that this method would work if the workpiece was held closer to the face of the chuck.

The second set of soft jaws was made for an 80mm 3 jaw chuck on my Boxford CNC lathe.

IMG_3367

The aluminium soft jaws are bolted to purchased, non hardened, jaw bases which fit the chuck grooves and have teeth to engage the chuck scroll.  Here shown after turning the rebates ready to accept the workpiece.  The rebates were turned while the jaws were tightened against an appropriately sized cylinder.

IMG_3364

The workpiece held securely.  The face has been skimmed, and the edge bevelled.  The engraving was CNC’d on the mill, earlier.  Subsequent turning produces a very clean, sharply defined engraving.   The workpiece is held in a 1mm rebate.

It can argued that aluminium is not ideal for soft jaws, because it is too soft.   I do intend to make another set of soft jaws from mild steel, for use with steel workpieces, but I will continue using the aluminium soft jaws when machining soft metals such as brass.

And here is another idea which I spotted on you tube.  Not soft jaws, but soft covers.  Click on the arrow to watch the video.

BOXFORD CNC LATHE (4)

Some videos and pics of some stuff made on the Boxford.

IMG_1389.jpg

CNC is great for multiples.  These are oil cups with ME threads.

IMG_1354.jpg

Steam engine link

IMG_2438.jpg

Ball end handle for a small lathe

IMG_2444.jpg

The finish on the distal end was suboptimal.

IMG_0991.jpg

First step in making Watts parallel motion links for the beam engine. 

IMG_1990

Base for a Jan Ridders Stirling engine

Error
This video doesn’t exist
Error
This video doesn’t exist
IMG_1534

The steam control cock and butterfly valve.  The body of the top valve and both handles were CNC’d.

If you have found this little series of blogs about the lathe CNC conversion interesting, and would like to see a similar blog about how I got an ancient CNC mill working, let me know.  Leave some feedback.

BOXFORD CNC LATHE (3)

Some more photos of the Boxford, after the conversion.  Sounds like the Damascus Road doesn’t it.  Going CNC is almost an epiphany.

IMG_3342

This is the wireless MPG controller.  The lathe can be controlled from across the room, using the MPG and the wireless mouse and keyboard.  The MPG even has an Estop kill button, along with the one on the lathe.

IMG_3341

The new setup.  Normally the keyboard and mouse sit under the screen to avoid swarf.  Note the multitude of LED and halogen lights.  I need those these days.

IMG_3343.jpg

The old Dell sits underneath, along with other bits and pieces.  The trolley has been very useful, as the lathe is progressively expelled from different rooms by SWMBO.

IMG_3338.jpg

One drawer of tool holders, collets, inserts etc.  The other drawer is not so tidy.

IMG_3339.jpg

The Dickson toolpost, and Diamond tangential tool.

IMG_3340.jpg

The ER32 collet chuck.  Much more accurate than the Burnerd 3 jaw chuck.  The mounting plate and backing plate were made by me to a design by Stuart Tankard.

If this conversion is of interest to you, look out for a technical description of the process in an article by Stuart Tankard to be published next year in Australian Model Engineer.

BOXFORD CNC LATHE (2)

This is the list of components and prices (AUD 2013) which was required to update the electronics so the Boxford 125 TCL would run on Mach3 and Windows.

Breakout board  C11  $129

Index pulse board  C3  $26

Gecko stepper drivers G251  $68 x2

Relays, relay bases, parallel port cable, Estop button   ~$80

Power supply  $30

Wireless MPG   from China  Ebay  $129

Heat sinks and adhesive   $20

Other cables, connectors, power sockets  ~$100

PC (an old Dell, running XP Pro, perfectly adequate for Mach 3)   free

Flat screen     free,  wireless keyboard and mouse  free.

Support arm for Screen  $60

Trolley  $200

It all adds up to $AUD910.   Plus the original $1500 for the lathe.  That is pretty inexpensive for a quality CNC lathe.  I am told that the Boxford retailed for about $30,000 in 1985!

Some before and after photos of the conversion…


IMG_0985.jpg

The back of the lathe opened, showing the old electricals  The spindle motor is top right.


The electricals after the conversion.

The electricals after the conversion.  Some of the old components were retained.  The lights are on the breakout board. 

BOXFORD CNC LATHE

About 3 years ago I decided that I wanted to see what CNC was about.  I had read some beginners guides to CNC, and CNC programming, but it was obvious that I would need to buy a CNC machine and actually start machining if I was to make any real progress.

Initially I bought a second hand lathe which had been converted to CNC.  It was a Seig C3, and stepper motors had been installed on the lead screw and cross slide screw.  Some low end electronics connected to a PC, and the setup was controlled with Mach3.

Needless to say, this machine gave poor results.  Poor finish, and poor reproducibility of dimensions.  The lathe was low quality to start with, and the CNC components were low end.  I was inclined to blame the lack of ball screws, but in retrospect, that was only one of the many problems.  It did however give me a taste of the process of CNC programming, and finishing with a CNC turned item.  I also developed some familiarity with Mach 3, and became a licensed user of the excellent software.

IMG_1009

Seig C3 converted to CNC. Not up to scratch.


IMG_1011

Then I saw a Boxford CNC lathe, owned by a friend in my engineering club (GSMEE).  It was 30 years old, and had started life as a technical school teaching lathe.  The original electronics and operating system were based on a CPM computer, pre-dating Windows, even pre-dating DOS.  It ran on software which was loaded each session from a 5.25″ floppy disk, with a capacity of 180 kilobytes.

My friend had changed the operating system to  Windows and Mach 3.  That involved changing many of the electronic components in the lathe, and hooking up a PC.

The lathe was an English Boxford TCL 125.  The swing is only 125mm (62.5mm above the bed), and the maximum length which can be machined is also 125mm. The spindle is belt driven, and spindle speeds range up to 3000 rpm.  The tool post is a very nice quick change Dickson.  The spindle bore is 19mm.  The whole machine has a quality appearance and feel.   My friend was producing work with fine finishes, and consistent dimensions.

It was clearly a quality lathe, and I asked him if he was willing to sell.  The answer, not surprisingly, was no.  However, he did know of an identical machine which might be for sale.  To get on with this story, I did buy the second machine.  It had also been a training lathe in a technical school, and was 30 years old.  It was not running, but the owner said that it had been in use until recently.  Since I planned to replace most of the electronics I was not too concerned that it was not working.  My friend, Stuart, had indicated a willingness to manage the upgrade-conversion, which was just as well, because it really did require a level of expertise with electronics which I do not possess.  Stuart had been through the process, knew exactly what was required, and is indeed, an expert.

IMG_0990

Boxford 125 TCL.  The yellow item is the tailstock which swings up into position. 80mm Pratt Burnerd chuck.  The control panel lower right was removed and replaced with a wireless pendant control.

IMG_0989

It cost $AUD1500, which was a bit much, but the seller probably realised that I really wanted it, and priced it accordingly.  I took the lathe, and the computer, and the 5.25″ floppy drive, and 6 tool holders home.  I immediately put the computer and floppy drive on Ebay, and amazingly they sold for $AUD150 (to a  collector of obsolete computers I presume).

IMG_1053

This old CPM computer with a tiny memory originally ran the Boxford CNC lathe.

We collected the various new electronic components over the next few weeks.  I will list the components in the next post for your interest.  Total cost of these was approximately $AUD800.

Under Stuart’s direction I removed the obsolete electronics, then in two half day sessions he installed the new ones. After some adjustments in the electronics, and in Mach 3, it was up and running.

In the subsequent 2-3 years I have replaced the ball screws (probably unnecessarily), and increased the number of tool holders to 30, and installed an ER32 collet chuck, and soft jaws on the 3 jaw Pratt Burnerd.

I have made many items and become increasingly comfortable with Mach3.  I also use a very useful program called Ezilathe, which I will describe in a later post.


Koffiekop Engine

I have been busy for the past week or so making a Stirling cycle engine.  It is the Coffee Cup engine designed by Jan Ridders.  It is powered by the heat from a coffee cup of hot fluid.  Or an ice cube sitting on the top plate!


Page one of five of Jan Ridders excellent plans.

Page one of five of Jan Ridders’ excellent plans.

Most of the components of the coffee cup engine.

Most of the components of the coffee cup engine.

IMG_3127

100mm flywheel.

IMG_3131

Possible alternative flywheel, roughed out, I will see how it appears with a bit more finishing. Looks interesting?

IMG_3129

An experiment with engine turning on an aluminium surface, using a “Brownells Engine Turning Kit”, kindly loaned to me by Stuart.   The pattern is made with the spring loaded wire brush seen in the picture. I used this on the upper plate of the displacement cylinder.

Lots of tiny fiddly bits.

Lots of tiny fiddly bits.

The piston is made from graphite.  An interesting material to turn.  Surprisingly tough, accepting a 3mm internal thread.  And presumably self lubricating. Machining it produces black, pervasive dust.  SWMBO is not impressed, since my CNC lathe sits in our living room.   I might get marching orders for the lathe as a result of this one.

SUGRU

Yet another acronym for my non responding brain to memorise?

No, Sugru is a new product,  a self-setting rubber compound, which I tried after seeing a description in “Model Engineers Workshop”.

It is described as being adherent to many materials, including metals, glass, wood, fabrics, plastics.

It remains tough and flexible after curing.

Cures at room temperature.

Mouldable by hand.  Waterproof.  Electrically insulating.  Temperature tolerant -50to +180 centigrade.  UV resistant.

Available in various colours.  I ordered black.  Got 3 small sealed packets of 5gm each.  Cost ~$au20 inc postage.

Once opened, the material should be used within 30 minutes.  Cures within 24 hours.

Shelf life about 1 year,  three times longer if kept in the fridge.  (seek medical advice if swallowed)

So I tried it, and it looks good.  Handles like slightly sticky PlayDoh.  Washes off the finger easily.

The before.  This the Z axis stepper motor on my Boxford CNC lathe.  The lathe is 30 years old, so it is not too surprising that the plastic cable coating is becoming stiff and peeling back.

The before. This the Z axis stepper motor on my Boxford CNC lathe. The lathe is 30 years old, so it is not too surprising that the plastic cable coating is becoming stiff and peeling back.

The product..  SUGRU.  Funny name.  Invented by Jane and "Made with love and science in the UK"

The product.. SUGRU. Funny name. Invented by Jane and “Made with love and science in the UK”

The after.  Looks good now.

The after. Looks good?. I will report how it stands up to constant movement and flexing in a few weeks.

IMG_3033

Another after. Once the sealed packet is opened, I presume that the Sugru sets. So I applied some to the X axis cable.

Cylinder valves for triple, and a neat method for cutting thin grooves.

The triple expansion steam engine now has a valve in each cylinder head.  They are manually controlled, not automatic, and I guess that is the reason they are called “false” valves.

The body of each valve was shaped in the CNC lathe, using software called “Ezilathe”.   There is a lot of good software for CNC milling machines, particularly Mach 3, but not much for lathes, at least for the non professional user.  “Ezilathe” is a free program (currently), works brilliantly, and was written by my friend Stuart.  It has an inbuilt simple CAD program, automatically generates G codes, and has a G code editor.   It also has a terrific, easy to use threading facility. It has an accurate simulator, and a tool editor.   Do a search on CNC Zone to download a copy.

The

The “false valves” in the cylinder heads.

One problem which I experienced with these valves was that the thread which secures the valves to the heads, stopped short of the expanded hexagon part by about 1mm, and I needed to turn a very narrow groove in the stem to allow the hexagon to screw down hard on the head.  I do not have a lathe narrow grooving tool with enough reach to do this, so the following photo shows how it was done…

A broken slitting blade, held in a shop made holder.  Normally I use it under power, but in this case, the part was held fairly tenuously, so I turned the lathe spindle by hand.  It worked perfectly!

A broken slitting blade, held in a shop made holder. Normally I use it under power, but in this case, the part was held fairly tenuously, so I turned the lathe spindle by hand. It worked perfectly!

Just for interest. This tiny engine was made by model engineer Peter B on a 3D printer.  It is about the size of a matchbox.

Just for interest.
This tiny engine was made by model engineer Peter B on a 3D printer. It is about the size of a matchbox.

TNC Lathe renovation 2

Some progress on the little lathe.

A complete disassembly, and separation of the parts to be repainted.

Some unwanted holes were filled with steel putty (similar to JB Weld), and filed flat after hardening.

Then further filing of the parts, a soaking in degreaser, and then a wipe over with acetone.

Then a coat of undercoat, from a spray can.

IMG_2435IMG_2439

Can hardly see the repair

Can hardly see the repaired holes through the undercoat.

Making the larger handle, the one for the leadscrew was a learning exercise.  I planned it in brass, with a counterweight to the handle.  Drew it up on CAD, then tried to make it using the Boxford CNC.  The end result is not perfect, but it will do.

IMG_2443I discovered that it is quite difficult to turn complete balls on each end and avoid chatter.  I used a carbide cutter.  Perhaps HSS would have worked better.

First result goes in the rubbish bin.

IMG_2437

Actually it will go into the odd brass bits bin in case it can be used for something.

I finally turned one end, then made a split collet, and turned the other end.  All done using CNC.

IMG_2436

Did not entirely eliminate the chatter.

IMG_2438

The partly completed workpiece, held in a taper split collet, which was held in an ER collet, which was held in my home made collet chuck.

IMG_2444

It will just have to do.

TCL lathe renovation 1

I CNC’d a new handle to replace the broken one on the little lathe, but the new one made the old ones look a bit shabby, so they will all be renewed.  The new, deeply waisted handles are very nice to use.

IMG_2432

The headstock shaft was 3/8″ and was a bit undersized due to wear, and I intend to use a collet chuck with a 10mm shaft, so I decided to increase the shaft size from 3/8 (9.525mm) to 10mm.

The headstock bearing housing is split, to permit some adjustment with wear.  I used a reamer with spiral teeth to avoid the teeth snagging the split.  And all seemed to go very well using the setup in the photo below.

IMG_2431


…Until I finished and raised the milling machine head out of the work.

Due to my lack of familiarity with the CNC mill controls I  activated the X axis rather than the Z axis.  The side movement broke the reamer and partially gouged the newly reamed lowermost housing.  Bugger.  Bugger.

What to do.  Throw the whole project into the scrap bin?  (following a few others).  Change the shaft to the next size (12mm) and enlarge the housing holes to 12mm?  That would thin and weaken the housing.  And would be tricky machining.  Also, due to the damage in a lateral direction caused by the mishap, I was not sure that drilling and reaming, or boring and reaming, would not follow the same lateral path.

At least the uppermost housing  was undamaged, so whatever tool was used would be held concentrically, as long as the cutting edge extended the distance between the 2 housings.

So I very slowly drilled 11.5mm (the 11.5mm drill did span the distance between the 2 housings) and re-reamed to 12mm, again as per the above photo. Despite my misgivings, this time it all went well.   The 12mm shaft is rather tight, and the housings will need some lapping.  The housings appear to have enough thickness remaining, but time will tell in that regard.   The lateral direction of the shaft is not perfect, but in such a small lathe that is not a big consideration.

As a consolation, and to retore some self esteem after this muck up, I made a new chuck key.

IMG_2433

The chuck is held onto the shaft with a 3/8″ x 24tpi thread.  That thread was cut on the CNC lathe, and is probably fairly accurate.  The oil cups are spare from the beam engine build.

I plan to lap the housings, install a thrust bearing behind the chuck, and make a drive pulley.  I have a spare 12mm shaft ER 16 collet chuck, which will probably be used more often than the 4 jaw chuck.  Then a new handle for the longitudinal feed, a paint job, a motor and belt…


CNC lathe tool holders.

I needed some extra toolholders for my Boxford CNC lathe, and the following photos show some of the steps in making them on a vertical mill with a horizontal attachment.

The toolpost holder is a Dickson, beautifully made, precise.  And it came with 6 tool holders.  6 should be adequate you think?  Not so.  You really need one holder for every tool that you might use, because with CNC, you want to do the CNC settings in the computer only once.  And the Dickson holders are expensive, so I made the extras.

The material for the tool holders is cast iron bar from a house wreckers yard.  The bar was 3 foot lengths of iron window counterweights from very old double hung windows.  Very cheap $5 each.  A bit porous in places, but enough good stuff to get useable 300mm lengths. Roughly cut to length in foreground, machined square behind, finished article on right.

The material for the tool holders is cast iron bar from a house wreckers yard. The bar was 3 foot lengths of iron window counterweights from very old double hung windows. Very cheap $5 each. A bit porous in places, but enough good stuff to get useable 300mm lengths.
Roughly cut to length in foreground, machined square behind, original holder bottom right.

The holders had been dimensioned and drawn up by my expert friend Stuart Tankard.

The holders had been dimensioned and drawn up by my expert friend Stuart Tankard.

This is the original horizontal machining set up.  I made each holder separately.

This is the original horizontal machining set up. I made each holder separately.

For the next batch, I got smarter, and milled 300mm lengths of the bar, and cut them up later.  You might also note that I painted the horizontal milling attachment, using Por 15 paint.  For the actual milling I also used copious lubricant fluid.

For the next batch, I got smarter, and milled 300mm lengths of the bar, and cut them up later. You might also note that I painted the horizontal milling attachment, using Por 15 paint. For the actual milling I also used copious lubricant fluid.

Using a drop bandsaw to cut off the milled blocks.  Less than 1mm clearance.

Using a drop bandsaw to cut off the milled blocks. Less than 1mm clearance.

I made about 30 altogether.  Some for centre drills, ER collets, various left right and centre insert bit cutters, and quite a few spares for the future. You say a cornucopia of toolholders.

I made about 30 altogether. Some for centre drills, ER collets, various left right and centre insert bit cutters, and quite a few spares for the future.
You might say a cornucopia of toolholders.

DSC_1664

The height setting knobs were turned on the Boxford 125 TCL CNC lathe, again designed and G coded by Stuart Tankard. The knurls were cut by Stuart on his 4 axis CNC mill.

DSC_1663 IMG_2356 IMG_2357 IMG_2358

DIVERSION

I have heard that the castings for the triple expansion marine engine will be arriving in the next week or so. That is good news after waiting since the order was placed in January.
In the meantime, I have bought some castings and partly made components for a Burrell Traction Engine. It is 1.5″ scale, and I obtained some 1.5″ plans from EJ Winter for the Burrell. Unfortunately, one mans’ 1.5″ is anothers’ 1.45″ and the plans are not exactly correct for the castings! What would have been a difficult build, has turned into a very difficult build. So I have put it aside and will tackle it gradually. The plans will be some use, but as well as the difference in scale, there are differences in the designs. So I will have to make it up as I go, to a considerable extent.
My metal working club has promoted a competition for 2014, and it appeared to be a fairly simple build, so that is what I am currently machining. See the progress in the photos below. It is a Stirling heat engine, designed by J Ridders. You can see one working on the Ridders web site http://heetgasmodelbouw.ridders.nu

IMG_1989

IMG_1990

IMG_1991

Almost finished stand for the cylinder fork.

Almost finished stand for the cylinder fork.

IMG_1993

Components made so far

Components made so far

The spirit burner, almost finished.  Copper and brass,  silver soldered.

The spirit burner, almost finished. Copper and brass, silver soldered.

Stirling "Bobber" plans

Stirling “Bobber” plans

MAKING OIL CUPS FOR THE BEAM ENGINE

Using the Boxford 125 TCL, and Mach 3
I will do a feature about this CNC lathe in a later post.
Some people consider that using CNC in model making is a form of cheating.
I will happily continue cheating.
It is a demanding and fascinating mode of metalworking, great for repetition work, tapers, curves and complex shapes.

Steam Cock and valve. Making the handle.


The steam control cock and butterfly valve.

The steam control cock and butterfly valve.

The brass and redgum blank joined with M3 threaded rod

The brass and redgum blank joined with M3 threaded rod

The brass-wood handle after turning

The brass-wood handle after turning

Milling the squared section

Milling the squared section

Drilling the square hole

Drilling the square hole

Filing the square hole corners.  (you didn't really believe that iI would drill a square hole did you?)

Filing the square hole corners. (you didn’t really believe that I would drill a square hole did you?)

Finished handle
Finished handle