
Lost PLA Casting – 3rd pour
by John
Today I attempted another aluminium casting session with trees that I had made 2 days ago. More wheel forks, and barrel trolley brackets. 16 parts altogether.
And this time I installed air release vents, following my previous poor results, and at the suggestion of reader Rob R.
I also made some 50mm extensions of the pouring funnel, to increase the head of melt pressure. The extensions were “add ons” rather than designed into the system, and the molten aluminium leaked between the extension and the main flask with the tree, so I doubt that they were very effective.
BUT! Of the 16 parts on the trees, 14 were good to excellent, and only 2 showed any voids, and I assess one of those as repairable. So, 15/16 is very pleasing. I feel that I am closer to getting good results every time, if I can make an effective system of increasing the delivery pressure of the molten aluminium.
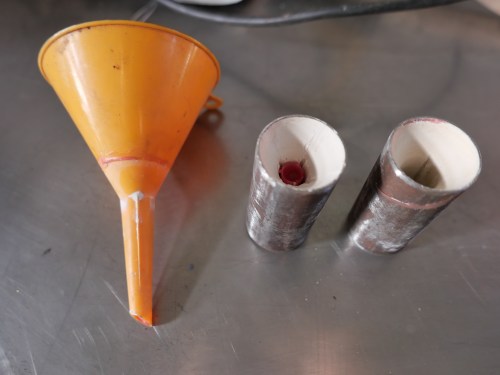
These are the extension pieces to the funnels on the investment flasks. The shape was made with the plastic funnel. If I had positioned them before the investment plaster had set hard they might have worked better, but as they just sat on top of the already hardened plaster, the join leaked molten aluminium rather badly. I have a different system in mind for my next pour.
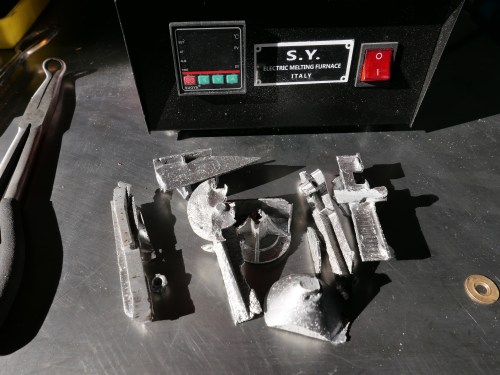
Previous failures were cut up and thrown into the melt.


See the tiny silver dots surrounding the central funnel. That proves that the air vents functioned as intended.

The aluminium trees. Not very pretty, but delightful to see. 10 parts on the top one, 6 on the other. It is odd to see the wax spaghetti turn into aluminium spaghetti. I will separate the parts tomorrow.
And while the investment burnout and baking was proceeding, I worked on previously cast parts.
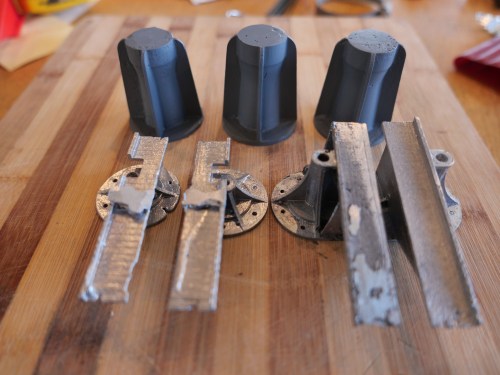
The centre columns have beep painted with etch primer. A little more filling required, then I will use the best 2 on the models. The 2 bracket and column assemblies on the right were initially considered unusable due to large voids, but I used some aluminium solder to fill the defects, and they might possibly be OK. The 2 on the left just need some tidying, machining removal of melt tubes, and minimal filling.

I will probably remake this one, but will continue to salvage it and see how well it comes up. Note the solder fill on the RHS. That will not be seen on the model.
One more melt and pour, and that should be the last of the castings made for the model Armstrong cannons. It has been a challenge, and lots to learn, but very interesting and very satisfying.

Finally for today’s post… I noticed some black marks on the normally pristine white wall above the casting bench. They extend about 4 meters above the floor. Do you know what they are? The paint has been melted off the wall by bits of flying molten brass, resulting from the steam explosion 2 days ago!
Many thanks to Rob R for his spot on suggestion about the air vents.

Hi John
I was in the die casting industry many years ago. When any new mould was first commisioned it took some time to get the venting right which you are doing with your lost wax mould.you are on the right track also your mould looks a bit full it might help to space things out some.I realise you are trying to get as much as possible into the limited space but some more spacing may help, also the runners could be a bit larger.
Getting the air out is the most important thing you can do keep working on it.
Cheers
John Emery
LikeLike
Hi John, and thanks. What is a runner? (an air vent? Sprue?
LikeLike
Hi John
The runner is the track from the spru to the gate which feeds the casting. Do a search casting runner and you will heaps of information. It brings back many memories it was 45 years ago when I was involved in the die casting industry happily semi retired now still doing the odd job to help pay for the hobby.
Cheers
John Emery
LikeLike
Thanks John. Another question… How does the spacing of PLA objects affect the mould outcome? John
LikeLike
Hi John
The spacing is all to do with getting the metal to flow the the extreams of the mould while pushing the air out. looking at your tree it looks crowded which can make it very hard to get the flow of molten metal to all parts of the mould also when we vented a mould we did things individually we would have a thin gate leading into a bulb shaped cavity to allow the air somewhere to go , it sometimes took many attempts to get right. Remember in die casting we were looking to make thousands of parts over time. When the part came out it would then usually went through a pressing operation to remove the flashing around the outside of the part.
LikeLike
OK. Thanks John
LikeLike
Thanks John,
I had a look at both interesting Videos.
Going on what I see on Ytube (often the source of much confusion), it does seem the head of molten metal and venting are critical. As Rob R suggested.
Plus congrats to your videographer capturing steady comprehensive shots.
LikeLike
Thanks John. Yes I might have to bribe her down to Glg more often.
LikeLike
Heard on the GSMEE grape vine that said daughter has in fact invited herself down to participate in the metal melting fun.
LikeLike