
Friction Welding
by John
Friction welding is a technique which is used in industry. It involves rotating 2 metal surfaces against each other, under considerable pressure. The heat generated from the friction is enough to make the contact surfaces to become red hot, then melt together. There is a funny and instructive YouTube video on the subject by AVE.
I had a costly and unintended demonstration of friction welding in my workshop yesterday. I was drilling multiple small holes in the 2mm thick sides of the model Armstrong cannon, when, somehow, I activated the Z axis downward in fast motion. Probably I miskeyed G0 instead of G1.
The hole was drilled in a fraction of a second and the chuck continued downward. My reflexes are not TOO bad, but by the time I hit the big red button, the bottom of the drill chuck was grinding into and bending the workpiece. Which was glowing red hot!
“Oh Dear”! (Or something along those lines.)
I could tell at a glance that the workpiece had been destroyed. I had a spare piece, so it was going to cost some time to repeat the work already spent on the part, probably at least a day.
But that was only the beginning.
I backed off the quill, and tried to remove the workpiece from the of the chuck. It would not budge, so I released the 2mm drill bit (actually a carbide end mill) from the chuck. Well, I tried, but the chuck key would not rotate. The chuck was frozen solid. So I went and had a cup of coffee.
On return, it was apparent that the workpiece was welded to the end of the chuck, and the chuck jaws were welded together at the tips.
So, I released the chuck and its arbor from the mill, and broke off the workpiece from the chuck with a hammer. The weld and the drill bit broke. But the jaws of the chuck were still welded together.
You might recall that I had accidentally destroyed an expensive Japanese chuck some months back, and this one was its “temporary” replacement. Obviously I will need to buy a replacement this time, but I am in the middle of my cannon build, and want to get on with it. What to do?
On close inspection the weld between the jaws stopped about 3mm from the jaw tips. It involved the surfaces between the jaws and the still present carbide drill shank, and the sides of the jaws. So I ground about 3mm off the ends the jaws until they started to move. Then used a tiny grinding wheel in my Dremel to remove most of the weld between the sides of the jaws. At this stage the chuck is looking very ugly, but it works in a fashion, and I was able to resume my drilling. Very carefully.
I did straighten the bent workpiece, but it is RS. I spent the remainder of the day using my spare workpiece, repeating the lost work. No photos of the damage. I was not in the mood.

These are the sides of the second carriage. For this one I am drilling the holes in both pieces simultaneously, by clamping, and then bolting them together. Pretty obviously a better method. Sometimes I am slow learner. But I do try to not make the same mistake more than 3 times in a row.
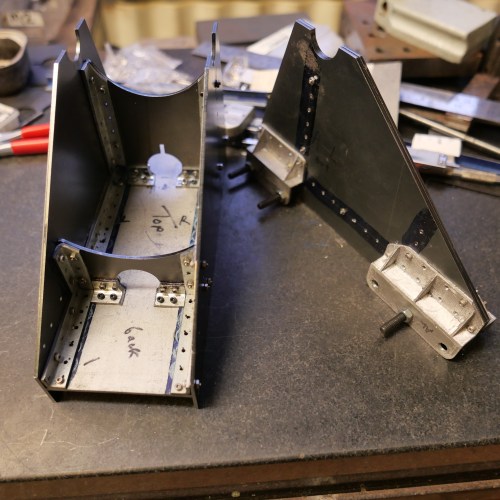
The “B” carriage on the left, and work to date on the “A” carriage on the right. The bolts will eventually be replaced with rivets.
BTW, I have de-monetised this blog. You should not see any more advertisements. I noted that the income from the ads from the one post on which they appeared, was one cent. Yep. One cent. If I had monetised the site from its beginning, 6 years ago, I would have earned approximately $AUD6 dollars. Nuf said.
Meanwhile, I discovered some more videos from posts 5-6 years ago. I have deleted the videos. A pity about that, but it has created some more storage space and allows me to continue to post on the current plan.

whoops a daisy!!
LikeLike
Shame about the unintended friction welding, also about the ruined work piece. Disappointment in not seeing the damage but fully appreciate your not being in the mood. Best sometimes to walk away, away, away!
LikeLike
Thanks John. We amateur machinists appreciate some coddling occasionally. John
LikeLike